1. Introduction
This manual provides detailed instructions for the installation, operation, and maintenance of your Roca Thermostatic Shower Set, Model A5A9A25C00. This shower column, part of the Victoria range, is designed to offer a comfortable and consistent showering experience with its thermostatic control and elegant design. Please read this manual thoroughly before installation and use to ensure proper function and safety.
2. Safety Information
WARNING: Improper installation or use can lead to injury or property damage.
- Installation should be performed by a qualified professional plumber in accordance with local plumbing and building codes.
- Ensure the water supply is turned off before beginning any installation or maintenance work.
- Verify that water pressure is within the recommended limits (maximum 10 Bars).
- Do not use corrosive or abrasive cleaning agents, as they can damage the chrome finish.
- Keep children away from the product during installation and ensure they are supervised during use.
3. Package Contents
Carefully unpack the box and ensure all the following components are present:
- Thermostatic Shower Column (Victoria Plus Single Lever)
- Rain Type Spray Head (20 cm diameter)
- Hand Shower (10 cm diameter)
- Flexible Metal Hose (1.50 m length)
- Height-adjustable Articulated Bracket
- Mounting Hardware (screws, anchors, gaskets)
- User Manual (this document)

Figure 1: Overview of the Roca Thermostatic Shower Set, showing the main column, rain shower head, hand shower, and controls.
4. Setup and Installation
The Roca Thermostatic Shower Set is designed for wall-mount installation. Professional installation is highly recommended to ensure correct functionality and adherence to safety standards.
4.1 Pre-Installation Checks
- Ensure all package contents are present and undamaged.
- Confirm that your water supply lines (hot and cold) are correctly positioned and accessible for connection.
- Verify that the wall surface is suitable for mounting and can support the weight of the shower set.
- Turn off the main water supply to the bathroom before proceeding.
4.2 Mounting and Connections
- Refer to the dimension diagram (Figure 2) for precise measurements and recommended mounting heights.
- Mark the drilling points on the wall according to the shower column's mounting brackets.
- Drill holes and insert appropriate wall anchors.
- Secure the main mixer unit to the wall, ensuring a watertight seal with gaskets.
- Connect the hot and cold water supply lines to the corresponding inlets on the mixer.
- Attach the vertical shower column to the mixer unit and secure it with the upper wall bracket.
- Install the rain type spray head onto the horizontal arm.
- Connect the flexible metal hose to the hand shower and the mixer unit.
- Mount the height-adjustable articulated bracket for the hand shower on the vertical column.
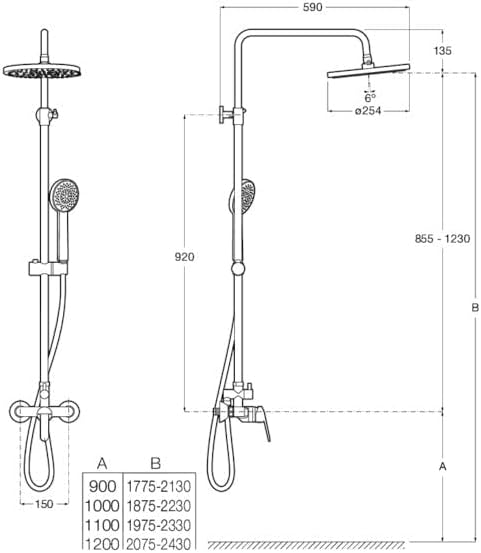
Figure 2: Technical drawing showing dimensions (in mm) and recommended installation measurements for the Roca Thermostatic Shower Set. Note the adjustable height ranges for points A and B.
4.3 Post-Installation
- Slowly turn on the main water supply and check all connections for leaks.
- Test the functionality of the thermostatic mixer, rain shower, and hand shower.
5. Operating Instructions
Your Roca Thermostatic Shower Set features a single lever for flow control and a separate control for temperature adjustment, ensuring a consistent and safe water temperature.
5.1 Water Flow Control
- The single lever on the mixer unit controls the water flow and diverts water between the rain shower head and the hand shower.
- Move the lever to increase or decrease water flow.
- Rotate the lever to switch between the rain shower and the hand shower.
5.2 Temperature Control
- The thermostatic control knob allows you to set your desired water temperature.
- Rotate the knob to adjust the temperature. A safety stop is typically present at 38°C (100°F) to prevent accidental scalding. Press the override button (if present) to exceed this temperature.
- The thermostatic valve will maintain the set temperature even if there are fluctuations in the hot or cold water supply pressure.
5.3 Hand Shower Adjustment
- The hand shower's height can be adjusted along the vertical column using the articulated bracket.
- Loosen the bracket, slide it to the desired height, and then tighten to secure.
6. Maintenance
Regular cleaning and maintenance will ensure the longevity and optimal performance of your Roca Thermostatic Shower Set.
6.1 Cleaning the Chrome Finish
- Clean the chrome surfaces regularly with a soft cloth and mild soap or a non-abrasive cleaner specifically designed for chrome fixtures.
- Rinse thoroughly with clean water and dry with a soft cloth to prevent water spots.
- Do not use: Abrasive cleaners, scouring pads, acids, bleach, or cleaners containing alcohol, as these can damage the chrome finish.
6.2 Cleaning Shower Heads
- Periodically clean the nozzles of the rain shower head and hand shower to remove limescale buildup. Many modern shower heads feature flexible silicone nozzles that can be cleaned by gently rubbing them.
- For stubborn limescale, a solution of white vinegar and water can be used. Soak the shower head (if detachable) or apply the solution with a cloth, then rinse thoroughly.
7. Troubleshooting
If you encounter issues with your shower set, refer to the following common problems and solutions:
| Problem | Possible Cause | Solution |
|---|---|---|
| No water flow or low pressure | Main water supply off, clogged shower head, kinked hose, low house water pressure. | Check main water supply. Clean shower head nozzles. Straighten hose. Consult a plumber for house water pressure issues. |
| Water temperature too hot/cold or fluctuating | Thermostatic cartridge issue, incorrect temperature setting, insufficient hot water supply. | Adjust temperature setting. Ensure adequate hot water supply. If problem persists, a qualified plumber may need to inspect or replace the thermostatic cartridge. |
| Leaks from connections | Loose connections, worn gaskets, damaged seals. | Turn off water supply. Tighten connections. Inspect and replace any worn gaskets or seals. |
| Dripping from shower head | Sediment in valve, worn diverter seal. | Flush the system. If dripping continues, a plumber may need to inspect the internal components. |
If you cannot resolve the issue using these steps, please contact a qualified plumber or Roca customer support.
8. Specifications
| Model Number: | A5A9A25C00 |
| Brand: | Roca |
| Type: | Thermostatic Shower Column |
| Color: | Metallic (Chrome Finish) |
| Material: | Metal |
| Number of Handles: | 2 (one for flow/diverter, one for temperature) |
| Mounting Type: | Wall Mount |
| Rain Shower Head Diameter: | 20 cm |
| Hand Shower Diameter: | 10 cm |
| Flexible Hose Length: | 1.50 m |
| Maximum Pressure: | 10 Bars |
| Dimensions (L x W x H): | 24 x 59 x 136 cm (approximate overall dimensions) |
| Item Weight: | 2 Kilograms |
9. Warranty and Support
For warranty information, product registration, or technical support, please refer to the warranty card included with your product or visit the official Roca website. Keep your proof of purchase for warranty claims.
For further assistance, you may contact Roca customer service directly.