1. Introduction
This manual provides detailed instructions for the installation, testing, and maintenance of the SWARK TFT LCD Touch Screen Display compatible with the Samsung Galaxy A7 2018 (models SM-A750, A750F, A750FN, A750N, A750G, A750GN/DS). Please read all instructions carefully before proceeding with the replacement process to ensure proper functionality and to prevent damage.
The replacement kit includes the LCD display and necessary tools for installation.
2. Product Overview
The SWARK replacement screen is a TFT LCD display designed for the Samsung Galaxy A7 2018. It features a 6.0-inch screen with a resolution of 2220x1080 pixels. The package includes the LCD assembly and a set of basic repair tools.

Image 2.1: SWARK TFT LCD Touch Screen Display for Samsung Galaxy A7 2018, shown with the included repair tools such as screwdrivers, pry tools, suction cup, and adhesive strips.
Compatibility: This display is compatible with Samsung Galaxy A7 2018 models: SM-A750, A750F, A750FN, A750N, A750G, A750GN/DS. Please verify your phone's model number before installation.

Image 2.2: Visual confirmation of compatibility, showing the Samsung Galaxy A7 2018 phone model for which this LCD is designed.
3. Installation Instructions
Screen replacement requires careful handling and technical skill. If you are not confident in your ability to perform this repair, it is highly recommended to seek assistance from a professional technician.
3.1 Pre-Installation Checks
- Inspect the New Screen: Upon receiving the screen, carefully inspect it for any physical damage. If the item is damaged, do not proceed with installation and contact customer support immediately.
- Power Off Device: Ensure your Samsung Galaxy A7 2018 is completely powered off before beginning any disassembly.
- Gather Tools: The provided tools include screwdrivers, pry tools, and adhesive. Additional tools like a hair dryer or heat gun may be useful for softening adhesive.
3.2 Disassembly and Screen Removal
- Heat the Edges: Gently heat the edges of the cracked screen using a hair dryer or heat gun to soften the adhesive. This makes removal easier.
- Carefully Pry: Use the provided pry tools to carefully separate the cracked screen from the phone's frame. Work slowly and avoid applying excessive force.
- Disconnect Cables: Once the screen is partially lifted, locate and carefully disconnect the flex cables connecting the screen to the mainboard.
3.3 Pre-Installation Testing
Before fully installing the new screen, it is crucial to test its functionality.
- Connect New Screen: Carefully connect the flex cables of the new screen to the mainboard. Do not bend the cables forcefully, as they are very fragile.
- Power On and Test: Temporarily power on your phone to check if the new screen displays correctly, responds to touch, and has no visible defects (e.g., lines, dead pixels).
- Power Off: If the screen functions correctly, power off the phone again before proceeding with full installation.
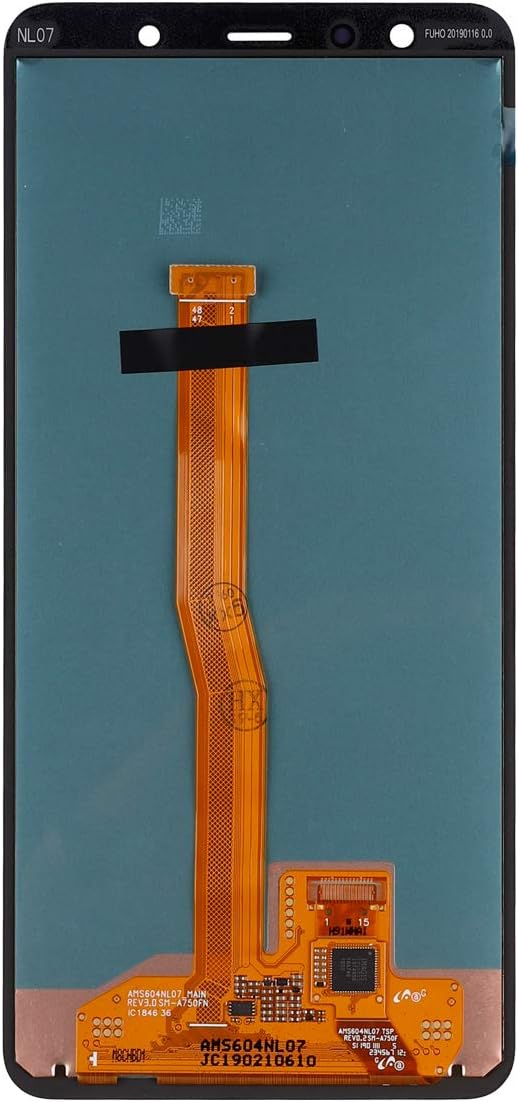
Image 3.1: The reverse side of the replacement screen, highlighting the delicate flex cable that connects to the phone's mainboard. Handle with extreme care.
3.4 Final Installation
- Apply Adhesive: Apply the provided 3M adhesive tapes or a suitable screen adhesive around the frame where the screen will sit.
- Secure Screen: Carefully align and press the new screen into place, ensuring all edges are flush.
- Reassemble: Reassemble any other components that were removed during disassembly.
Important Note: There are numerous instructional videos available online (e.g., YouTube) that demonstrate the screen replacement process for the Samsung Galaxy A7 2018. Watching these videos can provide valuable visual guidance.
4. Operating (Post-Installation Testing)
After completing the installation, perform a thorough check of the screen's functionality:
- Display Check: Ensure the screen displays images clearly, without flickering, dead pixels, or discolored areas.
- Touch Functionality: Test the touch response across the entire screen. Open an application that allows drawing or typing to verify all areas register touch input correctly.
- Brightness Adjustment: Verify that screen brightness can be adjusted through the phone's settings.
- Sensor Check: Confirm that proximity and ambient light sensors (if applicable to the screen assembly) are functioning correctly.
5. Maintenance and Protection
To prolong the life of your new screen and prevent future damage, follow these guidelines:
- Avoid Abrasive Contact: Do not place your phone in direct contact with keys, coins, or other metallic objects that can scratch the screen.
- Use a Screen Protector: Apply a high-quality screen protector to add an extra layer of defense against scratches and minor impacts.
- Keep Away from Magnetic Materials: Prolonged exposure to strong magnetic materials can potentially cause touch screen malfunctions.
- Use Approved Chargers: Always use the original or a certified third-party charger. Low-quality chargers can damage the phone's internal components, including the screen.
- Prevent Drops: Exercise caution to prevent accidental drops, especially when handling the phone in bed or on hard surfaces.
6. Troubleshooting
If you encounter issues after installation, consider the following troubleshooting steps:
- No Display or Partial Display:
- Ensure all flex cables are securely and correctly connected to the mainboard.
- Check for any visible damage to the flex cables themselves.
- Touch Not Responding or Ghost Touch:
- Verify flex cable connections.
- Ensure no debris or foreign objects are between the screen and the frame.
- Restart the device.
- Vertical Lines, Fringes, or Ghost Image:
- These symptoms often indicate improper installation or damage to the screen's internal components during handling. Recheck connections. If the issue persists, the screen may be faulty or damaged.
- Screen Damage on Arrival:
- If the package or screen was damaged upon delivery, take a picture and contact customer support immediately before attempting installation.
Improper installation can cause irreversible damage. If troubleshooting steps do not resolve the issue, professional assistance is recommended.
7. Specifications
| Feature | Detail |
|---|---|
| Screen Size | 6.0 inches |
| Screen Type | TFT LCD |
| Resolution | 2220x1080 pixels |
| Color | Black |
| Compatibility | Samsung Galaxy A7 2018 (SM-A750, A750F, A750FN, A750N, A750G, A750GN/DS) |
| Package Contents | 1 x LCD Display, 1 x Set of Installation Tools |
| Item Weight | 4.9 ounces |
| Package Dimensions | 7.28 x 4.02 x 1.02 inches |
8. Support and Contact Information
For any questions, concerns, or assistance regarding your SWARK replacement screen, please contact our customer support team. We aim to respond to inquiries within 24 hours.
Please refer to your purchase documentation for specific contact methods.