1. Introduction
The NEJE Master 2 Mini is a compact, high-speed laser engraver designed for precision engraving and light cutting tasks. It features wireless control via a dedicated application, a 110 x 120 mm engraving area, and a 2.5W laser output. This manual provides essential information for safe operation, setup, maintenance, and troubleshooting to ensure optimal performance and longevity of your device.

Image: The NEJE Master 2 Mini laser engraver held in hand, illustrating its compact size and key features such as automatic reset, smart & power module, built-in MEMS protection, APP wireless control, and high-strength material construction.
Key Features:
- Compact design for space efficiency.
- Wireless offline control and application support for ease of use.
- 360-degree engraving capability.
- High-speed operation for efficient project completion.
- Cloud gallery and online G-code support for creative flexibility.
- 110 x 120 mm engraving area for precise work on small objects.
- User-friendly interface, ideal for beginners.
- Built-in MEMS protection for enhanced safety.
2. Safety Information
WARNING: This device uses a high-power laser. Improper use can cause serious injury, including eye damage and burns. Always follow these safety guidelines:
- Always wear appropriate laser safety goggles when operating the engraver.
- Never look directly into the laser beam or at its reflection.
- Ensure the work area is well-ventilated to dissipate fumes from engraved materials.
- Keep children and pets away from the operating engraver.
- Do not leave the engraver unattended during operation.
- Operate the device on a stable, non-flammable surface.
- Be aware of the materials that can be safely engraved. Avoid highly reflective, transparent, or unknown materials that may cause unexpected laser behavior or hazardous fumes.
- In case of emergency, immediately disconnect power to the device.
3. Package Contents
Verify that all items listed below are present in your package. If any items are missing or damaged, please contact customer support.

Image: The NEJE Master 2 Mini laser engraver shown with its included accessories, such as power adapter, USB cable, safety goggles, and sample materials.
- NEJE Master 2 Mini Laser Engraver Unit
- Laser Safety Goggles
- Power Adapter
- USB Cable
- Hex Wrench
- Sample Engraving Materials (e.g., wood blocks, paper)
- User Manual (this document)
4. Setup
4.1 Initial Assembly and Connection
The NEJE Master 2 Mini comes largely pre-assembled. No complex installation is required.
- Place the engraver on a stable, level, and non-flammable surface.
- Connect the power adapter to the engraver's power input port and then plug it into a suitable power outlet.
- (Optional) Connect the engraver to your computer using the provided USB cable for wired control.
4.2 Software and App Installation
The NEJE Master 2 Mini can be controlled via NEJE Windows software, NEJE Android APP, or the "NEJE Wireless" APP for iOS and macOS.
- For PC (Windows/macOS): Download the latest software from the official NEJE website. Follow the on-screen instructions for installation.
- For Mobile (Android/iOS): Search for "NEJE" or "NEJE Wireless" in your device's app store and install the application.
Once installed, open the NEJE application and connect to your device via Bluetooth (for mobile) or USB (for PC) to begin.
4.3 Focusing the Laser
Proper laser focus is crucial for achieving optimal engraving and cutting results. The NEJE Master 2 Mini features an easy focus mechanism.


Images: A sequence demonstrating how to adjust the laser module for optimal focus. This typically involves rotating the lens or moving the module up/down until the laser spot is at its smallest and most intense point on the material surface.
- Place your material on the engraving platform.
- Adjust the laser module's height or lens rotation until the laser dot projected onto the material surface is as small and sharp as possible. This indicates the focal point.
- Ensure the focus is set correctly for each new material thickness to achieve the best results.
5. Operating Instructions
5.1 Preparing Your Design
- Create or import your design using the NEJE software or app. Supported graphic formats include G-CODE, BMP, JPG, PNG, NC, DXF.
- Adjust the size, position, and engraving parameters (power, speed, passes) according to your material and desired effect.
- The NEJE cloud service provides high-quality pictures, and you can share phone pictures directly to your computer for engraving.
5.2 Material Compatibility
The NEJE Master 2 Mini is suitable for engraving a wide range of materials. Cutting functionality is supported only in G-code mode and is limited to certain materials.
| Category | Supported Materials | Unsupported Materials |
|---|---|---|
| Wood & Paper | MDF, Balsa, Paper, Wood, Plywood, Foam paper, Bamboo | |
| Fabrics & Leather | Fabric, Leather, Non-woven, Cotton, Linen, Velvet, Canvas | |
| Plastics | Plastic, Acrylic, PPR, ABS board, PVC board | Transparent material |
| Metals & Others | Anodized aluminum, Paint metal, Dark alumina, Light alumina, EPE, KT board | Metal (pure), Glass, Stone, Ceramic, PCB, Stainless steel, Reflective metal, Gold |
Note: The Mini series modules are not compatible with modules of other specifications.
5.3 Starting an Engraving Job
- Place the material securely on the engraving platform.
- Ensure the laser is properly focused on the material surface.
- Wear your laser safety goggles.
- In the NEJE software/app, send your prepared design to the engraver.
- Monitor the engraving process. The device supports 360-degree engraving for cylindrical objects or specific orientations.

Image: The NEJE Master 2 Mini laser engraver shown in operation, demonstrating its ability to perform 360-degree engraving on a vertical surface like a door, controlled wirelessly via a smartphone app.
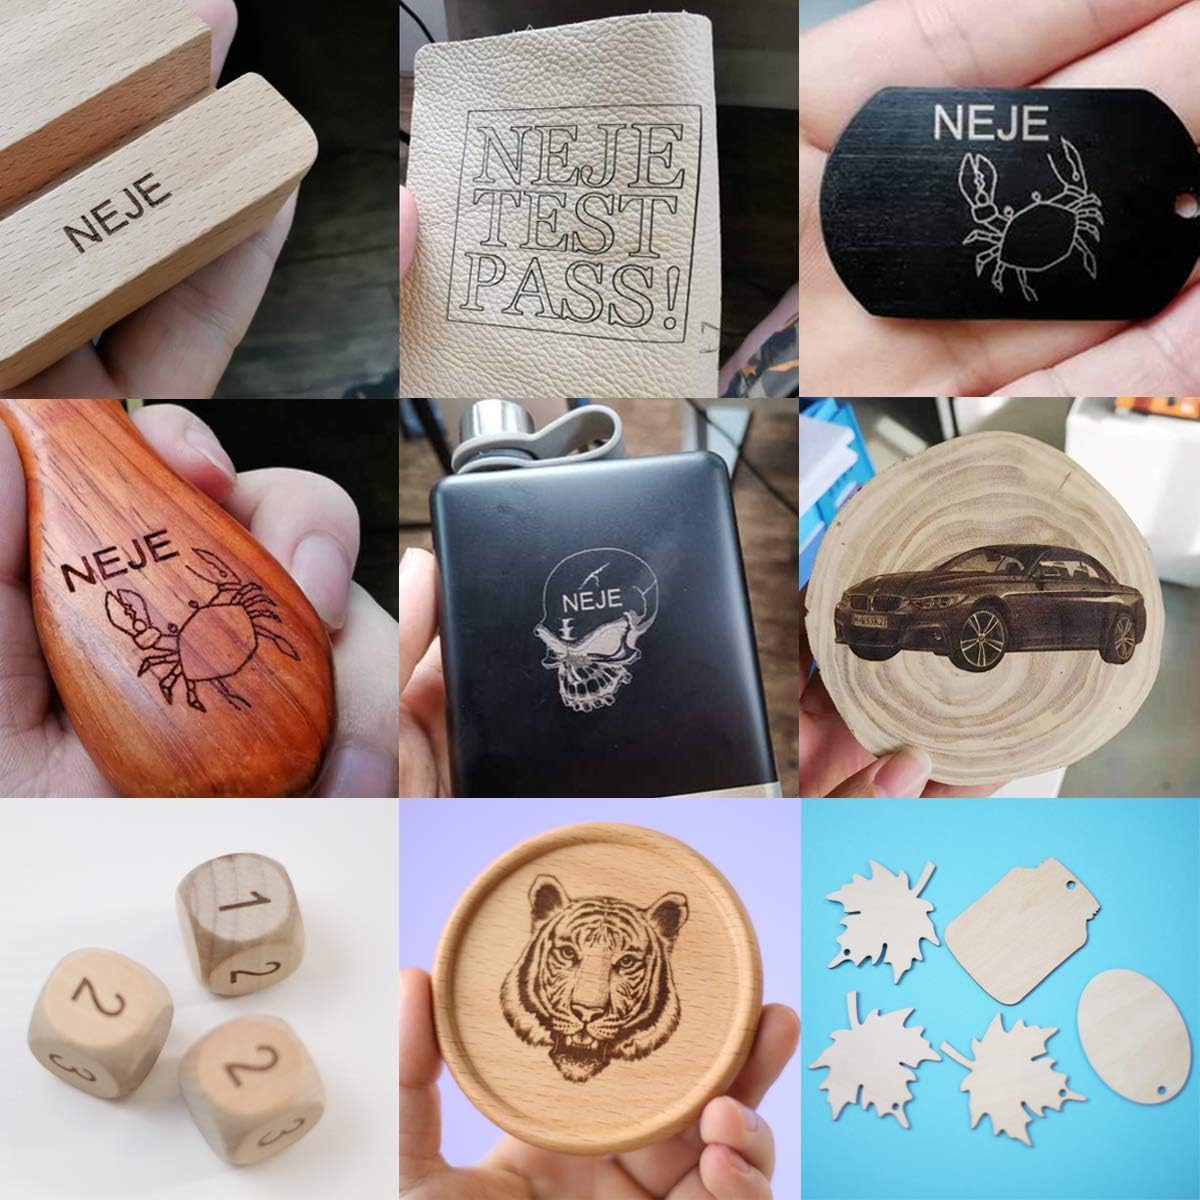
Image: A collage displaying various materials and objects successfully engraved by the NEJE Master 2 Mini, including wood, leather, and anodized metal, showcasing the engraver's versatility.
6. Maintenance
Regular maintenance ensures the longevity and optimal performance of your NEJE Master 2 Mini.
- Cleaning the Lens: Periodically inspect the laser lens for dust or debris. Gently clean it with a soft, lint-free cloth and lens cleaning solution if necessary.
- Cleaning the Engraver: Use a soft brush or compressed air to remove dust and debris from the machine's frame and moving parts.
- Belt Inspection: Check the 6mm drive belt for any signs of wear or looseness. Ensure it is properly tensioned for accurate movement.
- General Care: Keep the engraver in a clean, dry environment away from direct sunlight and extreme temperatures.
The laser module itself is designed for minimal maintenance.

Image: A detailed view of the NEJE Smart Laser Module, highlighting its components such as the fan, 4-pin input, built-in temperature sensor, and easy focus mechanism. The smart driver dynamically adjusts fan speed based on temperature.
7. Troubleshooting
If you encounter issues with your NEJE Master 2 Mini, refer to the following common problems and solutions.
| Problem | Possible Cause | Solution |
|---|---|---|
| Engraver not connecting to app/software | Bluetooth/USB not enabled, incorrect app version, device not powered on. | Ensure Bluetooth is on (for mobile), USB cable is connected securely (for PC), engraver is powered on, and you are using the correct NEJE app/software version. Restart both device and engraver. |
| Poor engraving quality / Laser not burning | Incorrect laser focus, wrong power/speed settings, incompatible material, dirty lens. | Re-focus the laser. Adjust power and speed settings in the software. Verify material compatibility. Clean the laser lens. |
| Engraver stops mid-job | Loose connection, software crash, overheating. | Check all cable connections. Restart the software and engraver. Ensure adequate ventilation. |
| Machine not responding | Power issue, software error. | Check power supply. Restart the engraver and computer/mobile device. |
If the problem persists, please contact NEJE customer support for further assistance.
8. Specifications
Detailed technical specifications for the NEJE Master 2 Mini Laser Engraver.

Image: A comprehensive table detailing the specifications of the NEJE Master 2 Mini, including carving area, laser power, material compatibility, and software support.
| Feature | Detail |
|---|---|
| Model | Master 2 Mini |
| Manufacturer | NEJE |
| Carving Area | 120mm x 110mm |
| Laser Output Power | Approximately 2.5W (Module Power: 10W) |
| Laser Wavelength | 450nm |
| Motherboard | 1 x MCU + Wireless control IC + MEMS |
| Safety Protection | MEMS (Motion-sensitive protection) |
| Driving Structure | 6mm Belt |
| Motor | 42mm step motor |
| Limit Switch | Yes |
| Machine Material | Aluminum + Composite material |
| Accuracy | High precision |
| Speed | High speed |
| Noise Level | Quiet |
| Engraving Max Depth | Max 2mm (NEJE Mode Easy Control) |
| Cutting Function | Yes (G-code mode only, limited materials) |
| Software Support | NEJE Windows software, NEJE Android APP, NEJE Wireless APP (iOS/macOS) |
| Control Method | PC (USB), Mobile (Bluetooth), Offline |
| Graphic Formats | G-CODE, BMP, JPG, PNG, NC, DXF |
| Package Dimensions | 33.6 x 29.8 x 19.1 cm |
| Weight | 1.77 kg |
| Batteries Included | No |
| First Available Date | December 13, 2020 |
9. Warranty and Support
9.1 Warranty Information
The NEJE Master 2 Mini Laser Engraver comes with a 2-year warranty from the date of purchase. This warranty covers manufacturing defects and malfunctions under normal use. Please retain your proof of purchase for warranty claims.
The laser module also has a 2-year warranty service.
9.2 Customer Support
NEJE offers lifetime customer service for the Master 2 Mini. If you have any questions, encounter issues not covered in this manual, or require technical assistance, please contact us.
- Contact Method: Please refer to the official NEJE website or your purchase platform for the most up-to-date contact information (e.g., email, support portal).
- We aim to respond to all inquiries within 24 hours.
For software updates and additional resources, visit the official NEJE Wiki or support pages.