1. Introduction
Thank you for choosing JOYLIT 24V LED Strip Lights. This manual provides essential information for the safe and effective installation, operation, and maintenance of your LED strip lights. Please read this manual thoroughly before installation and retain it for future reference.

2. Safety Information
Adhering to these safety guidelines is crucial for preventing damage to the product and ensuring user safety.
- Voltage Compatibility: This LED strip operates exclusively with a 24V DC power supply. Connecting it to a 12V power supply or a 110V/220V AC plug will damage the strip and is a safety hazard.
- Power Supply Wattage: Ensure your 24V power supply provides sufficient wattage. The LED strip consumes approximately 5.5W per foot. The power supply wattage should be calculated as 5.5W * total length (in feet) * 1.2 (to allow for a 20% capacity buffer). Insufficient wattage may cause the lights to dim or flicker.
- Indoor Use Only: This product is designed for indoor use (IP20 rated) and is not water-resistant. Avoid exposure to moisture or outdoor elements.
- Avoid Series Connection: Do not connect multiple LED strips in series for long runs, as this can lead to uneven brightness. Always use parallel connections for consistent illumination.
- Cutting: Only cut the LED strip at designated cut marks, typically indicated by copper pads. Cutting elsewhere will damage the circuit.
- Heat Dissipation: Ensure adequate ventilation around the LED strip, especially when installed in enclosed spaces, to prevent overheating and prolong lifespan.

3. Package Contents
Verify that all items are present in your package:
- ProLED 24V LED Strip (16.4FT / 5M, 126LEDs/M, IP20, 4000K Natural White)
- 2 PIN 8 MM Connectors (2 pieces)
- User Manual (this document)
4. Product Features
The JOYLIT 24V LED Strip Lights offer advanced features for superior lighting performance:
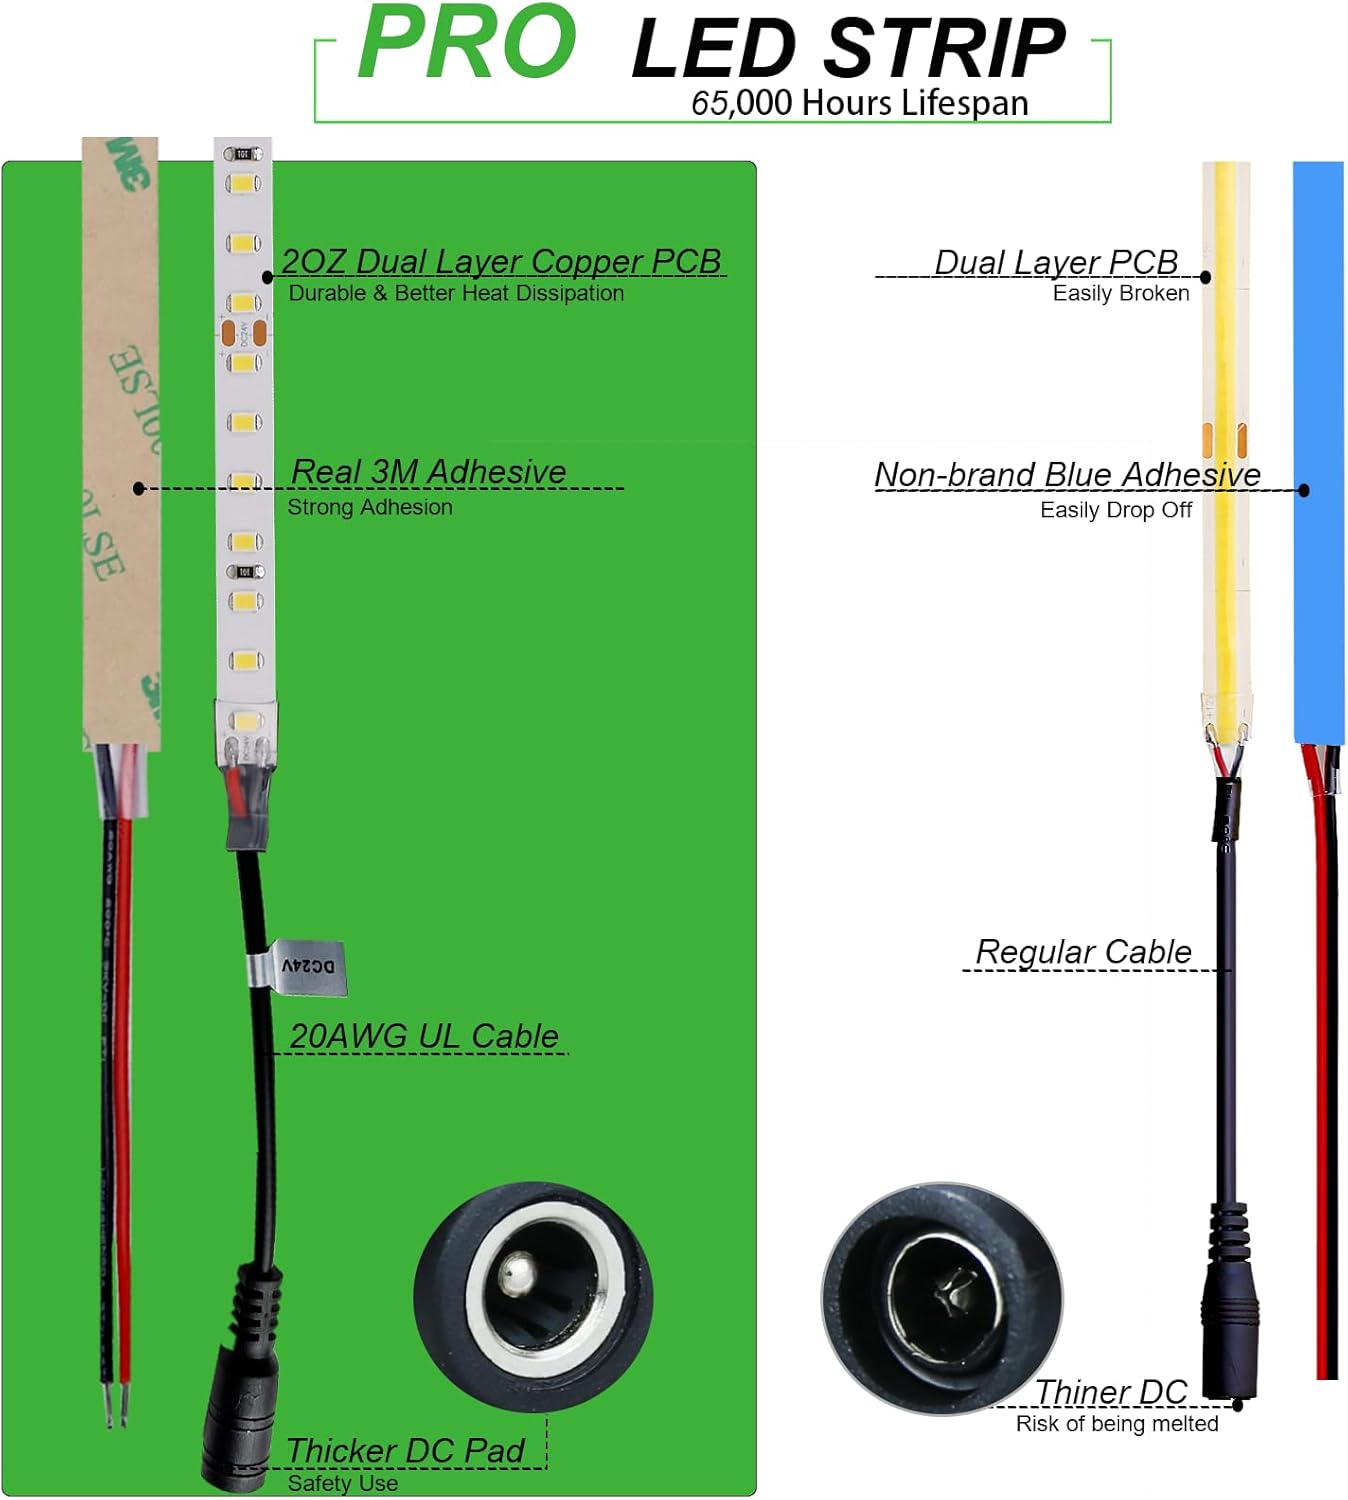
- Professional Grade: UL Listed with a 2OZ thick copper PCB board for enhanced durability, better heat dissipation, and a lifespan of 65,000 hours.
- High Brightness: Features 126 LEDs per meter (7 LEDs per segment), delivering 9000-9500 Lumens for powerful illumination, approximately 2.5 times brighter than standard LED strips.
- High Color Rendering Index (CRI 92+): Provides accurate and vibrant color reproduction, reducing eye fatigue and making objects appear more natural.
- Dimmable: Compatible with a DC LED dimmer (sold separately) for smooth brightness adjustment from 0% to 100% without flicker.
- No Strobe: Designed to eliminate visible flicker, protecting eye health and ensuring comfortable viewing.
- Strong Adhesive: Equipped with original brand self-adhesive tape for secure and lasting installation on clean, dry, and smooth surfaces.


5. Setup and Installation
Follow these steps for proper installation of your LED strip lights:
- Prepare the Surface: Ensure the installation surface is clean, dry, and smooth. Dust, grease, or uneven textures can compromise adhesive strength.
- Measure and Cut (if necessary): Measure the desired length for your installation. The LED strip can be cut at designated marks, typically every 5.56 cm (7 LEDs), indicated by copper pads. Use sharp scissors to ensure a clean cut.
- Connect Power Supply:
- For small applications (e.g., a single 16.4ft strip), connect the DC connector end of the LED strip directly to a compatible 24V 4A DC power adapter (sold separately).
- For larger applications or hard-wiring, use the 20AWG red and black cables at the other end of the strip to connect to a 24V LED driver (sold separately). Ensure correct polarity (red to positive, black to negative).
- Adhere the Strip: Peel off the protective backing from the self-adhesive tape on the back of the LED strip. Carefully press the strip onto the prepared surface, applying firm and even pressure along its entire length.
- Connect Multiple Strips (if applicable): If using multiple strips, connect them in parallel to the 24V power supply or LED driver to maintain consistent brightness across all segments. Do not connect them in series.


6. Operating Instructions
To operate your JOYLIT LED Strip Lights:
- Power On/Off: Connect the power supply to a suitable electrical outlet to turn on the lights. Disconnect or use a switch on your power supply/dimmer to turn them off.
- Dimming Function: If you have installed a compatible DC LED dimmer (sold separately), use its controls to adjust the brightness of the LED strip from 0% to 100%. The dimmer ensures smooth transitions without flickering.

7. Maintenance
Proper maintenance helps extend the life and performance of your LED strip lights:
- Cleaning: Gently wipe the LED strip with a dry, soft cloth to remove dust. Avoid using abrasive cleaners or excessive moisture.
- Inspection: Periodically check connections and the strip for any signs of damage or wear.
- Avoid Bending: Do not bend the LED strip sharply or at angles greater than recommended, as this can damage the internal circuitry.
8. Troubleshooting
If you encounter issues with your LED strip lights, refer to the following common solutions:
| Problem | Possible Cause | Solution |
|---|---|---|
| Lights do not turn on | Incorrect voltage power supply (e.g., 12V or 110V/220V instead of 24V). Loose connections. | Ensure a 24V DC power supply is used. Check all power connections for secure fit. |
| Lights are dim or flicker | Insufficient power supply wattage. Strips connected in series. | Verify power supply wattage meets requirements (5.5W/ft * length * 1.2). Ensure multiple strips are connected in parallel, not series. |
| Uneven brightness along the strip | Voltage drop due to long series connection. | Connect multiple strips in parallel to the power source. For very long runs, consider injecting power at multiple points. |
| Adhesive not holding | Surface was not clean, dry, or smooth. | Ensure proper surface preparation. For persistent issues, consider using additional mounting clips or stronger adhesive. |
9. Specifications
| Feature | Detail |
|---|---|
| Brand | JOYLIT |
| Model Number | S28BNP-NW1 |
| Length | 16.4 Feet (5 Meters) |
| Color Temperature | 4000K Natural White |
| LEDs per Meter | 126 LEDs/M (Total 630 LEDs) |
| Luminous Flux | 9500 Lumens |
| Color Rendering Index (CRI) | 92.0+ |
| Voltage | 24 Volts DC |
| Wattage | Approx. 5.5W/FT (Total 90 Watts max) |
| Average Life | 65,000 Hours |
| Indoor/Outdoor Usage | Indoor (IP20) |
| Dimmable | Yes (with external DC LED dimmer, sold separately) |
| Dimensions (L x W x H) | 196.85 x 0.31 x 0.08 inches (5000 x 8 x 2 mm) |
| Certification | UL Listed |
10. Warranty and Support
JOYLIT products are manufactured to high-quality standards. For specific warranty details and customer support, please refer to the documentation included with your purchase or visit the official JOYLIT website. Keep your purchase receipt as proof of purchase for any warranty claims.