1. Introduction
This manual provides essential information for the safe and efficient operation, maintenance, and troubleshooting of your DEWALT DXCMSAC426 26-Gallon Quiet Air Compressor. Please read and understand all instructions before using the product. Retain this manual for future reference.
The DEWALT DXCMSAC426 is designed for various applications requiring compressed air, featuring a 26-gallon vertical tank, a quiet 69 dBA operation, and an oil-free pump for reduced maintenance.
2. Safety Information
Always observe basic safety precautions to reduce the risk of fire, electric shock, and personal injury. This compressor operates at high pressure and uses electricity. Improper use can result in serious injury or property damage.
- Read all instructions: Familiarize yourself with the controls and proper use.
- Wear eye protection: Always wear ANSI Z87.1 compliant safety glasses.
- Avoid direct contact with hot surfaces: The pump and motor can become hot during operation.
- Ensure proper ventilation: Operate in a well-ventilated area to prevent overheating.
- Drain tank regularly: Condensation can cause rust and weaken the tank.
- Disconnect power: Always unplug the compressor before performing maintenance or repairs.
- Do not modify the compressor: Unauthorized modifications can be dangerous and void the warranty.
3. Product Components
The DEWALT DXCMSAC426 compressor consists of several key components:
- Air Tank: 26-gallon capacity for storing compressed air.
- Pump/Motor Assembly: Oil-free pump driven by a heavy-duty direct drive induction motor.
- Control Panel: Includes pressure gauges, regulator, and ON/OFF switch.
- Wheels: For portability.
- Drain Valve: Located at the bottom of the tank for removing condensation.

Figure 1: Overall view of the DEWALT DXCMSAC426 26-Gallon Quiet Air Compressor.
4. Setup
4.1 Unpacking
Carefully remove the compressor from its packaging. Inspect for any shipping damage. Report any damage to your dealer immediately.
4.2 Assembly (Wheels)
Attach the wheels to the compressor frame using the provided hardware. Ensure all bolts are securely tightened.

Figure 2: Side view illustrating the wheel attachment points.
4.3 Electrical Connection
Connect the compressor to a grounded 120 Volt, 60 Hz, AC-only electrical supply. Ensure the circuit can handle the compressor's power requirements (1.5 HP motor). Do not use extension cords unless absolutely necessary, and if used, ensure it is a heavy-duty, grounded cord of appropriate gauge and length.
4.4 Initial Start-up
- Ensure the drain valve is closed.
- Turn the ON/OFF switch to the 'ON' position.
- Allow the compressor to build pressure until it automatically shuts off. This may take several minutes.
- Check for any unusual noises or air leaks.
- Turn the ON/OFF switch to the 'OFF' position and open the drain valve to release all air. Close the drain valve. The compressor is now ready for use.
5. Operating Instructions
5.1 Powering On/Off
To turn on the compressor, flip the ON/OFF switch to the 'ON' position. The compressor will start and build pressure. To turn off, flip the switch to the 'OFF' position.
5.2 Adjusting Air Pressure
The compressor features a pressure regulator to control the output air pressure. Turn the regulator knob clockwise to increase pressure and counter-clockwise to decrease pressure. Monitor the regulated pressure gauge for the desired setting.
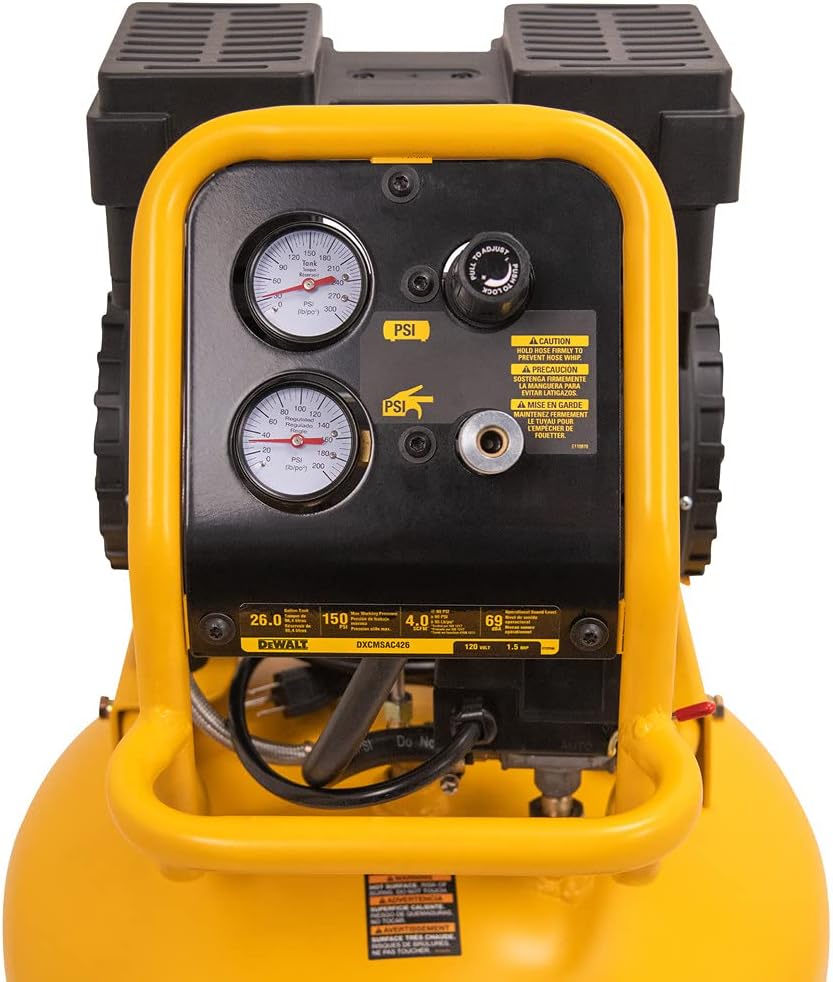
Figure 3: Control panel showing pressure gauges and regulator knob.
5.3 Connecting Air Tools
Attach your air hose to the quick-connect coupler on the control panel. Ensure the connection is secure before operating any air tools. Always refer to your air tool's manual for its specific pressure requirements.
5.4 Applications
This compressor is suitable for applications such as drilling, nailing, and spraying, among others. Always ensure the air tool's CFM requirements do not exceed the compressor's output (4.0 SCFM at 90 PSI).
6. Maintenance
Regular maintenance ensures the longevity and safe operation of your air compressor. This model features an oil-free pump, eliminating the need for oil changes.
6.1 Draining the Air Tank
Condensation accumulates in the air tank and must be drained daily or after each use. Failure to drain the tank will lead to rust and tank failure, which is dangerous and voids the warranty.
- Turn off the compressor and unplug it from the power source.
- Open the drain valve located at the bottom of the tank.
- Allow all air and moisture to escape.
- Close the drain valve securely.

Figure 4: Location of the tank drain valve.
6.2 Cleaning
Keep the compressor clean and free of dust and debris. Use a damp cloth to wipe down exterior surfaces. Do not use harsh chemicals or solvents.
6.3 Air Filter (if applicable)
While this model features an oil-free pump, some compressors may have an air intake filter. Inspect and clean or replace any air filters as per manufacturer recommendations to ensure optimal performance.
7. Troubleshooting
Before contacting customer support, review the following common issues and solutions:
| Problem | Possible Cause | Solution |
|---|---|---|
| Compressor does not start | No power, tripped circuit breaker, thermal overload | Check power connection, reset circuit breaker, allow motor to cool. |
| Low air pressure / Compressor runs continuously | Air leak, regulator set too low, excessive air tool demand | Check for leaks (use soapy water), adjust regulator, use appropriate air tools. |
| Excessive noise or vibration | Loose components, uneven surface | Tighten fasteners, place compressor on a level surface. |
| Moisture in air line | Tank not drained | Drain tank regularly. Consider an in-line air dryer for sensitive applications. |
8. Specifications
| Feature | Specification |
|---|---|
| Model Number | DXCMSAC426 |
| Tank Capacity | 26 Gallons |
| Max PSI | 150 PSI |
| SCFM @ 90 PSI | 4.0 SCFM |
| Noise Level | 69 dBA |
| Motor Horsepower | 1.5 HP |
| Power Source | Corded Electric (120 Volts) |
| Pump Type | Oil-Free |
| Item Weight | 132 Pounds |
| Material | Alloy Steel, Brass, Plastic |
9. Warranty and Support
9.1 Manufacturer's Warranty
This DEWALT air compressor is covered by a 2-year manufacturer's warranty. This warranty covers defects in materials and workmanship under normal use. Please retain your proof of purchase for warranty claims. The warranty does not cover damage due to misuse, abuse, neglect, unauthorized repairs, or failure to perform routine maintenance such as draining the tank.
9.2 Customer Support
For technical assistance, parts, or warranty inquiries, please contact DEWALT customer service. Have your model number (DXCMSAC426) and serial number (if applicable) ready when you call.