Product Overview
The Sunjoy 12.5 x 12.5 ft. Hardtop Gazebo provides a durable outdoor gathering spot, offering protection from sun and rain. It features a rust-resistant powder-coated steel roof and a natural Cedar wood frame, designed for stability and longevity.

Image: The Sunjoy 12.5 x 12.5 ft. Hardtop Gazebo installed in an outdoor patio area, showcasing its cedar frame and steel roof.
Safety Information
Always secure the gazebo to a stable foundation using the provided ground stakes. For solid surfaces like concrete or wood, additional anchors are required. Failure to properly secure the gazebo may result in instability or tipping, posing a safety hazard.
Assembly Instructions
This section provides a step-by-step guide for assembling your Sunjoy Hardtop Gazebo. For a visual guide, please refer to the assembly video below.
Video: Easy Step-by-Step Assembly Guide for 12.5x12.5 Wood Gazebo. This video provides detailed visual instructions for each assembly step.
- Step 1: Assemble Post Bases. Connect the Post Base (A) to the lower end of Post (01). Secure the Base Cover (B) to the lower end of Post (01) using Screw (H7). Tighten with a Phillips screwdriver (not included).
- Step 2: Connect Cross Beams. Connect eight Cross Beam (02) sections to each other using Bolt (H5), Flat Washer (H10), and Washer rubber (H12) to form the upper end of the Cross Beam (02). Then, connect the Post Cap (C) to the Cross Beam (02) using Bolt (H5), Flat Washer (H10), and Hex Nut (H13). Tighten with Wrench (HW2).
- Step 3: Attach Cross Beams to Posts. Lay Post (01) flat on the ground. Insert the assembled Cross Beam (02) into the slot at the upper end of the Post (01). Secure with Bolt (H6), Screw (H9), Flat Washer (H11), and Hex Nut (H14). Tighten with Wrench (HW3). Repeat this process for all posts and cross beams.
- Step 4: Assemble Big Roof Frame. Assemble the Big Roof Frame (D) in a clockwise order. Connect sections using Bolt (H2) and tighten with Wrench (HW1).
- Step 5: Assemble Rafters. Insert the Lower Rafter (F) into the lower end of the Upper Rafter (E). Connect them with Bolt (H2) and tighten with Wrench (HW1).
- Step 6: Attach Rafters to Roof Frame. Insert the assembled Upper/Lower Rafter (E,F) into the Big Roof Frame (D). Connect with Bolt (H2) and tighten with Wrench (HW1). Use Screw (H7) to fix the connecting piece on the Lower Rafter (F) to the Post (01). Use Screw (H8) to connect the Lower Rafter (F) to the Post (01) and tighten with Allen Key (HW4).
- Step 7: Install Middle Beams. Insert the Middle Beam (G) into the connecting piece on the Big Roof Frame (D). Connect with Bolt (H2) and tighten with Wrench (HW1). Use Screw (H7) to connect the Middle Beam (G) to the Cross Beam (02).
- Step 8: Install Outer Top Beams. Use Bolt (H2) to connect the Outer Top Beam 1/2 (J,K) to the Middle Beam (G). Tighten with Wrench (HW1). Then, insert the Outer Top Beam 1/2 (J,K) into the Lower Rafter (F).
- Step 9: Assemble Small Roof Components. Use Bolt (H2) to connect the Small Roof Rafter (L) to the Small Roof Connector (N). Then connect the Small Roof Rafter (L) to the Small Roof Brace (M) through spring buckles. Use Bolt (H1) to connect the Small Roof Decoration Panel (P) to the Small Roof Brace (M) and tighten with Wrench (HW1).
- Step 10: Attach Small Roof Panel Flashing. Use Bolt (H2) to connect the Small Roof Panel Flashing (Q) to the Small Roof Rafter (L). Tighten with Wrench (HW1).
- Step 11: Install Small Roof Panels. Put the Small Roof Panel 1/2 (R,S) onto the small top. Use Bolt (H2) to connect the Small Roof Panel 1/2 (R,S) to the Small Roof Rafter (L) and tighten with Wrench (HW1). Then use Bolt (H2) to connect the lower end of the Small Roof Panel 1/2 (R,S) to the Small Roof Panel Flashing (Q) and tighten with Wrench (HW1).
- Step 12: Install Small Roof Caps. Cover the Small Roof Rafter Cap (T) onto the small roof panel. Fix with Bolt (H4) and tighten with Wrench (HW1). Then use Bolt (H2) to connect the Small Roof Cap (U) to the Small Roof Connector (N) and tighten with Wrench (HW1).
- Step 13: Attach Small Top to Big Roof Frame. Put the assembled small top onto the Big Roof Frame (D). Fix it to the hole of the Upper Rafter (E) with Bolt (H2) and tighten with Wrench (HW1). Then tighten Hook (V) onto the Small Roof Connector (N).
- Step 14: Connect Top Beams. Use Bolt (H2) to connect the Top Beam 1/2 (W,X) to the Upper Rafter (E). Then use Bolt (H2) and Screw (H7) to connect the other end of the Top Beam 1/2 (W,X) to the Cross Beam (02) and Outer Top Beam 1/2 (J,K). Tighten with Wrench (HW1) and a Phillips screwdriver (not included).
- Step 15: Install Big Roof Small Panels. Put the Big Roof Small Panel 1/2 (Y,AA) onto the big top. Fix it to the Upper Rafter (E) with Bolt (H2) and tighten with Wrench (HW1).
- Step 16: Install Big Roof Middle Panels. Put the Big Roof Middle Panel 1/2 (AB,AC) onto the big top. Fix it to the Upper Rafter (E) with Bolt (H3) and Washer rubber (H12) to fix it on the Top Beam 1/2 (W,X). Tighten with Wrench (HW1).
- Step 17: Install Big Roof Big Panels. Put the Big Roof Big Panel 1/2 (AD,AE) onto the big top. Use Bolt (H3) and Washer rubber (H12) to fix it on the Top Beam 1/2 (W,X). Tighten with Wrench (HW1).
- Step 18: Connect Rafter Panel Flashing. Use Bolt (H4) to connect the Rafter Panel Flashing (AK) to the Lower Rafter. Tighten with Wrench (HW1).
- Step 19: Install Middle Beam Cap. Use Bolt (H4) and Washer rubber (H12) to connect the Middle Beam Cap (AF) to the middle beam. Tighten with Wrench (HW1).
- Step 20: Secure Gazebo. Fix the gazebo to the ground using Stake (HS) and Base Cover (B).
Product Features
- Sturdy Protection & Stability: Durable rust-resistant black powder-coated steel hardtop provides protection from weather elements. Premium Cedar wood frame construction ensures strength and sturdiness.
- Stable Construction: Four 5.5 x 5.5 inch extra-strong sturdy wood posts with ground stakes secure the gazebo to the ground, designed to withstand strong winds and inclement weather.
- Lighting Hook: A ceiling hook is provided for suspending lighting (not included) to illuminate evening gatherings.
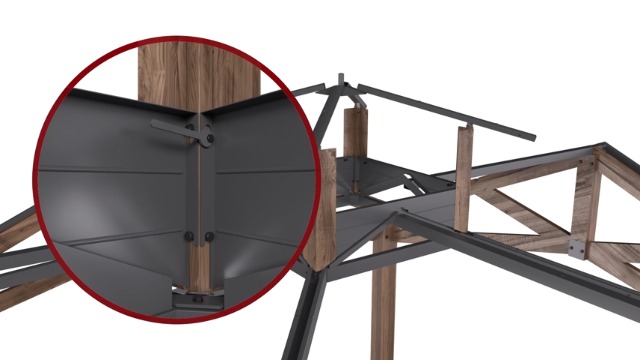
Image: Detail of the extra-strong 5.5 x 5.5 inch wood posts, highlighting their robust construction compared to standard posts.

Image: Illustration of the ventilated 2-tier top, designed to provide UV protection and allow for free air circulation.

Image: Detail of the built-in ceiling hook, suitable for suspending lighting or decorative items.
Specifications
- Brand: Sunjoy
- Material: Alloy Steel, Cedar Wood
- Style: Gazebo w/Ventilated 2-Tier Top
- Product Dimensions: 150.67"L x 150.67"W x 132.83"H
- Item Weight: 551.16 Pounds
- Frame Material: Wood, Steel
- Water Resistance Level: Water Resistant
- Shape: Square
- Ultraviolet Light Protection: Yes
- Assembly Required: Yes
- UPC: 841057177495
Maintenance
Regularly inspect all bolts and connections to ensure they remain tight. Clean the steel roof and cedar frame periodically with a mild soap and water solution to prevent buildup and maintain appearance. Avoid using harsh chemicals or abrasive cleaners that could damage the finish. Ensure proper drainage around the gazebo to prevent water accumulation.
Warranty and Support
This product comes with a 1-year manufacturer warranty. For any questions or assistance, please contact Sunjoy customer service. You can visit the official Sunjoy store for more information and support.
For customer support, please refer to the contact information provided with your purchase or visit the Sunjoy Store on Amazon.