1. Introduction
This manual provides essential information for the safe and efficient operation, installation, and maintenance of your Beko BBADF22300X Electric Built-in Double Oven. Please read these instructions thoroughly before using your appliance and retain them for future reference. Proper use and care will ensure optimal performance and longevity of your oven.
2. Safety Information
Always adhere to the following safety guidelines to prevent personal injury or damage to the appliance:
- Ensure the appliance is correctly installed by a qualified person.
- Do not allow children to operate or play with the oven.
- Always use oven mitts when handling hot dishes or oven racks.
- Do not use abrasive cleaners or sharp metal scrapers to clean the oven door glass, as they can scratch the surface, potentially leading to shattering.
- Disconnect the appliance from the power supply before cleaning or maintenance.
- Never attempt to repair the appliance yourself. Contact authorized service personnel.
3. Product Overview
The Beko BBADF22300X is a 99-liter electric built-in double oven featuring a stainless steel finish. It includes an upper oven and a lower oven, each with independent controls for versatile cooking.

Figure 1: Front view of the Beko BBADF22300X Double Oven. This image displays the appliance's full facade, highlighting the two distinct oven compartments. The upper section features a smaller oven with its own control knob and a digital display for time and settings. The lower section houses the larger main oven, also equipped with its dedicated control knob. Both ovens have glass doors, allowing visibility into the cooking cavities. The overall finish is stainless steel, providing a modern aesthetic.
Control Panel
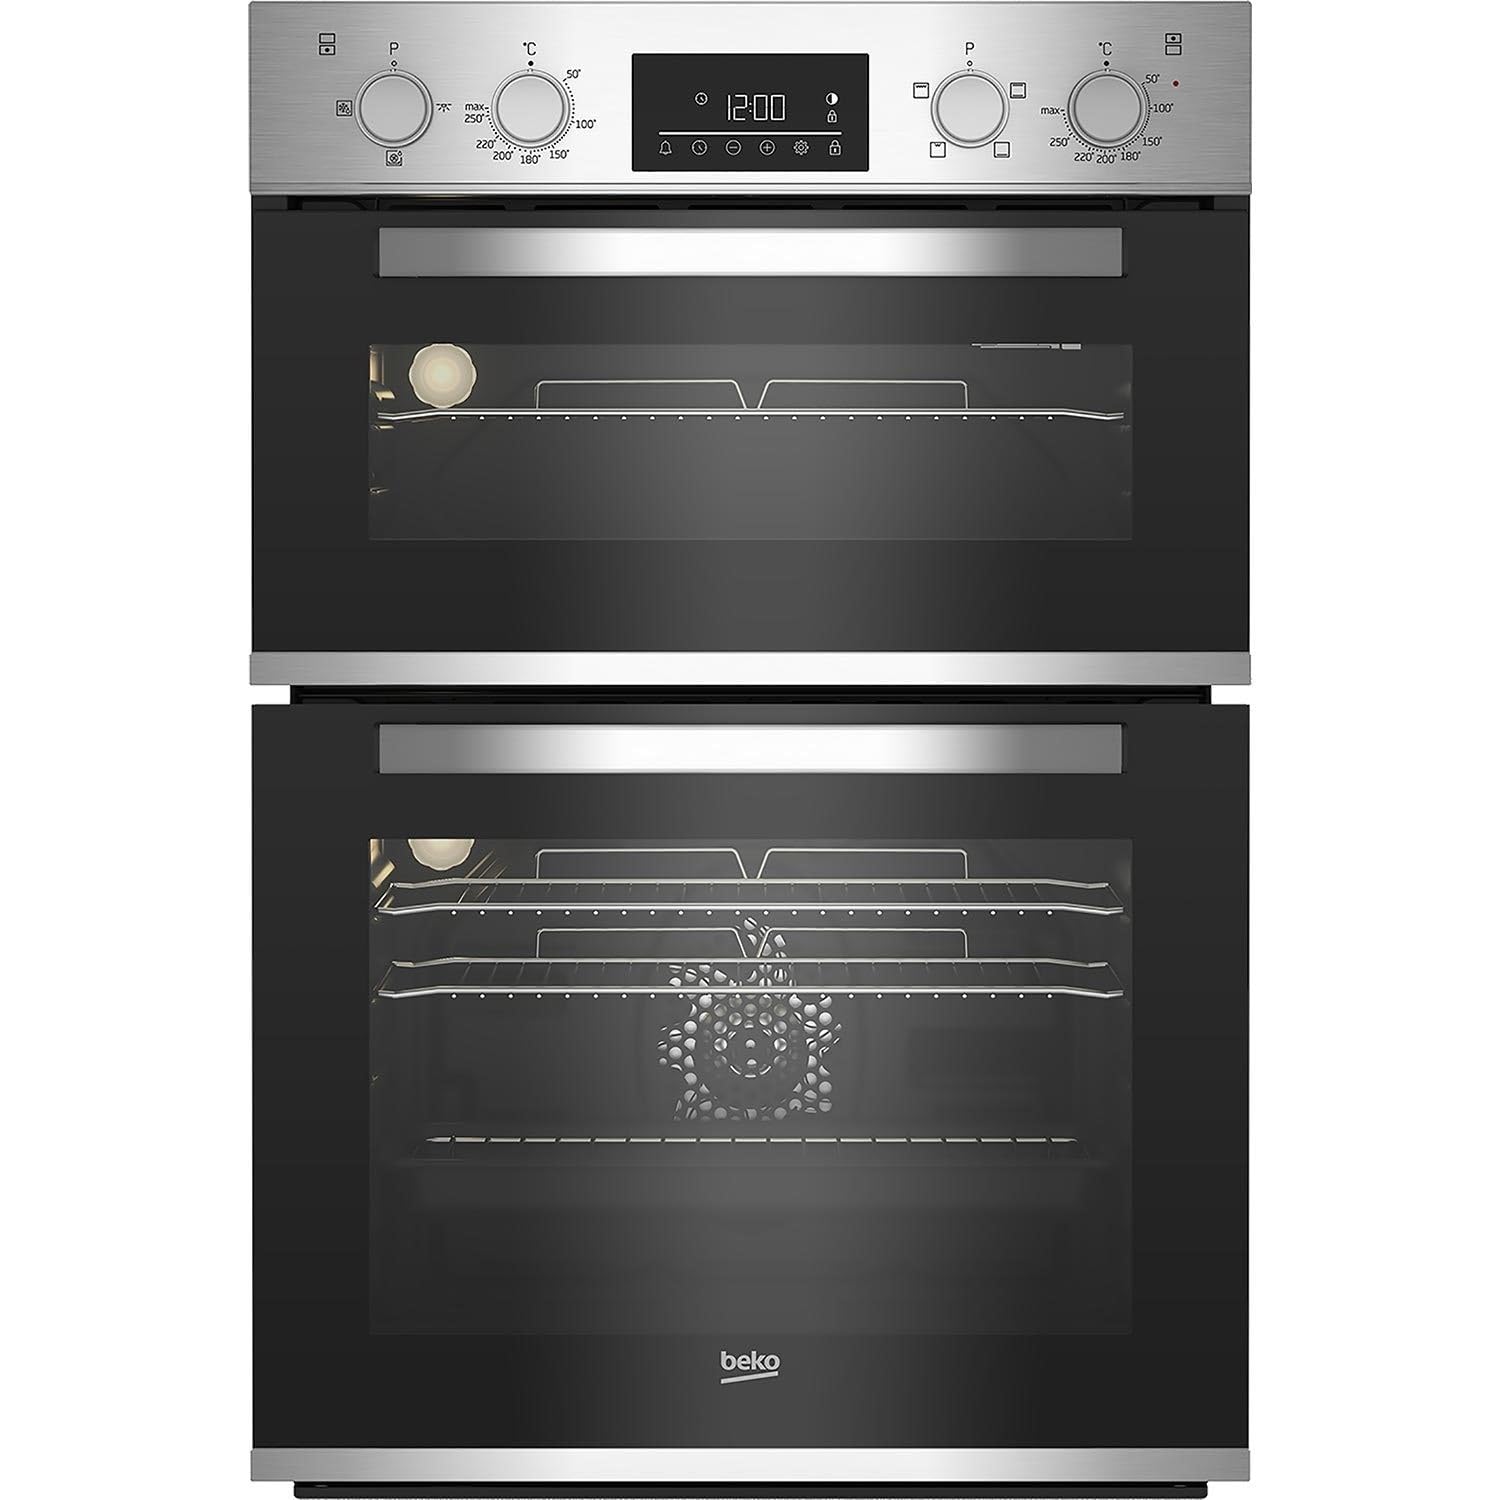
Figure 2: Detail of the Beko BBADF22300X Control Panel. The control panel is located at the top of the appliance, above the upper oven door. It consists of two rotary knobs, one for each oven, used to select cooking functions and set temperatures. Between these knobs is a central digital display, which shows the current time (e.g., 12:00) and various cooking indicators. Below the digital display are touch-sensitive buttons for timer settings, alarm, and other functions, indicated by icons such as a bell, clock, and light bulb.
- Upper Oven Control Knob: Selects cooking functions and temperature for the upper oven.
- Lower Oven Control Knob: Selects cooking functions and temperature for the lower oven.
- Digital Display: Shows time, temperature, and timer settings.
- Touch Controls: Used for setting the timer, clock, and other auxiliary functions.
4. Setup and Installation
This appliance is designed for built-in installation. Professional installation is highly recommended to ensure proper fitting and electrical connection.
4.1. Unpacking
- Carefully remove all packaging materials.
- Inspect the oven for any signs of damage. Do not install a damaged appliance.
- Keep packaging materials out of reach of children.
4.2. Electrical Connection
The oven must be connected to the mains supply by a qualified electrician, following local wiring regulations. Ensure the voltage and frequency ratings on the appliance's rating plate match your household supply.
4.3. Initial Cleaning
Before first use, wipe the interior and exterior surfaces of the oven with a damp cloth and mild detergent. Dry thoroughly. Remove all accessories and wash them in warm soapy water.
4.4. First Use (Burn-in)
To eliminate any manufacturing odors, operate both ovens empty for approximately 30-60 minutes at their maximum temperature setting. Ensure adequate ventilation during this process.
5. Operating Instructions
5.1. Setting the Clock
- When the oven is first connected to the power supply, the digital display will flash.
- Use the touch controls (e.g., '+' or '-' buttons) to set the current time.
- Confirm the time by pressing the clock icon or waiting a few seconds for it to set automatically.
5.2. Using the Upper Oven
The upper oven is typically used for grilling, browning, or smaller dishes.
- Turn the upper oven control knob to select the desired cooking function (e.g., Grill).
- Set the temperature using the same knob or a separate temperature knob if available.
- Allow the oven to preheat to the set temperature.
5.3. Using the Lower Oven
The lower oven is generally a fan-assisted oven, suitable for baking, roasting, and cooking multiple dishes simultaneously.
- Turn the lower oven control knob to select the desired cooking function (e.g., Fan Oven).
- Set the temperature.
- Allow the oven to preheat.
5.4. Timer Functions
The digital display allows you to set various timer functions:
- Minute Minder: An audible alarm that sounds after a set period, without affecting oven operation.
- Cooking Duration: Sets the length of cooking time. The oven will switch off automatically when the time expires.
- End Time: Sets the time when cooking should finish. The oven calculates the start time automatically.
Refer to the specific icons on your control panel for detailed instructions on setting each timer function.
6. Maintenance and Cleaning
Regular cleaning and maintenance will help keep your oven in optimal condition.
6.1. General Cleaning
- Always ensure the oven is cool and disconnected from the power supply before cleaning.
- Wipe exterior surfaces with a soft cloth and warm soapy water. Avoid abrasive cleaners.
- For the interior, use a specialized oven cleaner, following the product's instructions.
- Clean oven racks and accessories in warm soapy water or a dishwasher.
6.2. Removing the Oven Door
The oven door is removable for easier cleaning. Consult the manufacturer's specific instructions for your model on how to safely unhinge and reattach the door. Typically, this involves opening the door fully, flipping small levers on the hinges, and then gently lifting the door upwards and outwards.
6.3. Replacing the Oven Lamp
If the oven lamp needs replacement, ensure the oven is cool and disconnected from the power. Unscrew the protective cover, replace the bulb with a new one of the correct type and wattage (check specifications), and then reattach the cover.
7. Troubleshooting
If you encounter issues with your oven, refer to the following common problems and solutions:
| Problem | Possible Cause | Solution |
|---|---|---|
| Oven does not heat | No power supply; incorrect settings; fuse blown. | Check power connection; ensure correct function and temperature are set; check household fuse box. |
| Oven light not working | Lamp is faulty. | Replace the oven lamp (refer to Section 6.3). |
| Food not cooking evenly | Incorrect rack position; oven not preheated; door opened too frequently. | Use recommended rack position; always preheat; avoid opening door unnecessarily. |
| Digital display flashing | Power interruption; clock not set. | Reset the clock (refer to Section 5.1). |
If the problem persists after attempting these solutions, contact Beko customer service or a qualified technician.
8. Specifications
Detailed technical specifications for the Beko BBADF22300X Electric Built-in Double Oven:
| Feature | Specification |
|---|---|
| Brand | Beko |
| Model | BBADF22300X |
| Product Dimensions | 56.7 x 59.4 x 89 cm |
| Item Weight | 10 Kilograms |
| Energy Efficiency Class | A to G |
| Capacity | 105 Liters (Total) |
| Annual Energy Consumption | 1000 Watts |
| Installation Type | Built-in |
| Special Features | Removable Door |
| Heating Method | Convection |
| Colour | Stainless Steel |
| Voltage | 28V (Note: This value seems unusually low for an oven. Please verify with product label.) |
| Wattage | 200W (Note: This value seems unusually low for an oven. Please verify with product label.) |
| Fuel Type | Electric |
| Material Type(s) | Glass, Stainless Steel |
Note: Some electrical specifications (Voltage, Wattage) provided in the source data appear unusually low for a double oven. Please refer to the appliance's rating plate for accurate electrical requirements before installation.
9. Warranty Information
Your Beko BBADF22300X oven comes with a manufacturer's warranty. The terms and conditions of this warranty are typically outlined in a separate document provided with your purchase. Please retain your proof of purchase for warranty claims.
For detailed warranty information, including coverage period and claim procedures, please refer to the official Beko website or contact Beko customer support directly.
10. Support and Service
Should you require technical assistance, spare parts, or service for your Beko BBADF22300X oven, please contact Beko customer support.
- Online Support: Visit the official Beko website for FAQs, troubleshooting guides, and contact forms.
- Telephone Support: Refer to your product documentation or the Beko website for local customer service telephone numbers.
- When contacting support, please have your appliance's model number (BBADF22300X) and serial number ready.