Introduction
This user manual provides detailed instructions for the safe and effective operation, maintenance, and troubleshooting of your NCVI Double Electric Breast Pump. Please read this manual thoroughly before first use and retain it for future reference.
Setup
1. Unpacking and Components
Carefully unpack all items from the box. Verify that all components are present:
- Breast Pump Motor Unit
- Breast Shields (Flanges) - 21mm, 24mm, 28mm, 32mm sizes included
- Milk Bottles (180ml capacity)
- Air Tubes
- Duckbill Valves
- Diaphragms and Diaphragm Caps
- Bottle Holders
- USB Power Cable
- Breast Milk Storage Bags (10x)
- Nursing Pads (6x)

Image: Overview of all included components, such as the pump unit, bottles, flanges, and accessories.
2. Assembly
Before first use, wash and sterilize all components that come into contact with breast milk (bottles, breast shields, valves, diaphragms) according to the cleaning instructions in the Maintenance section. Ensure all parts are completely dry before assembly.
- Insert the duckbill valve firmly into the bottom of the breast shield.
- Attach the milk bottle to the bottom of the breast shield by twisting it securely.
- Place the silicone diaphragm onto the breast shield and secure it with the diaphragm cap.
- Connect one end of the air tube to the port on the diaphragm cap and the other end to the corresponding port on the main pump unit. For double pumping, connect both tubes. For single pumping, connect one tube and ensure the other port on the pump unit is sealed or unused.

Image: Illustration of the anti-reflux system, demonstrating how milk flows into the bottle without contaminating the pump unit.
3. Charging the Battery
The pump unit features a built-in 2200mAh lithium battery. Before initial use, fully charge the battery. The battery indicator on the display will show charging status.
- Connect the USB power cable to the charging port on the pump unit.
- Connect the other end of the USB cable to a compatible power source such as a laptop, power bank, wall adapter, or car charger.
- A full charge allows for approximately three pumping sessions.

Image: The pump unit demonstrating its versatile charging capabilities with different power sources.
Operating Instructions
1. Power On/Off
Press and hold the power button on the main unit to turn the pump on or off. The digital display will illuminate upon activation.
2. Understanding Modes and Levels
The NCVI breast pump offers 4 distinct modes and 9 adjustable suction levels to customize your pumping experience:
- Massage Mode: Used to stimulate milk let-down. This mode provides a gentle, rapid suction pattern.
- Multitronic Suction Mode: A varied suction pattern designed to mimic a baby's natural feeding rhythm.
- Suction Stimulation Mode: Focuses on stimulating milk flow with a specific suction pattern.
- Express Pumping Mode: Provides a steady, stronger suction for efficient milk expression once let-down has occurred.
Use the '+' and '-' buttons to adjust the suction intensity within each mode (levels 1-9). It is recommended to start with a lower level and gradually increase to a comfortable intensity.

Image: Visual representation of the four pumping modes (Massage, Multitronic Suction, Suction Stimulation, Express Pumping) and their distinct suction waveforms.
3. Single or Double Pumping
The pump supports both single and double pumping. To switch between modes, ensure the air tubes are correctly connected or disconnected from the main unit. For double pumping, connect both tubes to the two ports. For single pumping, connect only one tube to one port.
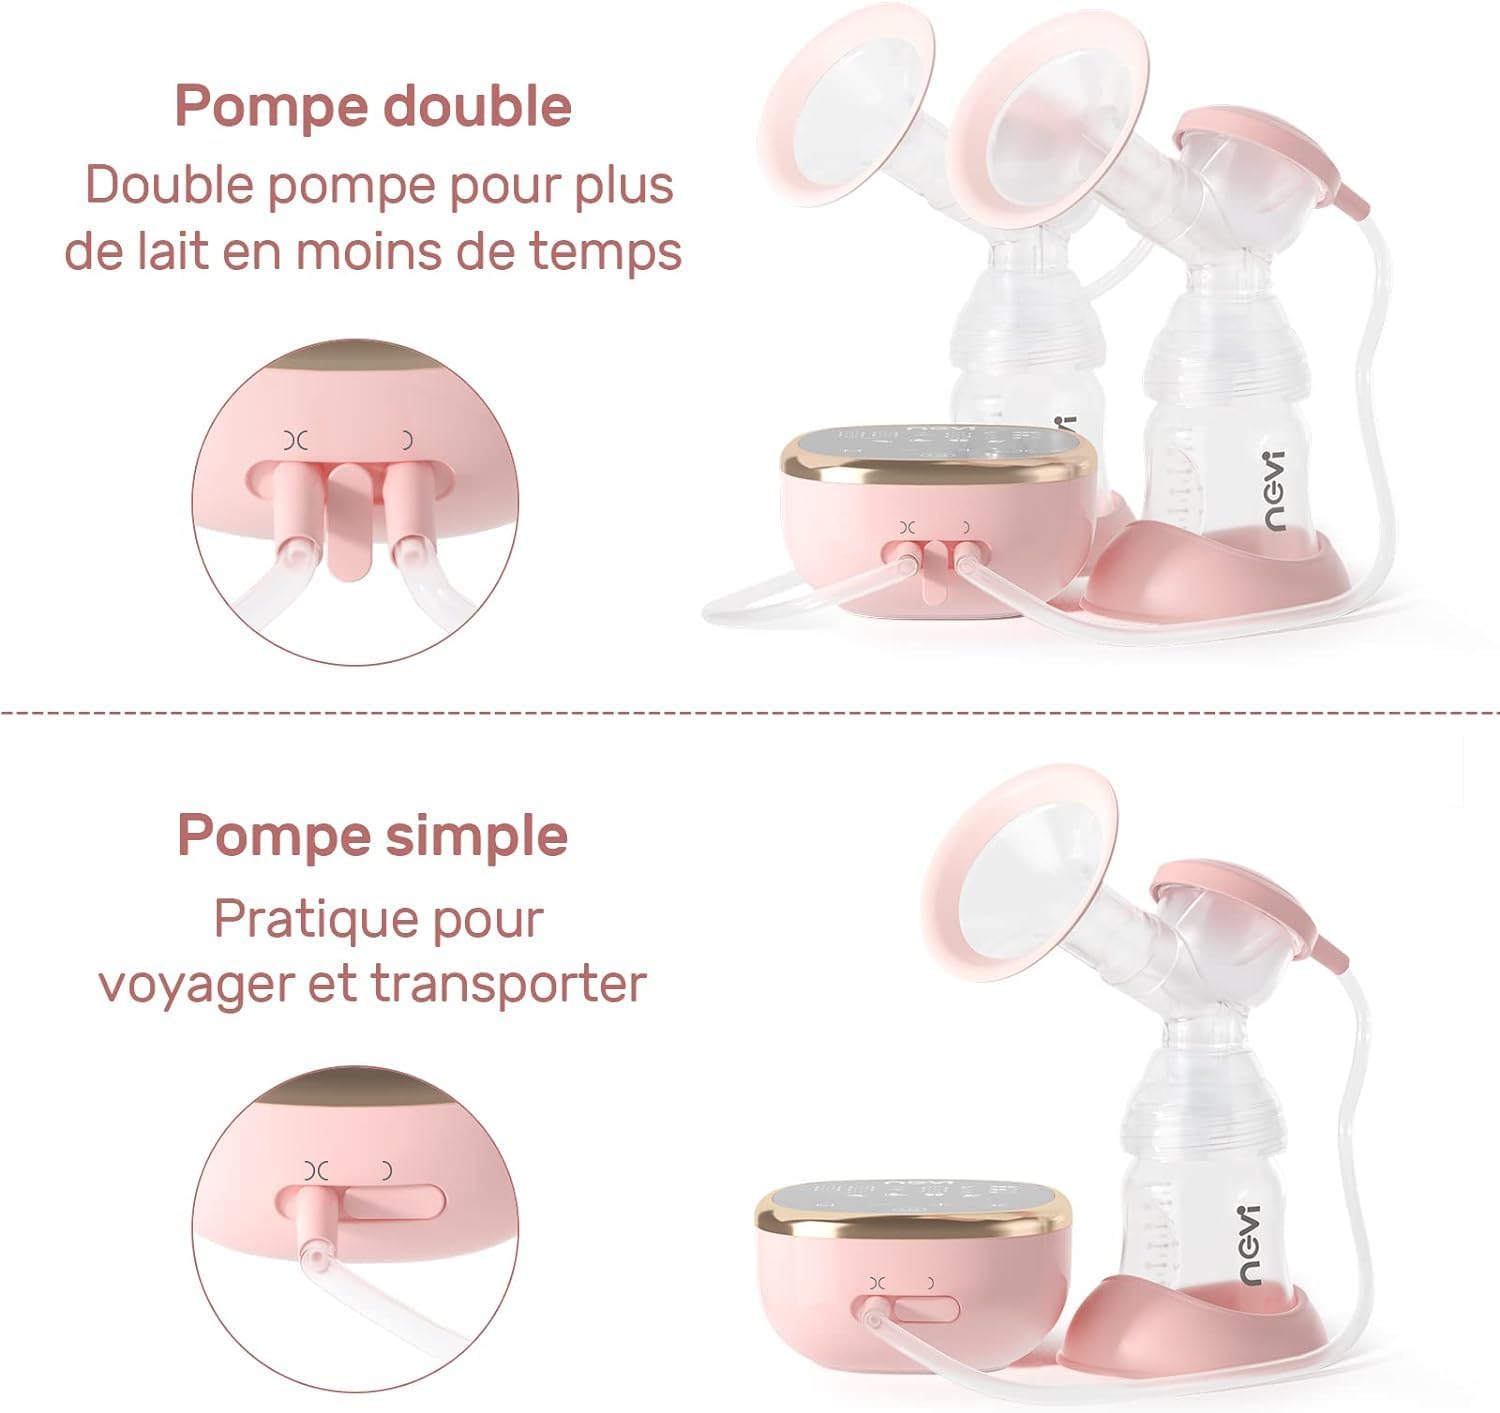
Image: Illustration comparing the setup for double pumping (using both breast shields) and single pumping (using one breast shield).
4. Flange Sizing
Choosing the correct breast shield (flange) size is crucial for comfort and effective milk expression. The pump includes four sizes: 21mm, 24mm, 28mm, and 32mm. Measure your nipple diameter at the base to select the appropriate size. The nipple should move freely within the tunnel without excessive friction or compression.

Image: Guide for selecting the correct flange size based on nipple diameter, with visual examples of proper fit and common misfits.
5. Quiet Operation
The NCVI breast pump is designed for quiet operation, producing approximately 40 dB of noise. This low noise level allows for discreet pumping sessions without disturbing your baby or others.

Image: Demonstrates the quiet operation of the pump, showing a sleeping baby undisturbed by the 40 dB noise level.
Maintenance
1. Cleaning
Proper cleaning of your breast pump components is essential for hygiene and longevity. All parts that come into contact with breast milk are made of food-grade silicone and PP material and are BPA-free.
- Immediately After Each Use: Disassemble all parts that came into contact with milk. Rinse them under cold running water to remove milk residue.
- Washing: Wash these parts in warm, soapy water using a dedicated brush. Rinse thoroughly with clean water.
- Sterilization: Sterilize components by boiling them in water for 5 minutes or using a steam sterilizer. Ensure parts do not touch the bottom or sides of the pot to prevent damage.
- Dishwasher Safe: All removable parts, except for the electrical components (main pump unit and air tubes), can be placed on the top rack of a dishwasher for cleaning.
- Drying: Air dry all parts on a clean paper towel or drying rack. Do not use cloth towels as they may leave lint. Ensure all parts are completely dry before reassembly or storage to prevent mold growth.
- Main Unit: Wipe the main pump unit with a clean, damp cloth. Do not submerge the main unit in water or other liquids.
2. Storage
Store the clean and dry breast pump components in a clean, dry place away from direct sunlight and extreme temperatures. Keep the main unit protected from dust and moisture.
Troubleshooting
If you encounter issues with your NCVI Double Electric Breast Pump, please refer to the following common troubleshooting tips:
| Problem | Possible Cause | Solution |
|---|---|---|
| No suction or weak suction |
|
|
| Pump not turning on |
|
|
| Milk leaking from components |
|
|
| Discomfort during pumping |
|
|
Specifications
| Feature | Detail |
|---|---|
| Model Number | NCVI-8782 |
| Battery Capacity | 2200mAh Lithium |
| Material Composition | PP, Silicone (BPA-Free) |
| Modes | 4 (Massage, Multitronic Suction, Suction Stimulation, Express Pumping) |
| Suction Levels | 9 levels per mode |
| Noise Level | Approximately 40 dB |
| Bottle Capacity | 180 Milliliters |
| Product Dimensions (L x W x H) | 11 x 12 x 10 cm |
| Item Weight | 1.2 Kilograms |
| Dishwasher Safe Parts | Yes (excluding electrical components and air tubes) |
| UPC | 780744556864 |
Warranty and Support
For information regarding product warranty, please refer to the warranty card included with your purchase or contact the seller directly. For technical support or further assistance, please reach out to the manufacturer or the point of purchase.


