
Introduction and Overview
The Emeril Lagasse Pasta & Beyond is a versatile 4-in-1 electric appliance designed to simplify your kitchen tasks. It functions as an automatic pasta and noodle maker, a slow juicer, a healthy frozen dessert maker, and a grinder. This fully automatic machine handles mixing, kneading, and extruding, allowing you to create fresh, homemade pasta and noodles in minutes. It supports various ingredients, including vegetable juices, eggs, flours, spices, and herbs, enabling you to prepare healthy, colorful, and gluten-free options tailored to your dietary preferences.
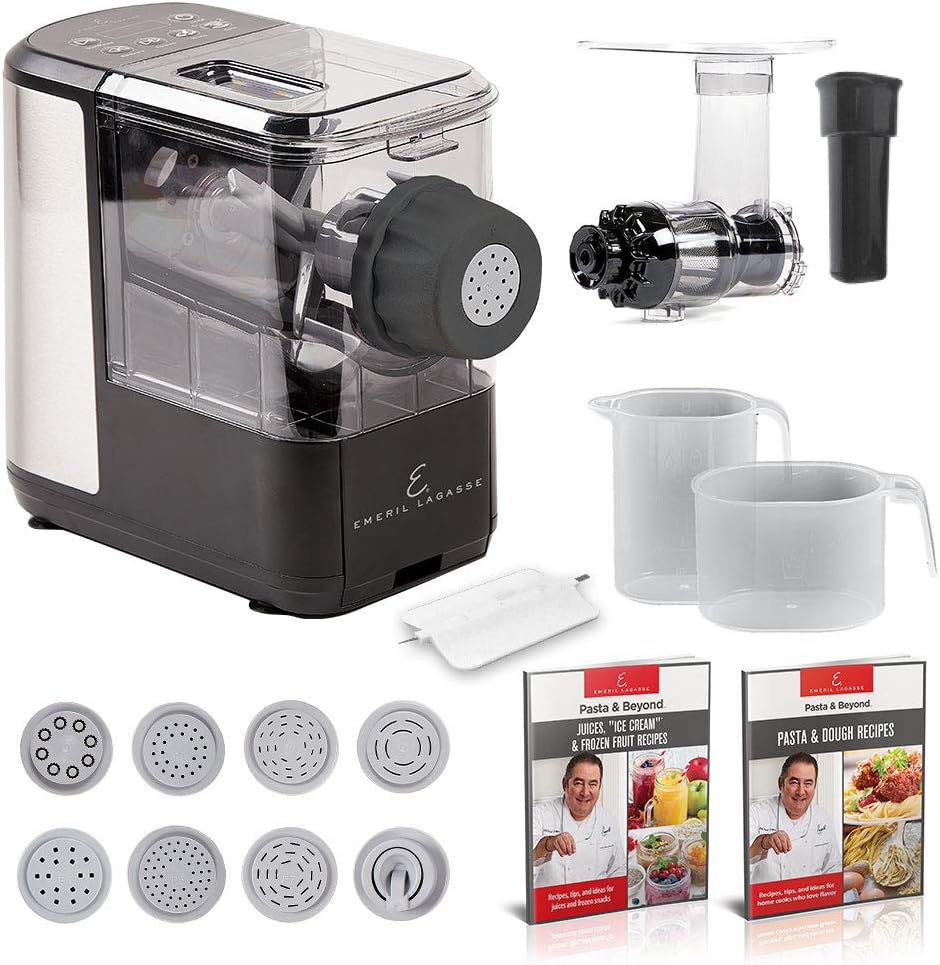
Figure 1: The Emeril Lagasse Pasta & Beyond machine shown with its complete set of accessories, including pasta discs, measuring cups, and juicer attachment.
Components and Accessories
Your Emeril Lagasse Pasta & Beyond machine comes with the following components and accessories:
- Main Pasta Maker Unit
- 8 Pasta Shaping Discs: Includes Penne, Spaghetti, Linguine, Tagliatelle, Udon, Angel Hair, Fettuccine, and Lasagna. These discs are stored in a built-in drawer for convenience.
- Pasta / Noodle Cutter
- 1 Dry Measuring Cup
- 1 Liquid Measuring Cup
- Spatula / Cleaning Tool
- Cleaning Brush
- Slow Juicer / Healthy Frozen Dessert Maker Attachment
- Cookbook with Emeril’s Easy Homemade Pasta Recipes
- Cookbook with Emeril’s Easy Juicing and Frozen Dessert Recipes

Figure 2: Illustration of the eight distinct pasta shaping discs included with the machine, allowing for a variety of pasta types.
Setup
Before first use, ensure all removable parts are thoroughly cleaned with warm, soapy water and dried completely. Refer to the "Maintenance and Cleaning" section for detailed cleaning instructions.
- Place the main unit on a stable, flat, and dry surface.
- Assemble the mixing chamber and attach the desired pasta shaping disc. Ensure it is securely locked into place.
- Connect the power cord to the machine and then plug it into a standard 120V - 60Hz electrical outlet.
- Ensure the lid of the mixing chamber is properly closed and secured before operation.
Operating Instructions: Automatic Pasta Making
The machine automates the pasta-making process. Follow these steps for optimal results:
- Prepare Ingredients: Use the provided dry measuring cup for flour and the liquid measuring cup for liquids (water, eggs, oil). Refer to the included recipe book for precise measurements. For example, for a 16 oz (8 servings) batch of basic pasta, you would typically use 2 full containers of all-purpose flour, 1 tsp salt, 2 large beaten eggs, 1 tbsp olive oil, and water to fill the liquid measuring cup to the 150-mL line.
- Add Dry Ingredients: Add the measured flour and salt into the mixing chamber.
- Select Batch Size: Turn on the machine. Press the "Batch" button once for a single batch (8 oz) or twice for a double batch (16 oz). The machine will begin mixing the dry ingredients.
- Add Liquid Ingredients: Slowly pour the liquid mixture (eggs, olive oil, water) into the mixing chamber through the designated slot in the lid while the machine is mixing. The machine will continue to mix until the dough reaches a crumbly, cookie-crumb-like consistency.
- Extrusion: Once the dough reaches the correct consistency, the machine will automatically reverse direction and begin extruding the pasta.
- Cut Pasta: As the pasta extrudes, use the provided pasta/noodle cutter or a knife to cut the pasta to your desired length.
- Cook Pasta: Freshly made pasta cooks much faster than dried pasta. Typically, it takes only 2-3 minutes to cook in boiling, salted water.

Figure 3: A sample recipe page from the included "Pasta & Dough Recipes" cookbook, detailing ingredients and directions for basic pasta.

Figure 4: The machine actively extruding fresh spaghetti, demonstrating the automatic process.
Operating Instructions: Juicing and Frozen Desserts
To use the juicer or frozen dessert maker function, replace the pasta making assembly with the slow juicer attachment. Refer to the dedicated "Juices, Ice Cream & Frozen Fruit Recipes" cookbook for specific instructions and recipes.

Figure 5: The machine configured with the slow juicer attachment, processing ingredients to create fresh juice.
Maintenance and Cleaning
Proper cleaning ensures the longevity and performance of your appliance. Most removable parts are dishwasher safe for convenience.
- Disassembly: Unplug the machine from the power outlet. Carefully disassemble all removable parts, including the mixing chamber, pasta discs, juicer attachment, and measuring cups.
- Initial Cleaning: For pasta-making components, allow any residual dough to dry slightly on the discs and inside the chamber. This makes it easier to remove. Use the provided spatula/cleaning tool and cleaning brush to scrape off dried dough.
- Washing: Wash all removable parts with warm, soapy water. For stubborn residue, especially in the intricate designs of the pasta discs, use the cleaning brush to ensure thorough cleaning. All removable parts are dishwasher safe (top rack recommended).
- Main Unit: Wipe the main unit with a damp cloth. Do not immerse the main unit in water or any other liquid.
- Drying and Storage: Ensure all parts are completely dry before reassembling or storing the machine. Store pasta discs in the built-in storage drawer.
Troubleshooting
If you encounter issues during operation, consider the following common solutions:
- Dough is too dry/crumbly: If the dough resembles fine flour or is too crumbly to form a cohesive mass, add water one teaspoon at a time while the machine is mixing until the desired cookie-crumb consistency is achieved.
- Dough is too wet/sticky: If the dough is too sticky or forms a single large lump, add flour one teaspoon at a time while the machine is mixing until the desired consistency is achieved.
- Pasta not extruding: Ensure the mixing chamber lid is securely closed and the pasta disc is correctly installed. Check that the dough consistency is correct (not too wet or too dry). The machine will only begin extrusion once the dough is properly mixed.
- Machine not turning on: Verify that the power cord is securely plugged into both the machine and a working electrical outlet. Ensure the mixing chamber and lid are correctly assembled and locked into place, as safety features prevent operation if not properly secured.
Specifications
| Feature | Detail |
|---|---|
| Brand | Emeril Everyday |
| Model Number | PM-01 |
| Color | Black |
| Material | Plastic, Stainless Steel (Blade) |
| Product Dimensions (L x W x H) | 13.9" x 6.2" x 10.9" |
| Item Weight | 20.1 pounds |
| Power Supply | 120V - 60Hz |
| Rated Power | 150W |
| Operation Mode | Automatic |
| Number of Discs | 8 |
| Dishwasher Safe Parts | Yes (removable parts) |
| UPC | 752356835927 |
Warranty and Support
For detailed warranty information, please refer to the official user manual provided with your product or visit the Emeril Everyday website. If you require technical assistance, replacement parts, or have questions regarding your appliance, please contact Emeril Everyday customer support.
An electronic version of the user manual is available for download: User Manual (PDF)