1. Introduction
Thank you for choosing the XTUGA AM6 4/6-Channel Audio Mixer. This professional mixing console is designed for a variety of audio applications, including home music production, live webcasting, and karaoke (K-song). It features Bluetooth connectivity, USB recording capabilities, 48V phantom power for condenser microphones, and integrated effects. Please read this manual thoroughly to understand the mixer's functions and ensure optimal performance.
2. Package Contents
Please check the package for the following items:
- 1 x XTUGA AM6 Audio Mixer
- 1 x USB Cable
- 1 x Power Adapter/Charger
- 1 x User Manual
3. Product Features
The XTUGA AM6 mixer offers a range of features to enhance your audio experience:
- 4-Channel/6-Channel Mixing Console: Features two mono channels and one stereo tape channel.
- USB Recording & Playback: Direct recording to USB or computer, and playback of MP3, FLAC, etc.
- Bluetooth Connectivity: Wireless connection for mobile devices within 4-8 meters (without obstruction).
- 48V Phantom Power: Integrated phantom power for condenser microphones.
- Built-in Effects Processor: Includes Delay and Repeat effects.
- Sound Card Function: Acts as an external sound card when connected to a computer via USB.
- Low Noise Design: Ensures clear audio on all microphone inputs.
- Adjustable Controls: Gain, 2-band EQ (high/low), signal level, main output, headphone volume, and effect parameters.
- Dedicated Headphone Output: With independent volume control for monitoring.
- Multiple Input Options: Supports 6.5mm phone type and RCA type connectors for line-level instruments.
- Compact and Portable: Can be powered directly via PC USB, mobile power bank, or AC/DC adapter.
4. Setup
4.1 Power Connection
Connect the provided power adapter to the mixer's power input and then to a suitable power outlet. Alternatively, the mixer can be powered via a USB connection to a computer or a mobile power bank.
4.2 Input Connections
Connect your audio sources to the appropriate input channels:
- Microphones: Use XLR (card head) or 6.5mm jack connectors for microphone inputs. For condenser microphones requiring phantom power, ensure the 48V phantom power is activated (see Section 5.2).
- Line-Level Instruments: Use 6.5mm phone type or RCA type connectors for instruments like electronic keyboards or other audio equipment.

4.3 Output Connections
- Main Output: Connect the main output (L/R) to your amplifier, powered speakers, or recording interface.
- Headphone Output: Connect your headphones to the dedicated headphone jack for monitoring. Adjust the headphone volume using its dedicated control.
5. Operating Instructions
5.1 Basic Audio Mixing
Each input channel features controls for gain, high/low EQ, and signal level. Adjust these to achieve the desired sound for each input. Use the main output level control to set the overall volume.
5.2 48V Phantom Power
To use condenser microphones, activate the 48V phantom power. Locate the 48V switch on the mixer and press it. Ensure condenser microphones are connected before activating phantom power to prevent damage to other equipment.

5.3 Bluetooth Connection
To connect a mobile device via Bluetooth:
- Ensure the mixer is powered on.
- Switch the MP3 function to BT (Bluetooth) mode. The display will indicate Bluetooth pairing mode.
- On your mobile device, search for available Bluetooth devices and select "XTUGA AM6" (or similar name).
- Once connected, you can stream audio wirelessly from your device to the mixer.

5.4 USB Recording and Playback
5.4.1 Recording to Computer
The mixer can function as a sound card for your computer:
- Connect the mixer to your computer using the provided USB cable.
- Switch the mixer's MP3 function to PC mode. The display will show "PC".
- On your computer, select the mixer as the audio input/output device in your recording software (e.g., GoldWave).
- You can now record audio from the mixer to your computer and play background music from your computer through the mixer.


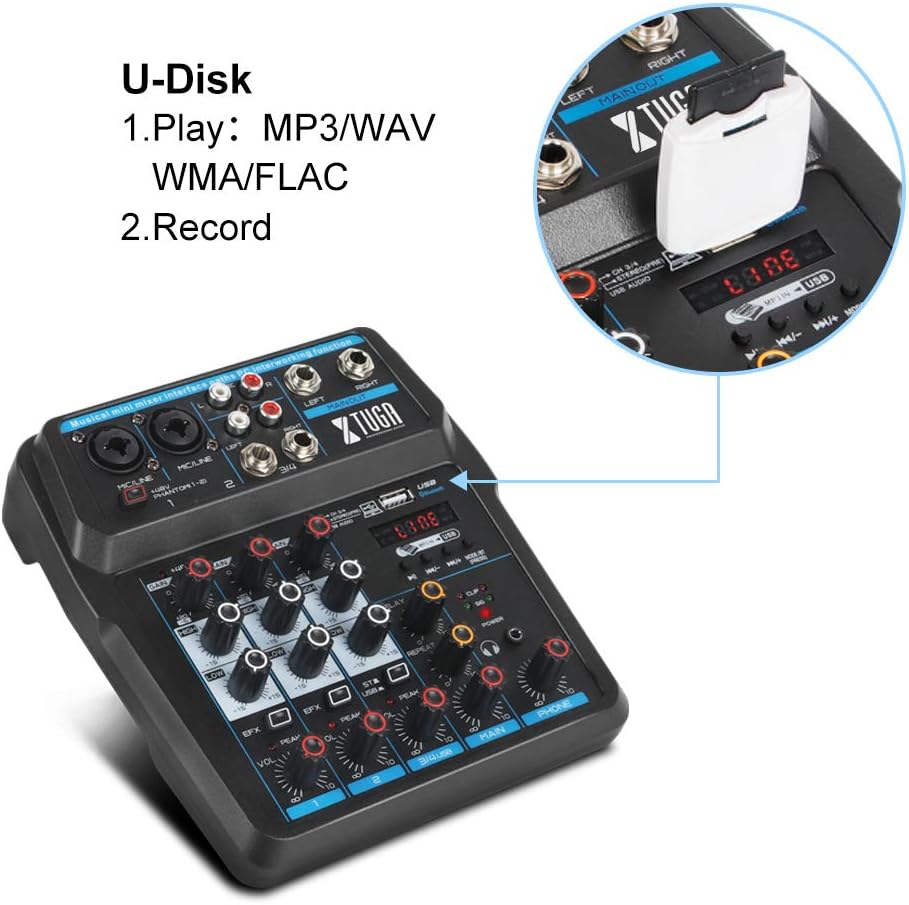
5.4.2 U-Disk (USB Drive) Playback and Recording
Insert a USB flash drive into the USB port on the mixer:
- Playback: The mixer can play MP3, WAV, WMA, FLAC, and other audio formats directly from the U-Disk. Use the MP3 function keys to control playback.
- Recording: You can also record directly to the U-Disk. Refer to the mixer's display and controls for recording functions.
5.5 Effects Processor
The mixer includes built-in Delay and Repeat effects. Use the dedicated controls to adjust the effect parameters, such as echo repeat frequency and time interval, to achieve your desired sound.
6. Maintenance
To ensure the longevity and optimal performance of your XTUGA AM6 mixer:
- Cleaning: Use a soft, dry cloth to clean the surface of the mixer. Avoid using liquid cleaners or solvents.
- Storage: Store the mixer in a cool, dry place away from direct sunlight, extreme temperatures, and high humidity.
- Handling: Handle the mixer with care. Avoid dropping it or subjecting it to strong impacts.
- Ventilation: Ensure proper ventilation around the mixer to prevent overheating.
7. Troubleshooting
If you encounter issues with your XTUGA AM6 mixer, refer to the following common problems and solutions:
- No Power: Ensure the power adapter is securely connected and the power outlet is functional. Try a different USB power source if using USB power.
- No Sound Output: Check all cable connections (inputs, main output, headphones). Verify that gain controls, channel levels, and the main output level are turned up. Ensure the correct input source is selected (e.g., LINE, BT, PC, USB).
- Microphone Not Working: For condenser microphones, ensure 48V phantom power is activated. Check microphone cable connections. Verify microphone gain and channel level.
- Bluetooth Connection Issues: Ensure the mixer is in BT mode and discoverable. Turn off and on Bluetooth on your mobile device. Ensure no other devices are connected to the mixer via Bluetooth.
- USB Recording/Playback Problems: Ensure the mixer is in PC or USB mode as appropriate. Check USB cable connection to the computer or U-Disk insertion. Verify computer audio settings if recording to PC.
- Distorted Sound: Reduce input gain or channel levels to prevent clipping (indicated by peak LEDs). Check cable quality.
If the problem persists, please contact XTUGA customer support for further assistance.
8. Specifications
| Feature | Specification |
|---|---|
| Brand | XTUGA |
| Model | AM4 |
| Number of Channels | 4 (also described as 4/6-channel) |
| Connectivity Technology | Auxiliary, Bluetooth, USB |
| Power Source | Corded Electric |
| Voltage | 48 Volts (for Phantom Power) |
| Manufacturer Part Number | AM |
| UPC | 784124158778 |
9. Warranty and Support
XTUGA products are designed for reliability and performance. For warranty information, technical support, or service inquiries, please refer to the warranty card included with your product or visit the official XTUGA website. Keep your purchase receipt as proof of purchase for any warranty claims.


