1. Important Safety Information
Please read all instructions carefully before using the Better Angel Electronic Acupuncture Pen Massager Machine. Retain this manual for future reference.
- Consult a healthcare professional before use if you have any pre-existing medical conditions, are pregnant, or have a pacemaker.
- Do not use this device if you have metal implants in your body.
- Do not use on broken skin, open wounds, or areas with skin conditions.
- Keep out of reach of children.
- Do not immerse the device in water or other liquids.
- Use only as directed in this manual.
Legal Disclaimer: Statements regarding dietary supplements have not been evaluated by the FDA and are not intended to diagnose, treat, cure, or prevent any disease or health condition. This device is not intended to replace professional medical advice or treatment.
2. Product Overview
The Better Angel Electronic Acupuncture Pen is designed to provide targeted massage and acupoint stimulation. It features adjustable intensity and sensitivity settings, along with various massage heads for different applications.

2.1 Key Features
- Acupoint detection for precise targeting.
- Adjustable intensity and sensitivity levels (1-10).
- Multiple interchangeable massage heads for varied applications.
- Rechargeable lithium battery for convenience.
- Digital display for feedback.

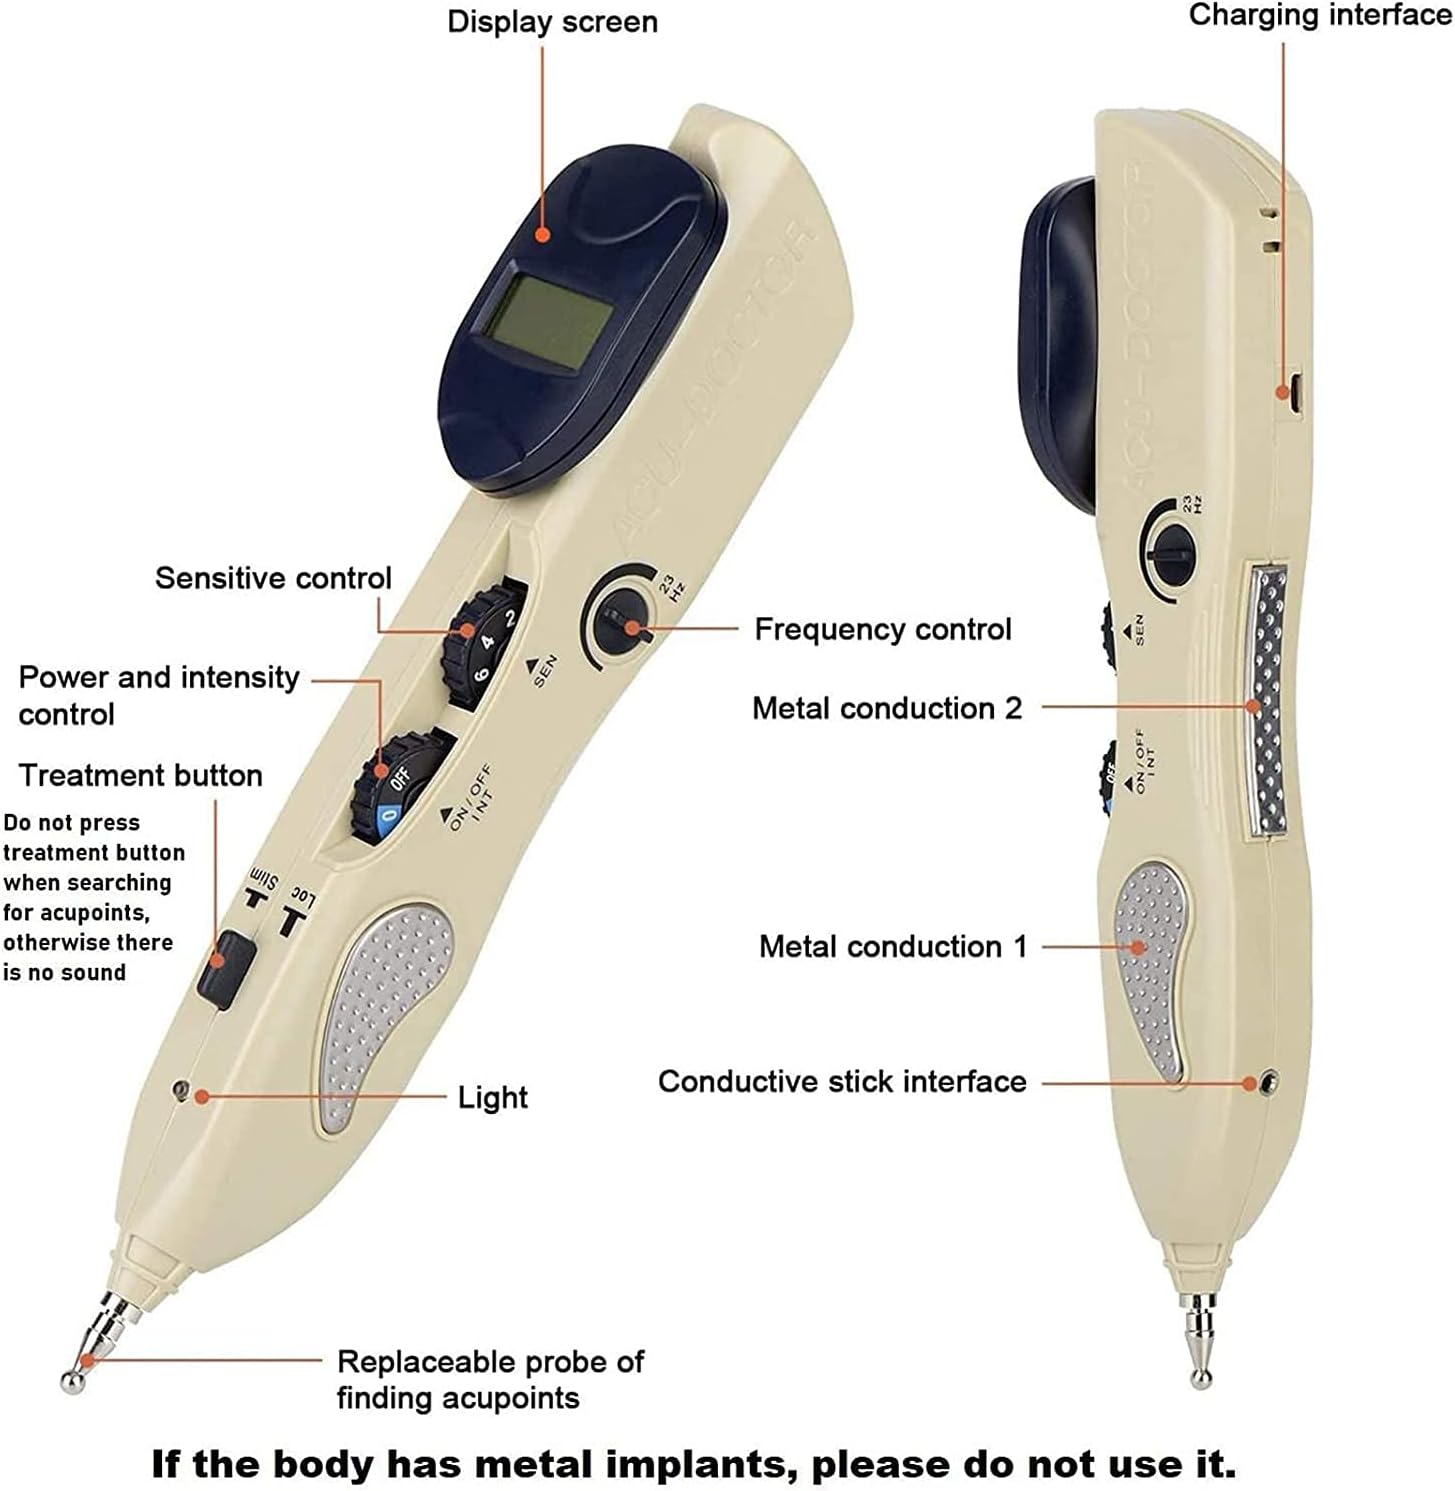
3. Components and Controls
Familiarize yourself with the different parts of your acupuncture pen:
- Display Screen: Shows numerical values for acupoint detection and intensity.
- Charging Interface: For connecting the charging cable.
- Sensitive Control (SEN): Adjusts the sensitivity for acupoint detection.
- Power and Intensity Control (ON/OFF INT): Turns the device on/off and adjusts the stimulation intensity.
- Frequency Control (Hz): Adjusts the pulse frequency.
- Treatment Button: Activates the pulse when an acupoint is found.
- Light: Indicator light.
- Metal Conduction Points: Areas for user contact to complete the circuit.
- Replaceable Probe: The tip for finding acupoints and applying stimulation.
3.1 Massage Heads
The device comes with three interchangeable massage heads:
- Dome Type Massage Head: Primarily used for facial massage.
- 5mm Ball Massage Head: Generally used for body massage.
- 3mm Ball Massage Head: Suitable for smaller areas of the body.
4. Setup
4.1 Charging the Device
- Locate the charging interface on the device.
- Connect the provided charging cable to the device and a suitable power source.
- Allow the device to charge fully before first use. The digital display may indicate charging status.
4.2 Attaching Massage Heads
- Select the desired massage head (Dome, 5mm Ball, or 3mm Ball).
- Gently screw the chosen head onto the replaceable probe at the tip of the pen until secure.
5. Operating Instructions
5.1 General Usage Steps
- Adjust Settings: Before beginning, adjust the intensity (ON/OFF INT), sensitivity (SEN), and frequency (Hz) to a low setting. Gradually increase as needed for comfort.
- Proper Grip: Hold the pen with your thumb in contact with the metal patch on the side of the pen. This completes the electrical circuit.
- Acupoint Search: Slide the acupuncture pen along the skin. When an acupoint is detected, the warning light will flash, and a beeping sound will occur. The digital display will show a higher value, indicating closer proximity to an acupoint.
- Apply Massage: Once an acupoint is located, press the pen tip onto the point and press the treatment button to initiate the pulse massage.

5.2 Acupoint Detection
The device utilizes meridian low resistance characteristics to locate acupoints. The digital display provides a numerical value; a larger value indicates closer proximity to an acupoint.

5.3 Intensity and Sensitivity Adjustment
The intensity and sensitivity can be adjusted from 1 to 10 levels. Start with lower settings and gradually increase to a comfortable level. Personal preferences and the area of application may require different settings.
5.4 Product Demonstration Video
6. Maintenance and Care
- Cleaning: Wipe the device and massage heads with a soft, damp cloth after each use. Do not use abrasive cleaners or immerse in water.
- Storage: Store the device in a cool, dry place, away from direct sunlight and extreme temperatures.
- Battery: Recharge the device regularly, even if not in frequent use, to maintain battery health.
7. Troubleshooting
| Issue | Possible Cause | Solution |
|---|---|---|
| No pulse felt or weak pulse | Low intensity setting; improper contact; low battery. | Increase intensity; ensure thumb is on metal patch and probe is firmly on skin; recharge device. |
| Device not turning on | Low battery; power switch off. | Recharge device; ensure ON/OFF INT dial is turned to an intensity level. |
| Acupoint detection not working | Low sensitivity setting; dry skin. | Increase sensitivity (SEN dial); apply a small amount of conductive gel or water to the skin. |
8. Specifications
| Feature | Detail |
|---|---|
| Model Number | 1 |
| Product Dimensions | 10.23 x 4.3 x 1.95 inches |
| Weight | 2.25 Pounds |
| Manufacturer | Better Angel |
| Power Source | Rechargeable Lithium Battery |
9. Warranty and Support
For warranty information or technical support, please refer to the product packaging or contact the manufacturer directly. Contact details are typically provided with your purchase documentation.