Pestairs PR-01
Pestairs Heavy Duty Aerial Dog Tie Out Trolley System User Manual
Model: PR-01 | Brand: Pestairs
1. Introduction
Thank you for choosing the Pestairs Heavy Duty Aerial Dog Tie Out Trolley System. This system is designed to provide your dog with a safe and expansive area to roam outdoors, preventing tangles and ensuring their security. This manual provides detailed instructions for proper setup, operation, maintenance, and troubleshooting to ensure optimal performance and safety.
2. Safety Information
Please read and understand all safety warnings before installation and use. Failure to follow these instructions may result in injury to your pet or damage to the product.
- Ensure the system is installed between two secure, stable objects (e.g., strong trees, sturdy fence posts, or a reinforced wall/frame of a house) that can withstand the pulling force of your dog.
- Maintain adequate clearance around the system to prevent your dog from getting tangled in obstacles or other objects.
- Regularly inspect all components for wear, damage, or corrosion. Replace any damaged parts immediately.
- Do not use this system with aggressive dogs or dogs prone to chewing through cables.
- Always supervise your dog, especially during initial use, to ensure they adapt safely to the system.
- Important: Please keep indoors when not in use! This will prolong the life of the product.
3. Package Contents
Verify that all components are present before beginning installation:
- 100 ft Aerial Dog Tie Out Cable (Red, Vinyl Covered)
- 10 ft Dog Run Cable (Red, Vinyl Covered)
- 2 Clamps
- 2 Screw Locking Clasps
- Installation Instructions (this manual)
- Oxford Bag for storage

Image: All components included in the Pestairs Aerial Dog Tie Out Trolley System package.
4. Setup Instructions
Follow these steps for a secure and effective installation:
- Select Stationary Objects: Choose two strong, stationary objects (e.g., mature trees, sturdy fence posts, or a reinforced wall/frame of a house) to secure the main aerial cable. Ensure the distance between them is less than the length of the aerial cable.
- Locate Screw Hooks: Install the screw hooks at the same height on both stationary objects. A recommended minimum height is 6 feet to prevent tangling and allow your dog to walk easily underneath.
- Attach Aerial Cable: Hang one end of the 100 ft aerial cable onto one screw hook using the turnbuckle. Slide the following items onto the other end of the aerial cable in this order: pre-stopper, pulley, pre-stopper, two large clamps.
- Tension the Cable: Extend the aerial cable to the second screw hook and loop it through. Pull the cable tight until there is no slack. Tighten the nuts on the clamps with a wrench to secure the cable. Adjust the turnbuckle by rotating its center until the desired tension is achieved, ensuring the cable is taut but not over-stressed. Note: It is important that you do not allow the cable to be twisted as you tighten the turnbuckle.
- Connect Dog Run Cable: Snap the 10 ft dog run cable (with its shock-absorbing spring) onto the pulley. The other end of the run cable attaches to your dog's collar or harness.

Image: Installation diagram for the Aerial Dog Tie Out Trolley System.
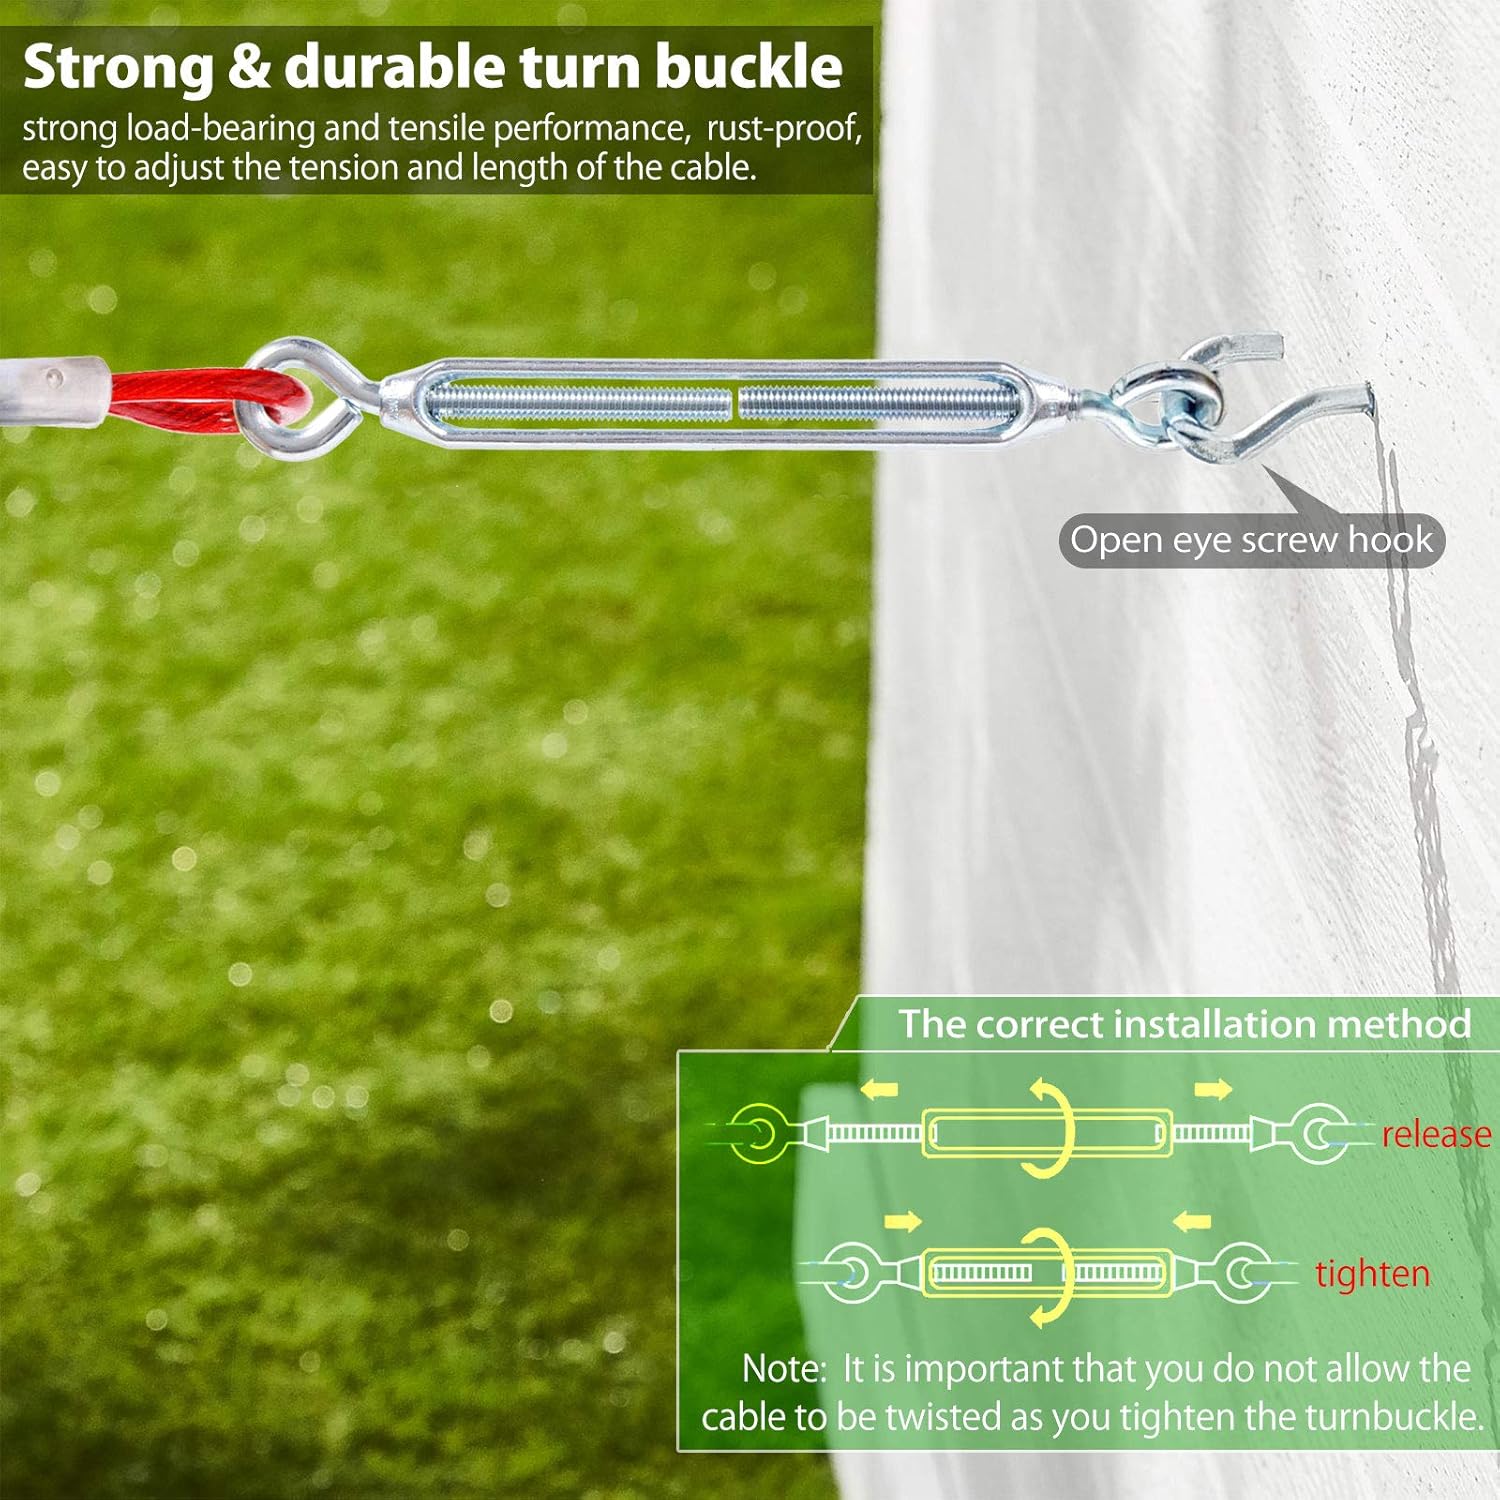
Image: Detail of the turnbuckle for adjusting cable tension.
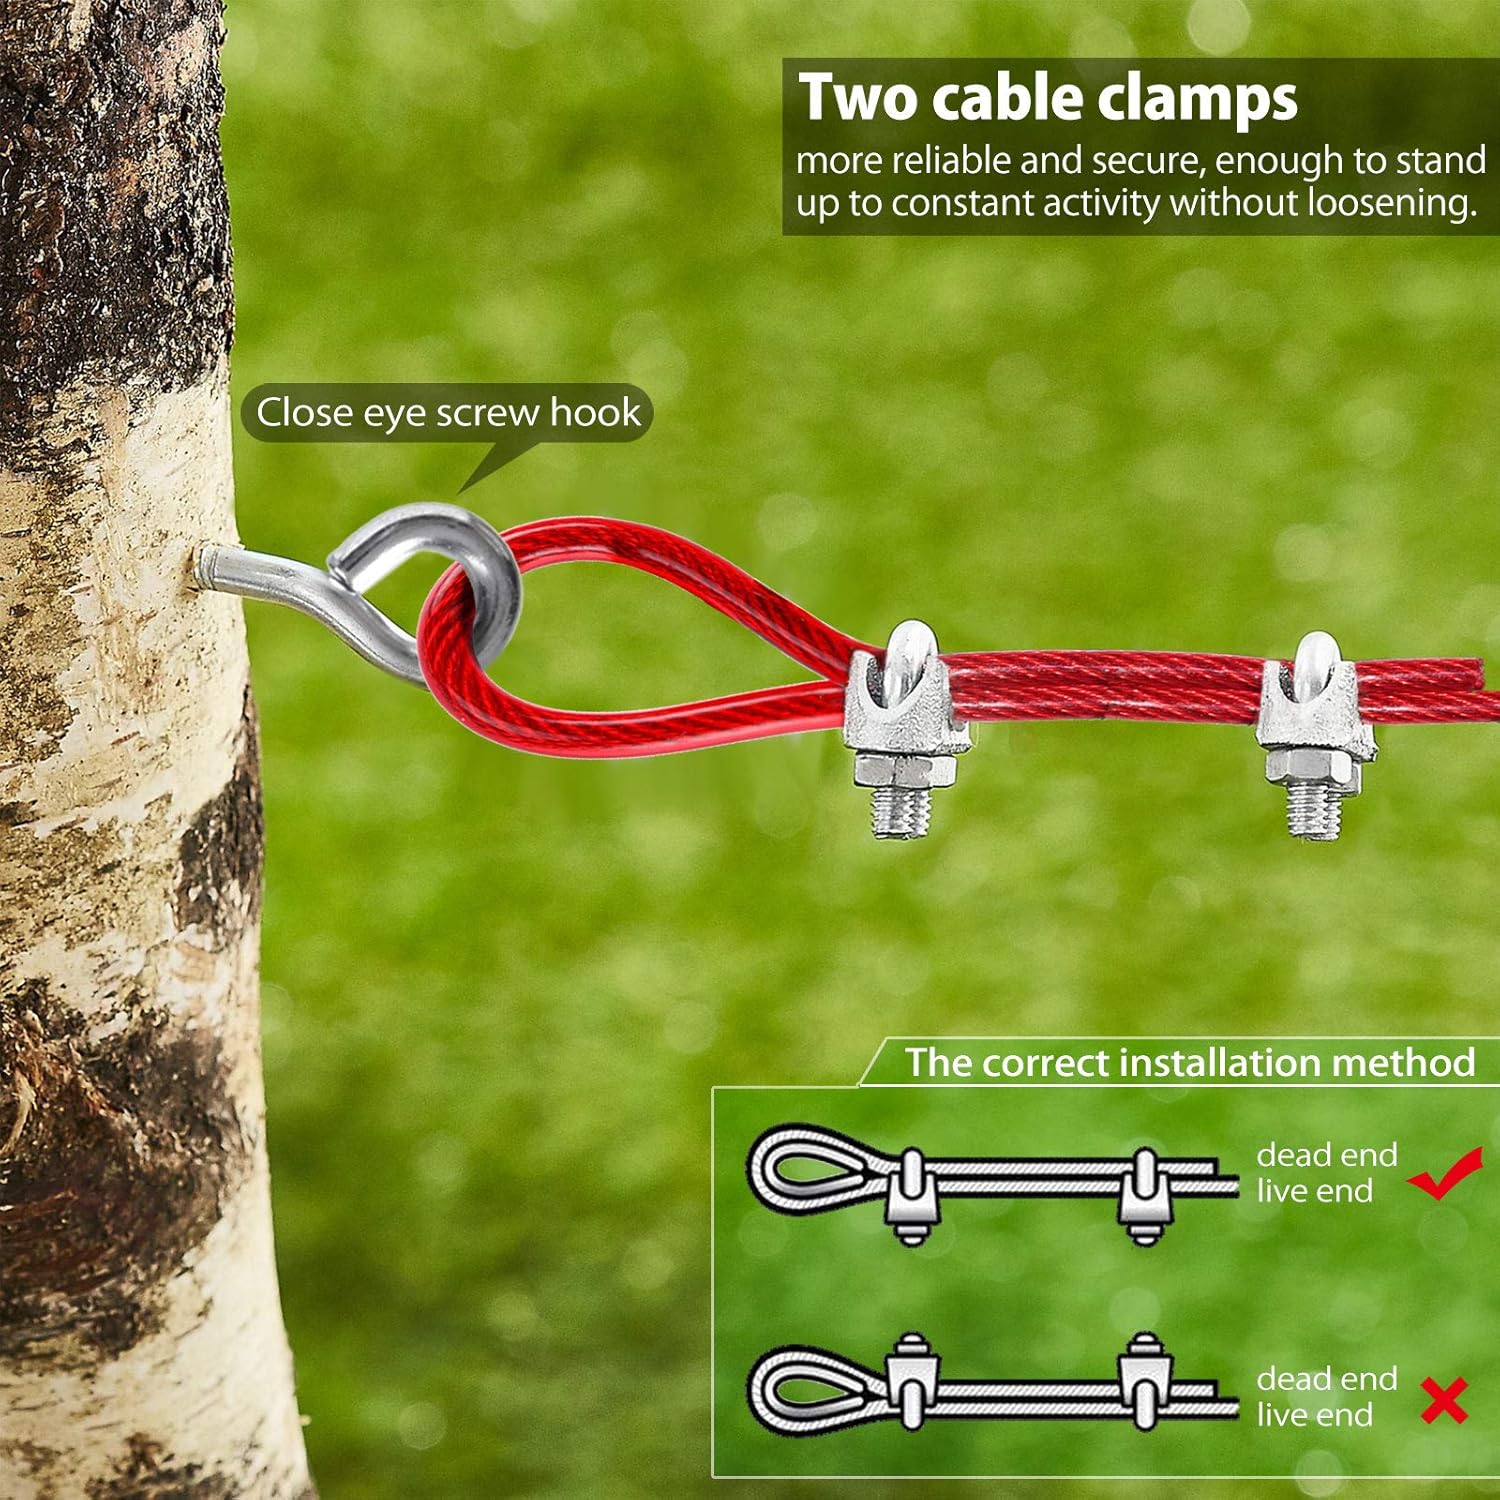
Image: Proper use of cable clamps for secure attachment.
5. Operating Instructions
Once installed, the Pestairs Aerial Dog Tie Out Trolley System allows your dog freedom of movement within the defined area.
- Attaching Your Dog: Securely clip the screw locking clasp at the end of the 10 ft dog run cable to your dog's collar or harness.
- Movement: The pulley system allows the dog run cable to slide smoothly along the 100 ft aerial cable, providing a large play area (approximately 2000 square feet).
- Shock Absorption: The integrated shock-absorbing spring acts as an elastic buffer, reducing sudden jerks and protecting your dog from injury if they reach the end of the run quickly.
- Tangle-Free Design: The 360° tangle-free swivel snap on the dog run cable prevents tangling, allowing your dog to move freely without getting caught. The elevated aerial cable also helps avoid ground obstacles.

Image: Dog enjoying freedom with the Aerial Dog Tie Out Trolley System.

Image: Detail of the pulley and shock-absorbing spring.

Image: The 360-degree tangle-free swivel snap ensures smooth movement.
6. Maintenance
Proper maintenance will extend the life of your Pestairs Aerial Dog Tie Out Trolley System:
- Regular Inspection: Periodically check the entire system, including cables, clamps, turnbuckle, pulley, and spring, for any signs of wear, fraying, rust, or damage.
- Cleanliness: Wipe down vinyl-covered cables and metal components as needed to remove dirt and debris.
- Storage: When not in use, especially during harsh weather conditions (heavy rain, snow, extreme sun), it is recommended to disassemble and store the system indoors in its oxford bag to prevent rust and prolong its lifespan.
- Tension Adjustment: Over time, the aerial cable may sag due to use or environmental factors. Re-tension the cable using the turnbuckle as necessary to maintain optimal height and performance.
7. Troubleshooting
Here are solutions to common issues you might encounter:
| Problem | Possible Cause | Solution |
|---|---|---|
| Cable sagging | Natural stretching over time; insufficient initial tension. | Tighten the turnbuckle to increase tension. Ensure the cable is not twisted. You may need to adjust the height of the attachment points. |
| Dog getting tangled | Obstacles in the dog's path; dog not accustomed to the system. | Clear the area of any potential tangling hazards. Ensure the aerial cable is installed at a sufficient height. Supervise your dog until they are comfortable with the system. |
| Components showing rust/wear | Prolonged exposure to elements; lack of maintenance. | Regularly inspect and clean components. Store the system indoors when not in use, especially in harsh weather. Replace severely corroded or worn parts. |
| Dog run cable snap not working smoothly | Dirt/debris in the swivel mechanism; wear and tear. | Clean the swivel mechanism. Apply a small amount of lubricant if necessary. If severely worn, replace the dog run cable. |
8. Specifications
| Feature | Detail |
|---|---|
| Model Name | Aerial Dog Tie Out Trolley System |
| Model Number | PR-01 |
| Aerial Cable Length | 100 ft |
| Dog Run Cable Length | 10 ft |
| Material | Metal, Vinyl |
| Color | Red |
| Item Weight | 4.44 pounds |
| Recommended Dog Weight | Up to 200 lbs (for this specific variant) |
| Play Area | Approximately 2000 square feet |
9. Warranty and Support
Warranty Description: This product comes with a 6 months warranty from the date of purchase. This warranty covers manufacturing defects and material flaws under normal use conditions.
Customer Support: For any questions, concerns, or assistance with your Pestairs Aerial Dog Tie Out Trolley System, please refer to the contact information provided on the product packaging or visit the official Pestairs website. Our customer service team is available to help you with installation, troubleshooting, or warranty claims.
We are committed to providing high-quality, durable, and innovative pet products that promote the well-being and happiness of your dogs.
Related Documents - PR-01
 |
Sealey CX104 2-Level Extra Heavy-Duty Trolley with Lockable Top - Instructions User manual and safety instructions for the Sealey CX104 2-Level Extra Heavy-Duty Trolley with lockable top. Includes assembly guide, parts list, and operational safety guidelines. |
 |
Sealey CX104 2-Level Extra Heavy-Duty Trolley with Lockable Top - Instructions and Assembly Official instructions and assembly guide for the Sealey CX104 2-Level Extra Heavy-Duty Trolley with Lockable Top. Learn about safety, parts, and setup for this workshop trolley. |
 |
Sealey AP890M/AP890MHV Heavy-Duty Mobile Tool & Parts Trolley User Manual Detailed user manual for the Sealey AP890M and AP890MHV heavy-duty mobile tool and parts trolley. Covers safety, specifications, assembly instructions, and maintenance for this 5-drawer trolley. |
 |
Outshine Gaming Hauler Heavy Duty CPU Trolley Instruction Manual Instruction manual for the Outshine Gaming Hauler Heavy Duty CPU Trolley (Model OGCPB-24), providing assembly, safety, and maintenance guidelines. |
 |
Heavy Duty Cargo Anchor Manual: Installation, Usage, and Safety Guide Detailed product manual for heavy-duty steel cargo anchors. Covers specifications, functions, installation, usage instructions, safety warnings, cleaning, maintenance, and FAQs. Ideal for securing cargo in trucks, trailers, and vans. |
 |
VEVOR 2T-J Manual Trolley - Heavy Duty Beam Trolley for I/H-Beams Detailed instructions and specifications for the VEVOR 2T-J Manual Trolley. Learn about safety, assembly, usage, and maintenance for this heavy-duty beam trolley designed for I/H-beams. |
Ask a question about this manual
Ask about setup, troubleshooting, compatibility, parts, safety, or missing instructions. Manuals+ will review the question and use this page’s manual context to help answer it.