1. Introduction
Thank you for choosing the Moongiantgo XHH-28 Electric Grain Mill Grinder. This high-speed, multifunctional grinder is designed for pulverizing various dry materials, including grains, spices, and herbs, into fine powder. Constructed from high-quality stainless steel, it ensures durability and meets food safety standards. Please read this manual thoroughly before operation to ensure safe and efficient use of your new grinder.

Image 1: The Moongiantgo Electric Grain Mill Grinder, illustrating its capability to grind dried grains, spices, and herbs. It also clearly indicates that it is not suitable for wet, fresh, oily, or sticky materials such as fruit, meat, nuts, sugar, or salt.
Important Note: This grinder is specifically designed for dry materials only. Do not attempt to grind wet, fresh, oily, or sticky substances, as this can damage the machine and void the warranty. Ensure all materials are completely dry before grinding.
2. Safety Instructions
Your safety is paramount. Please adhere to the following safety guidelines:
- Open-Cover-Stop Protection: The grinder is equipped with a safety device. If the lid is opened during operation, the machine will immediately stop to prevent injury. Ensure the lid is securely closed before starting.
- Overload Protection: In case of overload or overheating, the machine may stop functioning. This is a safety feature. Refer to the troubleshooting section for resolution.
- Dry Materials Only: Only grind dry materials. Wet or oily substances are not suitable and can cause damage.
- Recommended Capacity: Do not overfill. The material to be ground should cover the long blade in the middle and not exceed 2/3 of the tank capacity. This allows sufficient space for proper grinding circulation.
- Operating Time: Do not operate continuously for more than 3 minutes. Allow the machine to rest for 5 to 10 minutes after every 3 minutes of operation to prevent overheating and motor damage.
- Electrical Safety: Ensure the power supply matches the grinder's voltage (220V). Do not operate with wet hands or in wet environments.
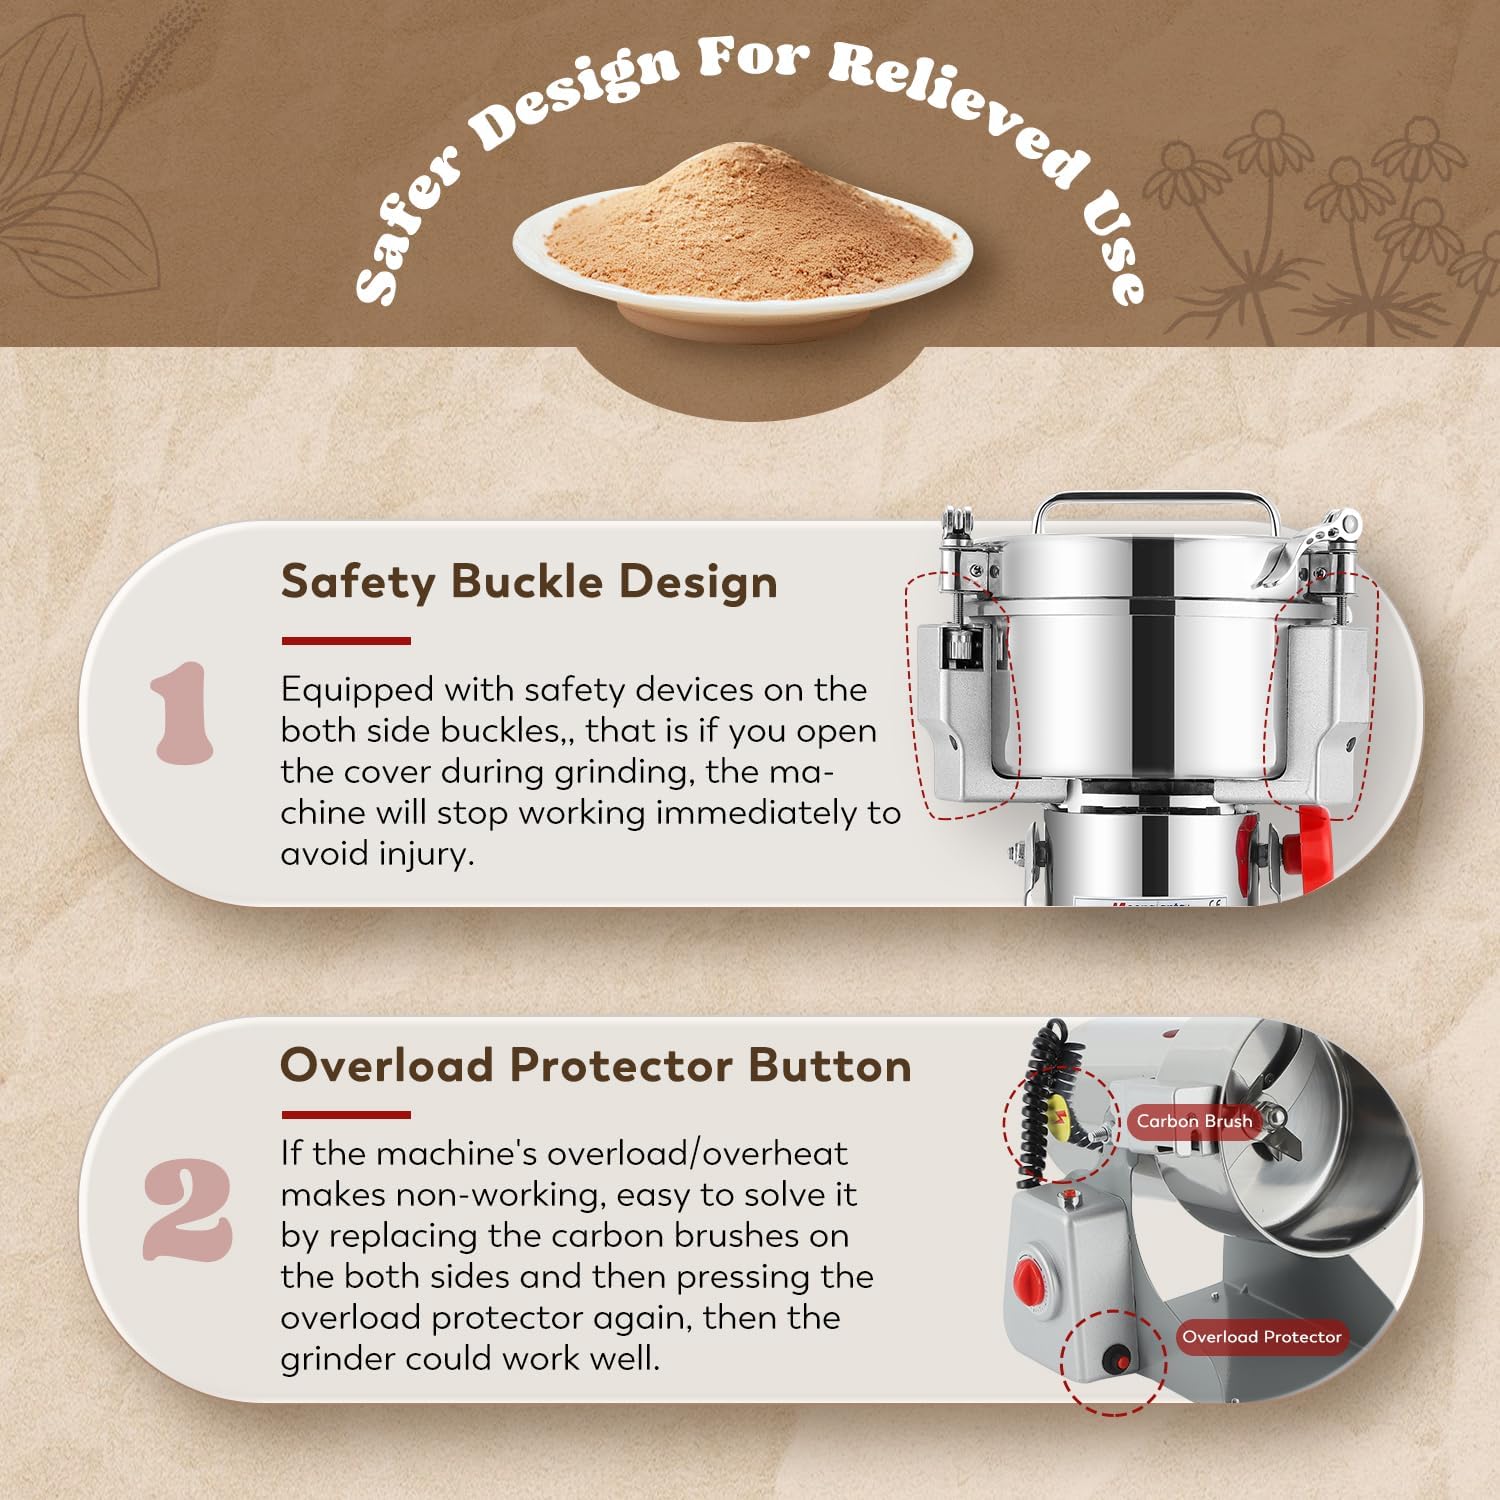
Image 2: Illustration of the safety buckle design, which stops the machine if the cover is opened, and the overload protector button, used for resetting after carbon brush replacement.
3. Product Overview and Components
The Moongiantgo XHH-28 Electric Grain Mill Grinder features a robust stainless steel body and a powerful motor for efficient grinding. Familiarize yourself with its components and included accessories.
Included Accessories:
- 1 x Electric Grain Grinder Unit
- 1 x Set of Spare Blades
- 2 x Carbon Brushes
- 1 x Cleaning Brush
- 1 x Sieve
- 1 x User Manual
- 1 x After-sales Service Card

Image 3: An overview of the Moongiantgo Electric Grain Mill Grinder, detailing its dimensions and listing the various accessories included, such as spare blades, carbon brushes, cleaning brush, and sieve.
4. Setup
Before first use, follow these steps:
- Unpack: Carefully remove all components from the packaging.
- Placement: Place the grinder on a stable, dry, and level surface. Ensure there is adequate ventilation around the unit.
- Initial Cleaning: Wipe the interior of the grinding chamber with a dry cloth to remove any manufacturing residue.
- Lid Check: Ensure the lid is properly aligned and securely closed. The safety mechanism requires the lid to be fully engaged for the grinder to operate.
- Power Connection: Plug the power cord into a suitable 220V electrical outlet.
5. Operating Instructions
Follow these steps for grinding materials:
- Prepare Materials: Ensure your materials are completely dry. Break larger pieces into smaller, manageable sizes if necessary.
- Load Materials: Open the lid and carefully place the dry material into the grinding chamber. Ensure the material covers the long blade and does not exceed 2/3 of the tank capacity.
- Secure Lid: Close the lid firmly. Make sure the safety buckles on both sides are fully engaged. If the lid is not properly closed, the grinder will not start.
- Set Timer: Use the timer switch to set the desired grinding duration (0-5 minutes). For most materials, a short burst of 10-30 seconds is sufficient.
- Start Grinding: Press the power switch to begin grinding.
- Monitor: Observe the grinding process. For optimal results and to prevent overheating, do not grind continuously for more than 3 minutes.
- Rest Period: After each grinding cycle (especially if it lasts close to 3 minutes), allow the machine to rest for 5 to 10 minutes before the next operation.
- Check Fineness: Once the grinding cycle is complete, open the lid and check the fineness of the powder. If a finer powder is desired, you can use the included sieve to separate coarser particles and re-grind them.
- Empty Grinder: Carefully tilt the non-detachable jar and use the cleaning brush to brush out the ground powder.

Image 4: A visual guide demonstrating the different fineness levels achievable for various materials (wheat, corn, hot peppers, cinnamon, dried moringa) after grinding for 10, 20, and 60 seconds.
6. Maintenance and Cleaning
Proper maintenance ensures the longevity and performance of your grinder.
Cleaning:
- Do Not Rinse: The grinding bowl is not removable and cannot be cleaned with water directly. Do not rinse the motor base or the grinding chamber with water.
- Dry Cleaning: Use the provided cleaning brush to remove any residual powder from the grinding chamber.
- Wipe Down: Wipe the interior of the chamber and the exterior of the machine with a dry cloth.
Blade Replacement:
If blades become dull or damaged, they can be replaced:
- Unplug: Always unplug the grinder from the power outlet before performing any maintenance.
- Access Blades: Open the lid.
- Loosen Nut: Use a screwdriver to hold the middle screw in place. Then, use the provided wrench or sleeve to turn the blade's lock nut counter-clockwise to loosen it.
- Replace: Carefully remove the old blades and install the new spare blades, ensuring they are securely fastened by tightening the lock nut clockwise.
Carbon Brush Replacement:
If the overload protector triggers frequently, it may be time to replace the carbon brushes.
- Unplug: Disconnect the grinder from the power supply.
- Locate Brushes: The carbon brushes are typically located on the sides of the motor housing.
- Replace: Unscrew the caps covering the carbon brushes, remove the old brushes, and insert the new ones. Secure the caps.
- Reset: After replacing the carbon brushes, press the overload protector button (usually a small red button) to reset the machine.

Image 5: A visual guide on how to clean the grinder, emphasizing that the motor base should not be rinsed and the jar should not be washed directly with water. It shows the correct method of cleaning by wiping with a dry rag.
7. Troubleshooting
If you encounter issues with your grinder, refer to the following common problems and solutions:
| Problem | Possible Cause | Solution |
|---|---|---|
| Grinder does not start after turning on. | Lid not securely closed; induction switches not triggered. | Adjust the lid to ensure both rods are pushed to the end of the two buckle structures on both sides without any space. |
| Grinder stops during operation. | Lid opened during grinding (safety feature). | Close the lid securely. The machine should resume if the timer is still active. |
| Grinder stops and will not restart (overload). | Overload/overheat protection activated; worn carbon brushes. | Unplug the unit. Replace carbon brushes if necessary (refer to Maintenance). Press the overload protector button to reset. Allow the machine to cool down. |
| Material not grinding finely enough. | Insufficient grinding time; material too coarse initially; overfilling. | Increase grinding time (within limits). Break materials into smaller pieces. Do not overfill the chamber. Use the sieve and re-grind coarser particles. |
| Excessive vibration or noise. | Uneven loading; loose blades; unstable surface. | Ensure material is evenly distributed. Check if blades are securely fastened. Place the grinder on a stable, level surface. |

Image 6: A detailed view explaining why the grinder might not start, highlighting the induction switch and the importance of ensuring the lid's rods are fully engaged with the buckle structures.
8. Specifications
| Feature | Specification |
|---|---|
| Model Number | XHH-28 |
| Voltage | 220 V |
| Power | 3000 W |
| Capacity | 1500 g |
| Grinding Degree | 50-300 mesh |
| Maximum Continuous Working Time | < 3 minutes |
| Recommended Interval Time | 5-10 minutes |
| Rotation Speed | 36000 R/min |
| Timer Configuration | 0-5 minutes |
| Material | Stainless Steel |
| Dimensions (approx.) | Height: 15.2 inches (38.7 cm), Width: 9.5 inches (24 cm), Depth: 7.5 inches (19.1 cm) |
| Weight (approx.) | 8.26 kg |
9. Warranty and Support
Moongiantgo is committed to providing high-quality products and customer satisfaction.
- Warranty: We offer a one-year warranty from the date of purchase. This warranty covers manufacturing defects and malfunctions under normal use. It does not cover damage caused by misuse, accidents, or unauthorized modifications.
- Technical Support: Online technical support is available to all our valued customers. If you have any questions, require assistance with troubleshooting, or need further information, please contact our customer service team.
- Contact Information: Please refer to the after-sales service card included with your product for specific contact details or visit the official Moongiantgo website for support options.