
1. Introduction
The LATNEX RF Explorer WSUB1G Plus is a versatile digital handheld spectrum analyzer designed for a broad range of radio frequency (RF) signal analysis applications. This device offers wide band coverage and advanced functionality, making it an ideal tool for professionals and enthusiasts alike.
Key features of the RF Explorer WSUB1G Plus include:
- Wide Frequency Range: Covers 50KHz to 960MHz, encompassing LF, MF, HF, VHF, and UHF bands.
- Broad Application Coverage: Suitable for popular sub-1Ghz bands such as FM, TV, DTV, ISM, RFID, GSM, and amateur radio (HAM) bands from 160 meters to 33cm.
- PC Connectivity: Offers advanced functionality when connected to a Windows, Linux, or macOS PC via free downloadable professional software, including Waterfall 3D and 2D elements.
- Portability and Protection: Comes with a durable aluminum carrying case to protect the device and organize its components.

Figure 1.1: LATNEX RF Explorer WSUB1G Plus, showing the handheld unit, antennas, USB cable, and protective aluminum carrying case.
2. Setup
2.1 Unpacking and Component Identification
Carefully unpack all components from the aluminum carrying case. Verify that the following items are present:
- RF Explorer WSUB1G Plus Handheld Unit
- Wideband 144/433MHz Dual Band Telescopic Antenna
- UHF 400-900MHz Rubber Duck Articulated Antenna
- USB Cable
- Aluminum Carrying Case
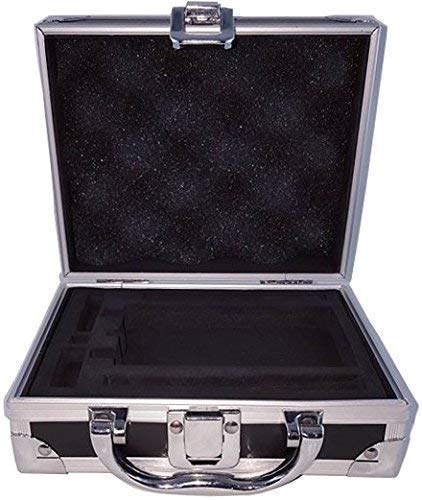
Figure 2.1: The aluminum carrying case, designed to securely hold the RF Explorer unit and its accessories.
2.2 Charging the Device
The RF Explorer WSUB1G Plus is equipped with an internal 1800mAh rechargeable Lithium Ion battery. Before initial use, it is recommended to fully charge the device. Connect the RF Explorer to a standard USB power source using the provided USB cable. The charging indicator on the device will provide status.
2.3 Attaching Antennas
The device features a standard SMA 50 ohms connector for antenna attachment. Select the appropriate antenna for your measurement frequency range. Gently screw the antenna onto the SMA connector until it is finger-tight. Do not overtighten.

Figure 2.2: The RF Explorer unit with both the telescopic and rubber duck antennas connected, demonstrating proper antenna attachment.
3. Operating Instructions
3.1 Powering On/Off
To power on the device, press and hold the power button (usually marked with a circle or power symbol) until the display illuminates. To power off, press and hold the same button until the display turns off.
3.2 Basic Navigation and Display
The RF Explorer features a Graphics LCD 128x64 pixel display with backlight for visibility in various lighting conditions. Navigate through menus and adjust settings using the directional buttons and selection keys on the front panel. The display shows real-time frequency and amplitude measurements, along with other relevant parameters.

Figure 3.1: The RF Explorer held in hand, illustrating its compact and portable design for field use.
3.3 Advanced Functionality with PC Software
For more advanced analysis and data visualization, connect your RF Explorer to a Windows, Linux, or macOS computer. Free professional software is available for download, offering features such as Waterfall 3D and 2D elements, detailed spectrum analysis, and data logging.
The software provides a comprehensive interface to control the device, view real-time spectrum data, and perform in-depth analysis. It supports multi-platform open-source software and API libraries for custom applications.

Figure 3.2: A screenshot of the RF Explorer software interface, demonstrating the Waterfall 3D and 2D visualization capabilities for detailed spectrum analysis.

Figure 3.3: Another view of the RF Explorer software, highlighting the spectrum analyzer and power control options available for precise measurements.
4. Maintenance
4.1 Cleaning
To clean the RF Explorer unit, use a soft, dry cloth. For stubborn dirt, a slightly damp cloth with mild soap can be used, ensuring no liquid enters the device openings. Do not use abrasive cleaners or solvents.
4.2 Battery Care
To prolong the life of the internal Lithium Ion battery, avoid fully discharging the device frequently. Store the device with a partial charge (around 50%) if it will not be used for extended periods. Recharge the battery regularly, even if not in use, to maintain its health.
4.3 Storage
When not in use, store the RF Explorer and its accessories in the provided aluminum carrying case. This protects the device from dust, moisture, and physical damage, ensuring its longevity and readiness for future use.
5. Troubleshooting
This section addresses common issues you might encounter with your LATNEX RF Explorer WSUB1G Plus.
5.1 Device Does Not Power On
- Check Battery Charge: Ensure the device battery is sufficiently charged. Connect it to a USB power source and allow it to charge for at least 30 minutes before attempting to power on again.
- Verify USB Connection: If charging, ensure the USB cable is securely connected to both the device and the power source.
5.2 No Signal Detected / Inaccurate Readings
- Antenna Connection: Confirm that the antenna is securely attached to the SMA connector. A loose connection can significantly impact signal reception.
- Correct Antenna Selection: Ensure you are using the appropriate antenna for the frequency range you are attempting to measure.
- Environmental Factors: Large metallic objects or other strong RF sources nearby can interfere with measurements. Try moving to a different location.
- Software Settings: If using PC software, verify that the frequency span, center frequency, and other settings are correctly configured for your measurement.
5.3 PC Software Not Connecting to Device
- USB Cable: Ensure the USB cable is properly connected between the RF Explorer and your computer. Try a different USB port or cable.
- Driver Installation: Verify that the necessary drivers for the RF Explorer are installed on your computer. Refer to the software documentation for driver installation instructions.
- Software Version: Ensure you are using the latest version of the RF Explorer software.
- Device Power: Confirm the RF Explorer unit is powered on before attempting to connect with the software.
6. Specifications
The following table details the technical specifications of the LATNEX RF Explorer WSUB1G Plus:
| Feature | Specification |
|---|---|
| Product Dimensions | 2.76 x 0.98 x 5.12 inches; 2.07 Pounds |
| Item Model Number | WSUB1G Plus |
| Batteries | 1 Lithium Ion battery required (included) |
| Manufacturer | LATNEX |
| Frequency Band | 0.05 - 960MHz |
| Frequency Span | 0.1 - 960MHz |
| Internal Selectable LNA Gain | 25dB |
| Internal Selectable Attenuator | 30dB |
| Display | Graphics LCD 128x64 pixels, with backlight |
| OS Support | Windows, Linux, macOS X |
| Battery Capacity | 1800mA/h rechargeable |
| Antenna Connector | Standard SMA 50 ohms |
| Included Antennas | Wideband 144/433MHz dual band telescopic, UHF 400-900MHz rubber duck articulated |
| Amplitude Resolution | 0.5dBm |
| Dynamic Range | -125dBm to 10dBm |
| Absolute Max Input Power | +30dBm |
| Average Noise Level (typical LNA) | -125dBm |
| Frequency Stability and Accuracy (typical) | +-10ppm |
| Amplitude Stability and Accuracy (typical) | +-2dBm |
| Frequency Resolution | 1KHz |
| Resolution Bandwidth (RBW) | Automatic 2.6KHz to 600KHz |
7. Warranty and Support
The LATNEX RF Explorer WSUB1G Plus comes with full support and a 2-year warranty from the manufacturer. For technical assistance, troubleshooting beyond this manual, or warranty claims, please contact LATNEX customer support. Refer to the official LATNEX website or product packaging for the most current contact information.


