Introduction
Thank you for purchasing the TAKRINK Digital Projection Alarm Clock. This device combines a digital alarm clock with a projection feature, FM radio, and a convenient USB charging port. Please read this manual carefully to ensure proper use and to fully utilize all its features.

Image: The TAKRINK Digital Projection Alarm Clock displaying time, temperature, and humidity, with a smartphone connected for charging via its USB port. The projection feature is active, showing time on a surface.
Key Features
- 5.5-inch Large LED Display: Clear and easy-to-read display with 4 adjustable brightness levels (dark, medium, bright).
- 180° Ultra-Clear Rotating Projection: Project time onto the ceiling or wall with adjustable angle (-90° to 90°). Optimal projection distance is 3m, effective up to 5m.
- USB Charging Port: Conveniently charge your mobile phone or tablet directly from the clock. (Power adapter not included).
- Dual Alarm & Snooze Function: Set two separate alarms for different schedules. Snooze function allows 5 to 60 minutes of extra sleep (default 5 minutes).
- FM Radio & Sleep Timer: Save up to 30 FM radio stations (76.0 MHz - 108.0 MHz). The sleep timer function automatically turns off the radio after a set duration (5 to 60 minutes).
- Temperature and Humidity Display: Integrated sensors provide real-time indoor temperature and humidity readings.
- Mirror Surface: The smooth mirror surface can also function as a cosmetic mirror.
Setup
1. Power Connection
Connect the provided USB cable to the clock's power input port and plug the other end into a USB power adapter (not included) or a powered USB port. The display will light up.
2. Initial Time Setting
Upon first power-up, the clock may display a default time. Refer to the "Operating Instructions" section for detailed steps on setting the correct time and date.

Image: The product packaging showing the alarm clock, USB cable, and user manual, indicating the items included in the box.
Operating Instructions
1. Time and Date Setting
- Press and hold the "SET" button to enter time setting mode.
- Use the "+" or "-" buttons to adjust the hour, then press "SET" to confirm.
- Repeat for minutes, year, month, and day.
- Press "SET" again to exit time setting mode.
- To switch between 12/24 hour format, press the "12/24H" button.
2. Alarm Setting (Dual Alarm)
This clock supports two independent alarms (AL1 and AL2).
- Press the "AL" button once to set Alarm 1 (AL1). The AL1 icon will flash.
- Use "+" or "-" to adjust the hour, then press "AL" to confirm.
- Repeat for minutes.
- Press "AL" again to select the alarm sound (e.g., buzzer, FM radio).
- Press "AL" to confirm and activate Alarm 1. The AL1 icon will remain lit.
- Repeat the process by pressing "AL" twice for Alarm 2 (AL2).
- To deactivate an alarm, press the "AL" button repeatedly until the corresponding alarm icon disappears.

Image: Illustration showing the dual alarm feature with two different wake-up times (7:30 AM and 8:00 AM) and the snooze function in use, with a person sleeping.
3. Snooze Function
When the alarm sounds, press the "SNOOZE/LIGHT" button to activate the snooze function. The alarm will pause for the preset snooze duration (default 5 minutes) and sound again afterward. You can adjust the snooze duration from 5 to 60 minutes in the settings.
4. Projection Settings
The clock features a 180° rotatable projection lens.
- Adjusting Projection Angle: Manually rotate the projection lens on the side of the clock to adjust the projection angle (-90° to 90°).
- Projection Brightness: Press the "PROJECTION" button repeatedly to cycle through projection brightness levels: High, Low, Off.
- Reversing Projection: If the projected image is upside down, long press the "PROJECTION" button to reverse the image.
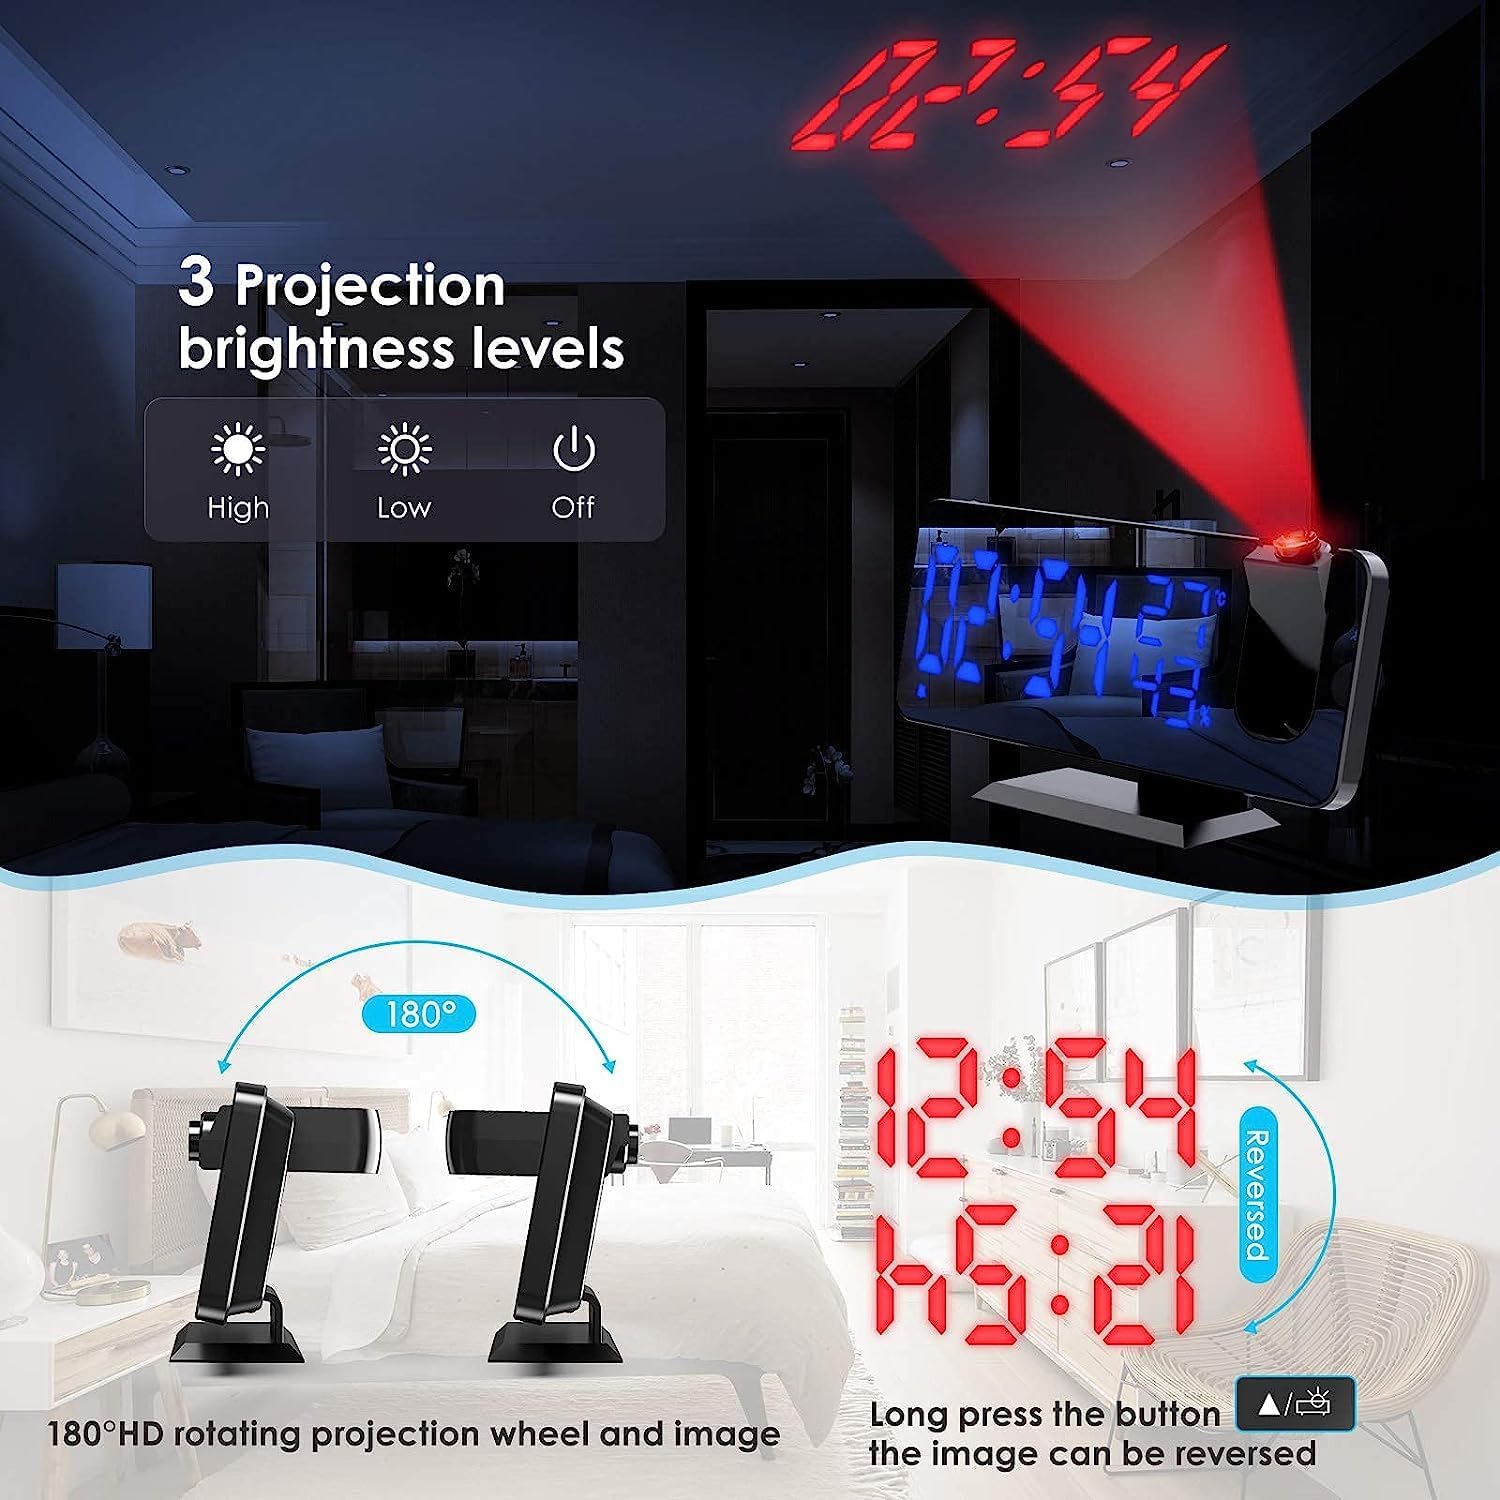
Image: Demonstrates the 180° HD rotating projection wheel and the three projection brightness levels (High, Low, Off). It also shows how to reverse the projected image.

Image: Compares the visibility of the projected time in a well-lit room versus a dark room, highlighting the clarity of the projection in low light conditions.
5. Display Brightness Adjustment
The main display has 4 adjustable brightness levels and a light sensor for automatic adjustment.
- Manual Adjustment: Press the "SNOOZE/LIGHT" button repeatedly to cycle through the 4 brightness levels (High Light, Medium Light, Low Light, Off).
- Light Sensor Mode: The clock can automatically adjust display brightness based on ambient light. Refer to the settings menu to enable or disable this feature.
- Night Mode: Set a specific time period for the display to automatically switch to low light mode.

Image: Shows the four display brightness levels (High, Medium, Low, Off) and explains the light sensor for automatic brightness adjustment and the night mode feature.
6. FM Radio Operation
- Turn On/Off: Press the "RADIO" button to turn the FM radio on or off.
- Automatic Search & Store: Long press the "RADIO" button to automatically scan and save available FM stations (76.0 MHz - 108.0 MHz).
- Manual Tuning: Use the "+" or "-" buttons to manually tune to a specific frequency.
- Volume Adjustment: Use the "VOL" button and then "+" or "-" to adjust the radio volume (0-15 levels).
- Sleep Timer: While the radio is playing, press the "SLEEP" button repeatedly to set a sleep timer (5-60 minutes). The radio will automatically turn off after the set time.
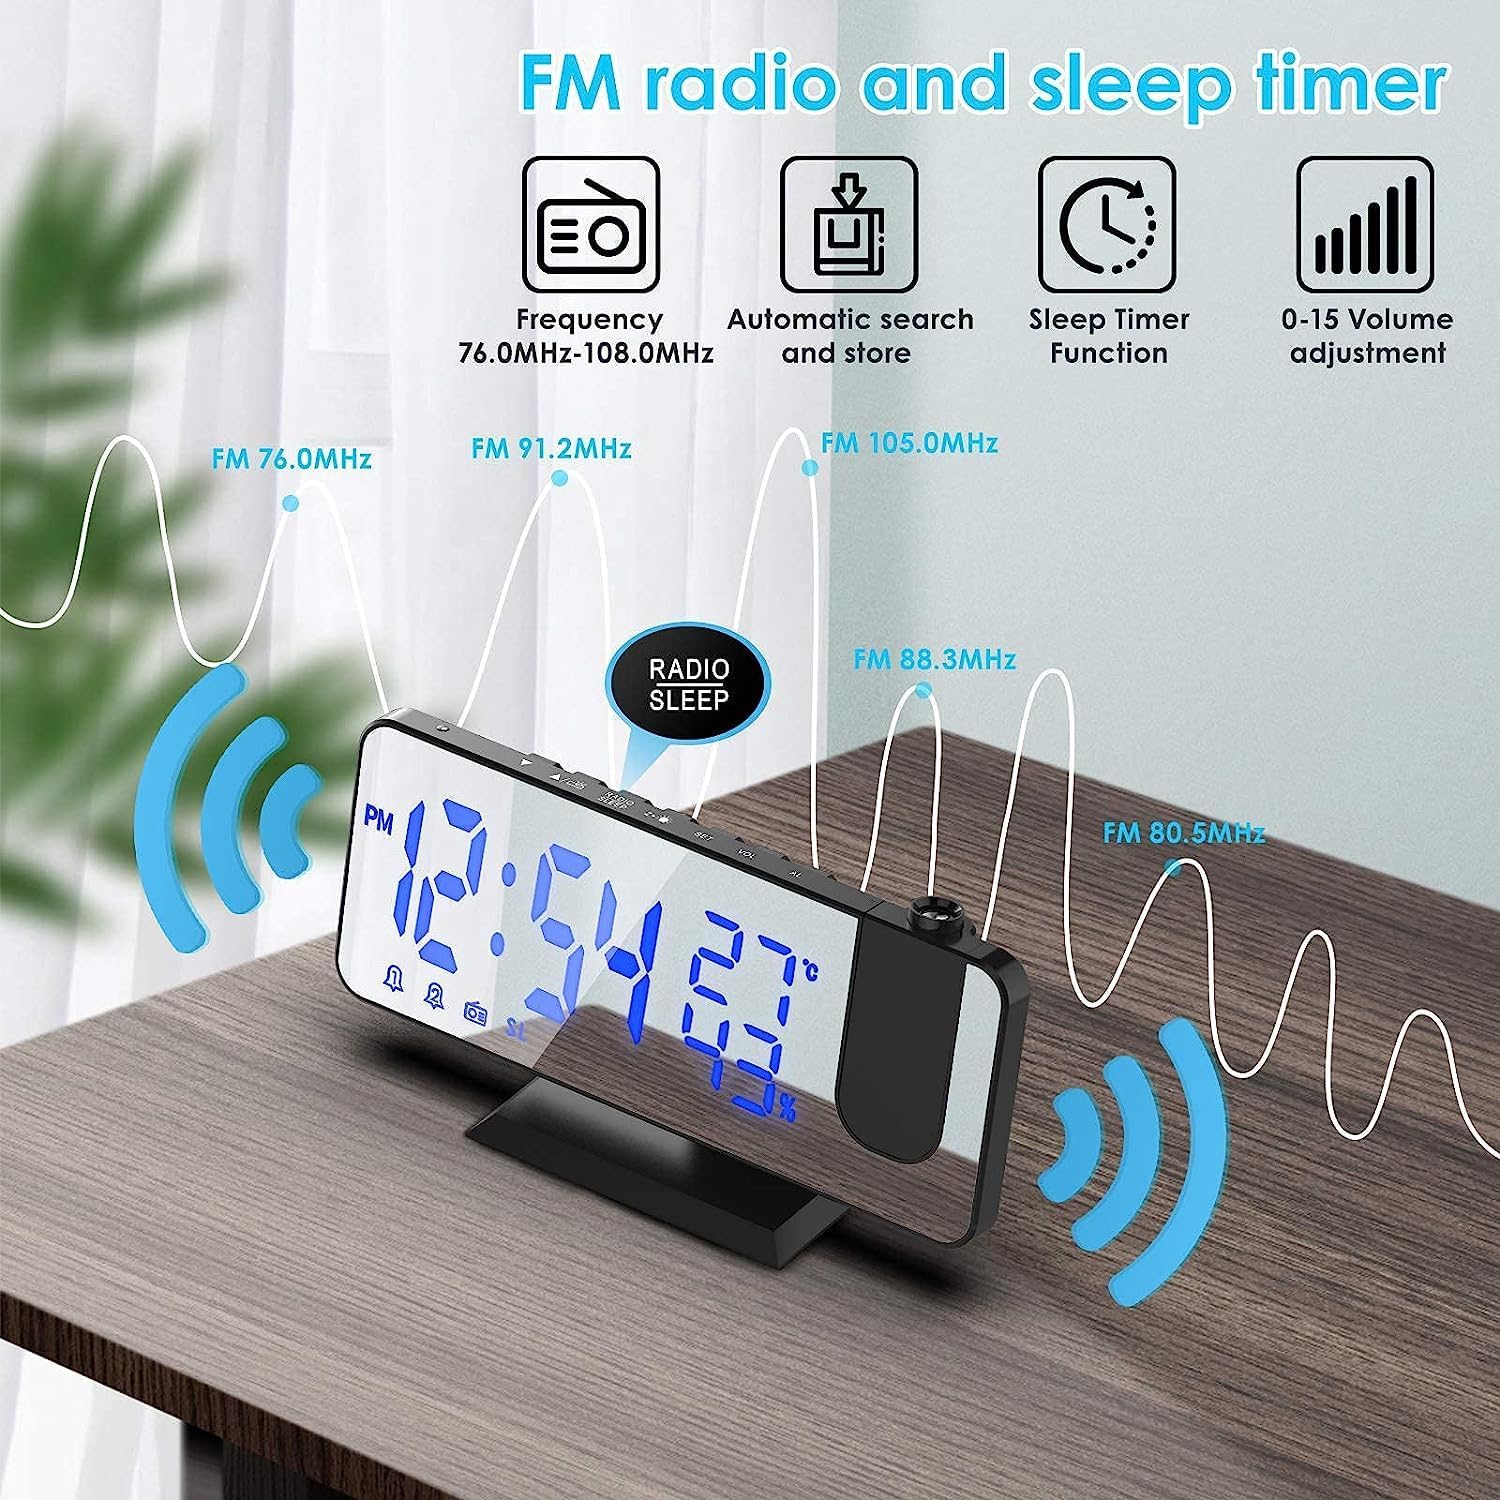
Image: Illustrates the FM radio features including frequency range (76.0 MHz - 108.0 MHz), automatic search and store, sleep timer function, and volume adjustment (0-15).
7. USB Charging Port
The USB output port on the back of the clock allows you to charge your mobile devices. Simply connect your device's USB charging cable to this port. This port is for charging only and does not transfer data.
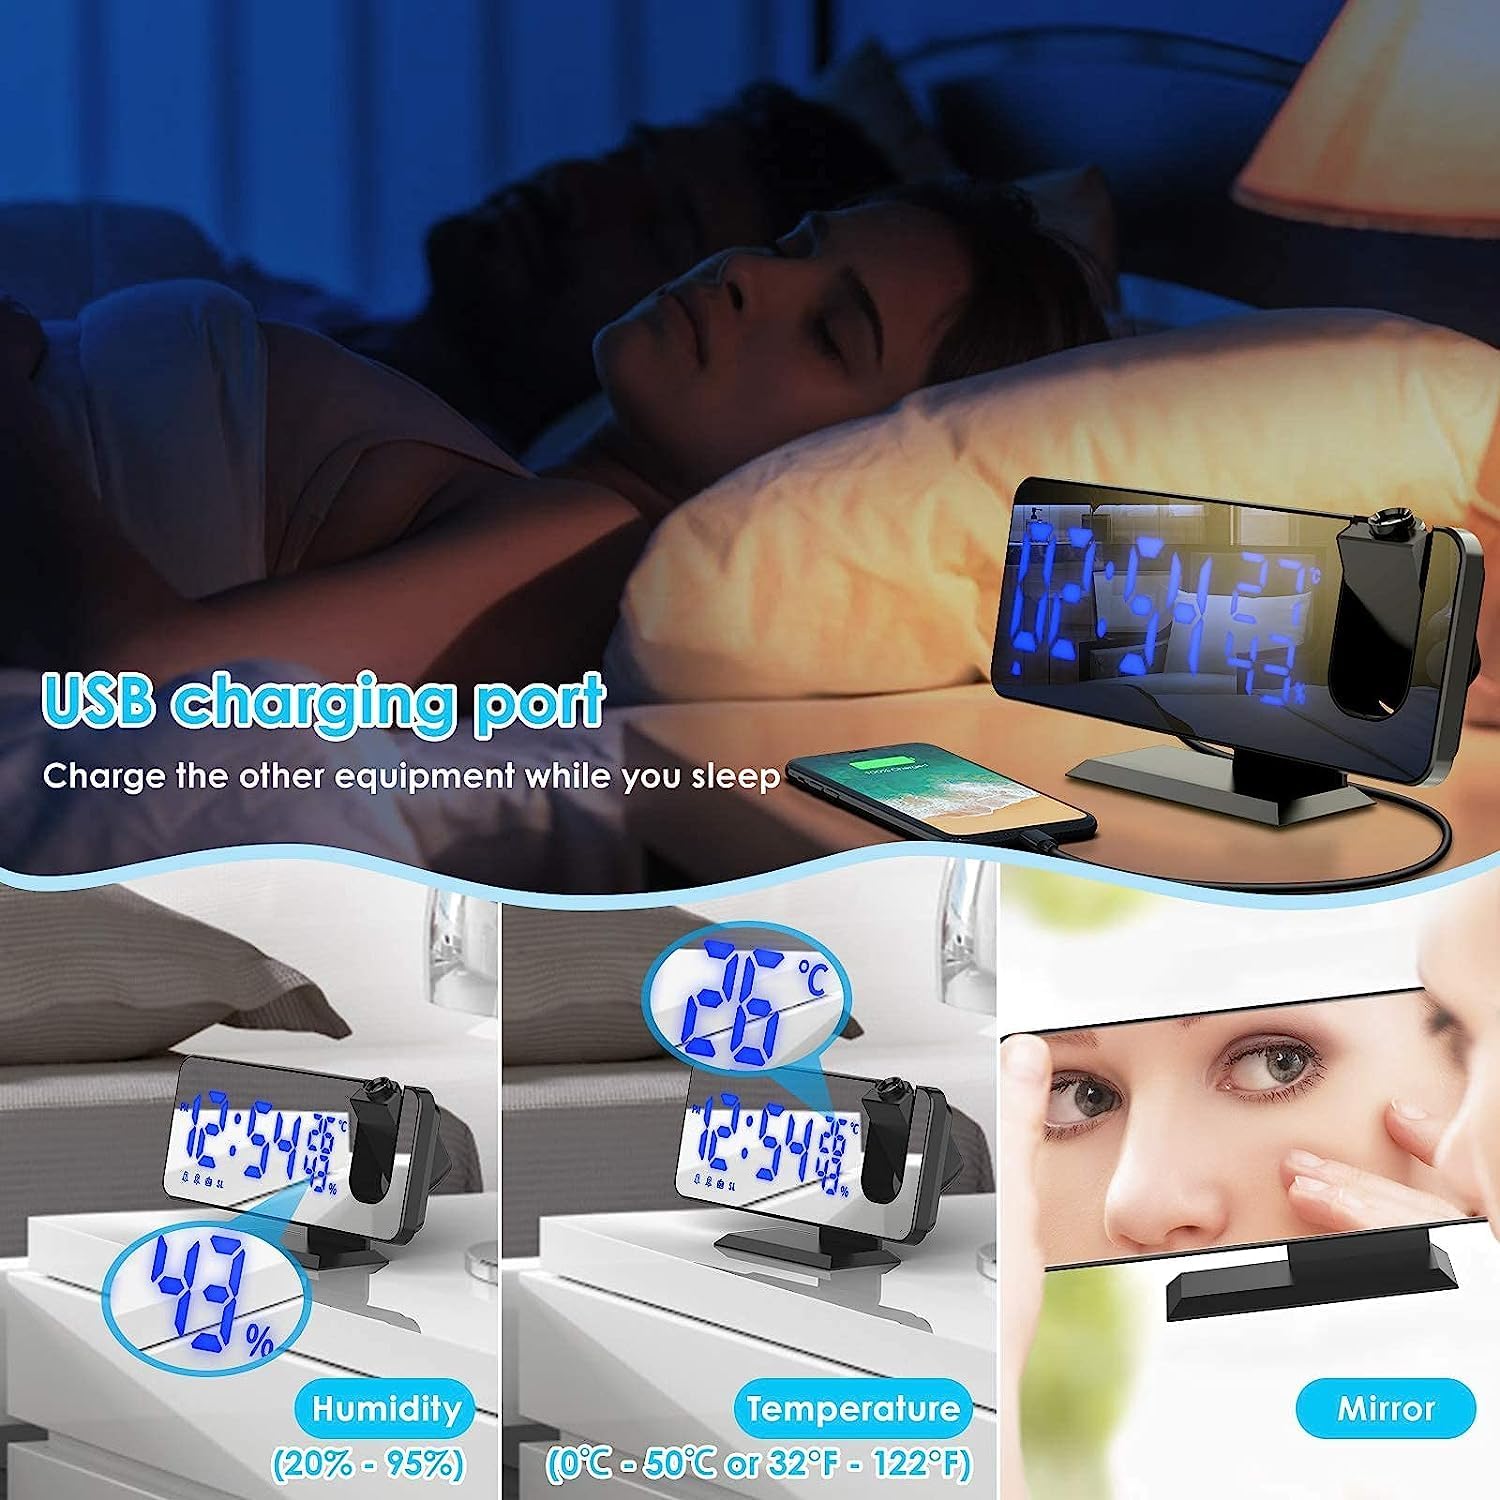
Image: Shows the USB charging port on the back of the alarm clock, with a phone connected for charging. Also displays the humidity and temperature readings on the clock face and its mirror surface.
Maintenance
- Clean the clock with a soft, dry cloth. Do not use abrasive cleaners or solvents.
- Keep the device away from direct sunlight, extreme temperatures, and high humidity.
- Do not disassemble the unit. This will void the warranty.
Troubleshooting
| Problem | Possible Cause | Solution |
|---|---|---|
| Display is blank. | No power or power cable is loose. | Ensure the USB power cable is securely connected to a working power source. |
| Alarm does not sound. | Alarm is not activated or volume is too low. | Check if the alarm icon is lit on the display. Increase alarm volume. |
| Projection is blurry or unclear. | Incorrect projection distance or focus. | Adjust the distance of the clock from the projection surface (optimal 3m). Ensure the projection lens is clean. |
| FM radio static. | Poor signal reception. | Adjust the position of the clock to improve reception. Try auto-scanning for stronger stations. |
Specifications
- Brand: TAKRINK
- Model: B08MVTMRHH
- Display Type: Digital LED
- Screen Size: 5.5 inches
- Display Brightness: 4 levels adjustable
- Projection: 180° rotatable, adjustable brightness
- Alarm: Dual alarm with snooze (5-60 minutes)
- Radio Frequency: FM 76.0 MHz - 108.0 MHz
- USB Output: For charging external devices
- Power Input: USB (adapter not included)
- Additional Features: Temperature display, Humidity display, Mirror surface

Image: Displays the dimensions of the alarm clock: approximately 18.3cm (7.3 inches) wide, 7.5cm (3 inches) high, and 2cm (0.75 inches) deep, with the projection arm extending to 9.3cm (3.5 inches) in height.
Warranty and Support
This product comes with a standard manufacturer's warranty. For warranty claims, technical support, or any inquiries, please contact your retailer or the manufacturer directly. Please retain your proof of purchase for warranty purposes.
For further assistance, please visit the official TAKRINK website or contact their customer service.