
1. Introduction
This manual provides comprehensive instructions for the assembly, operation, and maintenance of your ARCH 114mm Astronomical Reflector Telescope. Please read this manual thoroughly before use to ensure proper function, safety, and longevity of your instrument. This telescope is designed for both daytime terrestrial viewing and nighttime astronomical observation, suitable for beginners and enthusiasts.
2. Safety Information
- WARNING: Never look directly at the sun through your telescope or its finder scope without a professionally made solar filter. Permanent and irreversible eye damage may result.
- Do not leave the telescope unattended in direct sunlight, as it can focus sunlight and cause fires.
- Handle optical components with care to avoid scratches or damage.
- Ensure all parts are securely fastened during assembly and use to prevent accidental falls.
- Keep the telescope away from moisture and extreme temperatures.
3. Product Components Overview
Familiarize yourself with the various parts of your telescope before assembly. Refer to the diagram below for identification.

Figure 1: Labeled Diagram of Telescope Components
This diagram illustrates the main parts of the ARCH 114mm Astronomical Reflector Telescope, including the main tube, finder scope, eyepieces, focusing wheel, equatorial mount, tripod, and counterweights.
- Main Tube: The primary optical component, a reflector telescope with a 114mm objective lens diameter.
- Finder Scope: A small auxiliary telescope (6x30) used for locating objects before viewing them through the main telescope.
- HD Eyepiece: High-definition eyepieces for magnified viewing.
- Focusing Wheel: Used to adjust the focus for clear images.
- Equatorial Mount: Allows for precise tracking of celestial objects as the Earth rotates. Features a 360° rotating mechanism.
- Stainless Steel Tripod: Provides a stable base for the telescope, adjustable in height.
- Heavy Hammer (Counterweights): Balances the telescope tube on the equatorial mount.
- Accessory Tray: A convenient tray to hold eyepieces, filters, and other small accessories.
- Phone Adapter: Allows attachment of a smartphone for astrophotography.
4. Setup and Assembly
Follow these steps to assemble your ARCH 114mm Astronomical Reflector Telescope.
- Assemble the Tripod:
Extend the legs of the stainless steel tripod to your desired height. Ensure the foot tube telescopic buckles are securely locked. Spread the legs wide enough for stability. - Attach the Equatorial Mount:
Place the equatorial mount onto the tripod head. Secure it firmly using the fixed button or connecting screw. - Attach the Main Telescope Tube:
Carefully attach the main telescope tube to the equatorial mount's hoop. Ensure it is balanced and securely clamped. - Install Counterweights:
Slide the heavy hammers (counterweights) onto the counterweight shaft of the equatorial mount. Adjust their position to balance the telescope tube, then tighten them. - Install the Finder Scope:
Attach the finder scope (star finder) to its designated bracket on the main telescope tube. Ensure it is oriented correctly for easy viewing. - Insert Eyepiece:
Insert the desired eyepiece into the focuser. If using the 3x teleconverter (Barlow lens), insert it into the focuser first, then insert the eyepiece into the Barlow lens. - Attach Accessory Tray:
Mount the accessory tray to the tripod brace for convenient storage of eyepieces and other small items.

Figure 2: Fully Assembled Telescope
This image shows the ARCH 114mm Reflector Telescope fully assembled on its equatorial mount and tripod, with a phone adapter attached.

Figure 3: Equatorial Mount and Star Finder Details
This image highlights the 360° rotating equatorial mount, the star finder for object positioning, and the robust stainless steel tripod.
5. Operating Instructions
5.1 Aligning the Finder Scope
Before observing, the finder scope must be aligned with the main telescope. Point the main telescope at a distant, stationary object (e.g., a treetop or telephone pole) during daylight hours. Center the object in the main telescope's eyepiece. Then, adjust the screws on the finder scope bracket until the same object is centered in the finder scope's crosshairs.
5.2 Focusing
Once an object is located, use the focusing wheel to achieve a sharp image. Turn the wheel slowly until the image appears clear and crisp. Different eyepieces and atmospheric conditions may require refocusing.

Figure 4: Focusing Wheel and Phone Adapter
This image shows the focusing wheel for precise image adjustment and the phone adapter for connecting a mobile device.
5.3 Using Eyepieces and Barlow Lens
- Start with the lowest power eyepiece (highest millimeter number) for a wider field of view, making it easier to locate objects.
- Once the object is centered, switch to a higher power eyepiece (lower millimeter number) for more magnification.
- The 3x teleconverter (Barlow lens) triples the magnification of any eyepiece it is used with. Insert the Barlow lens into the focuser first, then insert the eyepiece into the Barlow lens.
5.4 Tracking Celestial Objects with the Equatorial Mount
The equatorial mount is designed to track celestial objects as they move across the sky due to Earth's rotation. After aligning the mount with the celestial pole (a more advanced setup not detailed here), you can use the Right Ascension Spinner to smoothly follow objects with a single motion, keeping them centered in your eyepiece.
5.5 Astrophotography with Phone Adapter
Attach your smartphone to the phone adapter and secure it to the eyepiece. Adjust the phone's camera to align with the eyepiece's view. This allows you to capture images and videos of your observations.
6. Maintenance
- Cleaning Optics: Use a soft, lint-free cloth specifically designed for optical lenses. For stubborn smudges, use a small amount of optical cleaning fluid. Avoid touching the lens surfaces with your fingers.
- Cleaning the Telescope Body: Wipe the exterior surfaces with a soft, damp cloth. Avoid abrasive cleaners.
- Storage: When not in use, store the telescope in a dry, dust-free environment. Keep the objective lens cover on to protect the optics.
- Regular Checks: Periodically check all screws and fasteners to ensure they are tight.
7. Troubleshooting
- Image is blurry: Adjust the focusing wheel slowly. Ensure the eyepiece is fully inserted. Check for condensation on the lenses.
- Difficulty finding objects: Ensure the finder scope is properly aligned with the main telescope. Start with the lowest power eyepiece for a wider field of view.
- Image is dim: This is normal for very high magnifications or faint objects. Ensure your optics are clean. Observe from a dark location away from light pollution.
- Telescope is unstable: Ensure the tripod legs are fully extended and locked, and the equatorial mount is securely fastened to the tripod. Check that counterweights are properly balanced.
8. Specifications
| Model Number | ARCH-08 |
| Optical System | Reflector |
| Objective Lens Diameter | 114mm |
| Focal Length | 500mm |
| Teleconverter (Barlow Lens) | 3x |
| Finder Scope | 6x30 Reflex |
| Telescope Mount | Equatorial Mount |
| Focus Type | Manual Focus |
| Item Weight | 16000 Grams (16 kg) |
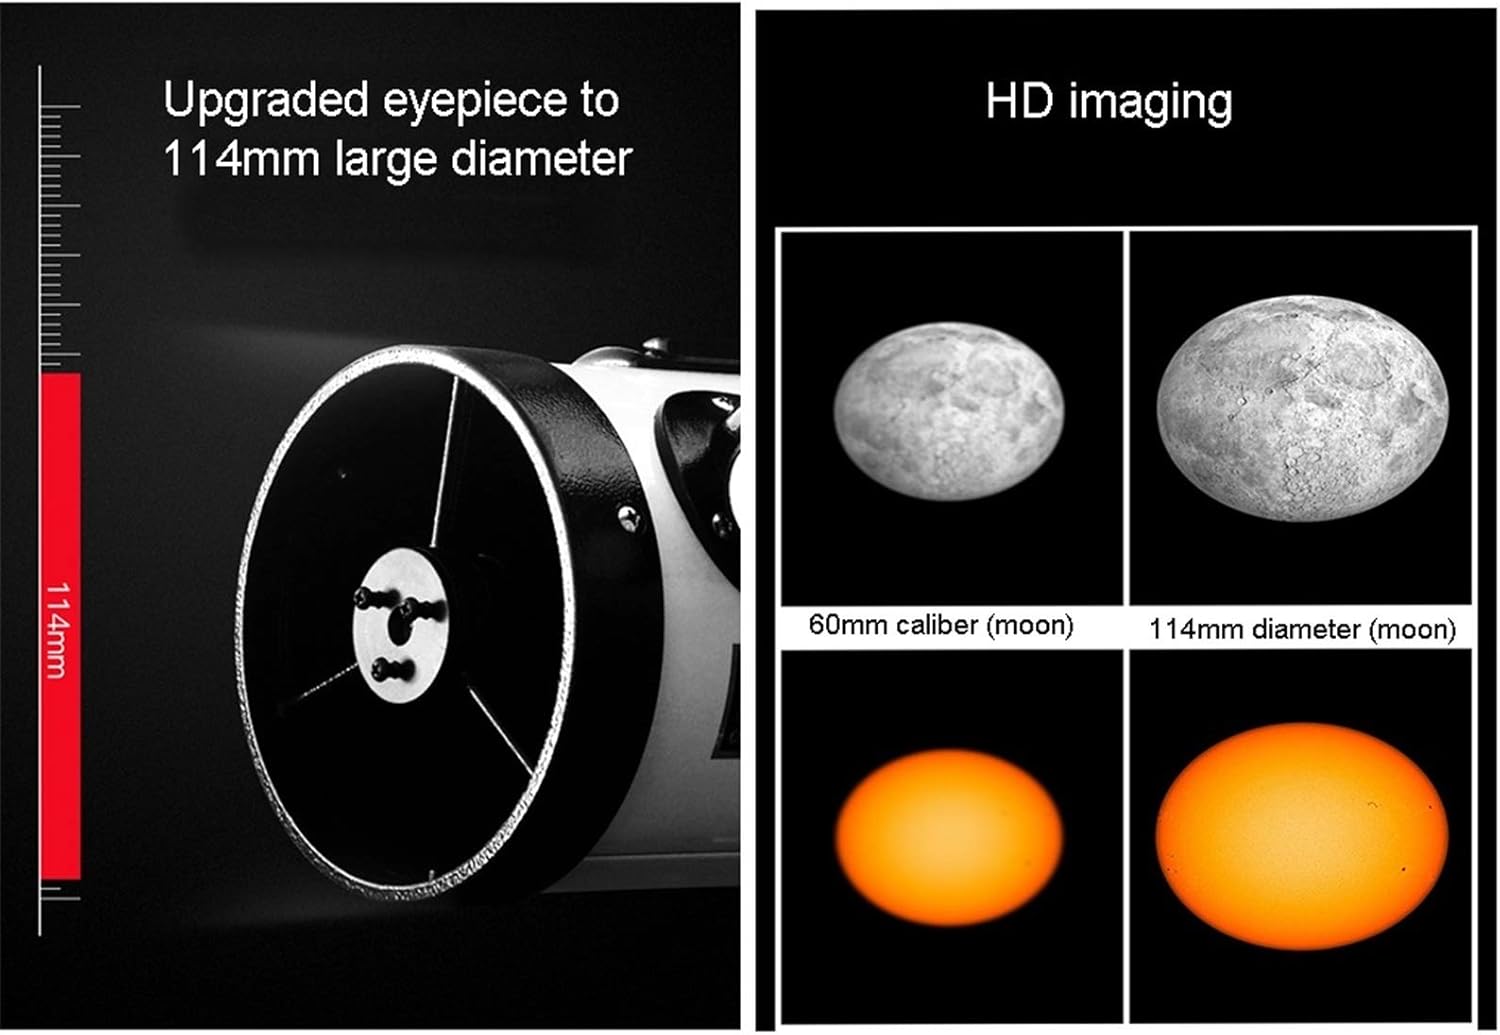
Figure 5: Eyepiece Diameter and Imaging Comparison
This image illustrates the 114mm large diameter eyepiece and provides a visual comparison of imaging quality.
9. Customer Support
For any questions or issues regarding your ARCH 114mm Astronomical Reflector Telescope, please do not hesitate to contact us. We are committed to providing support and will respond to your inquiries within 24 hours.


