Introduction
This manual provides detailed instructions for the installation, operation, and maintenance of your Smartwares SH4-99559 Wireless Built-in Shutter Switch Kit. This kit allows you to wirelessly control your electric blinds, shutters, or curtains, integrating them into your Smartwares Plug & Connect smart home system.
The kit includes three wireless built-in switches, designed for easy integration into existing electrical systems. For optimal performance and safety, please read this manual thoroughly before installation and use.
Setup and Installation
Important Safety Information: Installation should only be performed by a qualified electrician or in accordance with local electrical codes. Always disconnect power at the main circuit breaker before beginning any electrical work.
1. Unpacking and Inspection
Carefully remove all components from the packaging. Verify that all three built-in switches are present and undamaged. If any components are missing or damaged, contact your retailer.

Image: The Smartwares SH4-99559 kit, showing three white wireless built-in shutter switches.
2. Wiring the Switch
Each built-in switch is designed to be installed within a standard junction box behind your existing shutter switch or directly connected to your electric motor. The module requires a 230V power supply and connects to the motor's up and down control wires.
- Disconnect Power: Ensure the power supply to the circuit is completely off at the main breaker.
- Identify Wires: Identify the Live (L), Neutral (N), Up (U), and Down (D) wires for your electric shutter motor. The switch also has a connection for a common wire (C) if applicable.
- Connect Wires: Connect the wires to the corresponding terminals on the Smartwares SH4-99559 switch. Refer to the diagram below for terminal identification.
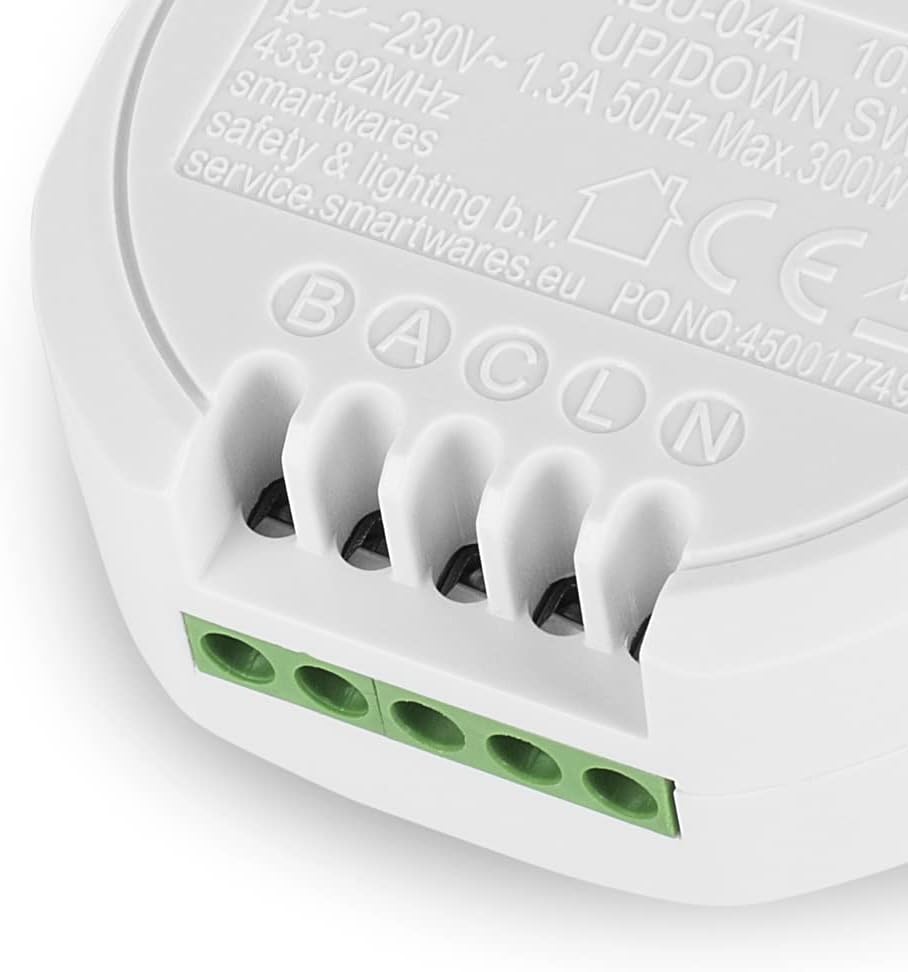
Image: A close-up view of the Smartwares SH4-99559 built-in switch, showing the screw terminals labeled B, A, C, L, N for electrical connections. These typically correspond to Up, Down, Common, Live, and Neutral.
Terminal Guide:
- L: Live (Phase) 230V AC
- N: Neutral 230V AC
- U (or B): Up control wire for the motor
- D (or A): Down control wire for the motor
- C: Common wire (if required by your motor/system)
3. Mounting the Switch
Once wired, carefully place the built-in switch into the junction box. Ensure no wires are pinched and that there is sufficient space for the module. Secure the module if necessary, then re-attach the cover plate or existing switch mechanism.

Image: The Smartwares SH4-99559 built-in switch shown installed within a standard round electrical junction box, demonstrating its compact design for concealed installation.
4. Pairing with a Remote Control or Smart Switch
The Smartwares SH4-99559 switches operate on a 433 MHz radio frequency and are compatible with Smartwares Plug & Connect remote controls and smart switches (sold separately). Follow these general steps to pair your switch:
- Restore Power: Turn the power back on at the main circuit breaker.
- Activate Pairing Mode: On the SH4-99559 module, there is typically a small learning button or a specific sequence to enter pairing mode. Consult the specific instructions for your Smartwares remote control or smart switch for the exact pairing procedure. Usually, you press the learning button on the module, then activate the desired button on your remote or app.
- Confirmation: The shutter motor should briefly move or an indicator light on the module should flash to confirm successful pairing.
- Test Functionality: Test the up and down functions using your paired remote or smart switch.
Operating Instructions
Once installed and paired, your Smartwares SH4-99559 switches provide convenient wireless control over your electric blinds, shutters, or curtains.
Using a Smartwares Remote Control
- Press the "UP" button on your remote to raise the shutter/blind.
- Press the "DOWN" button on your remote to lower the shutter/blind.
- Press the "STOP" button (if available on your remote) to halt the shutter/blind at its current position.
Using the Smartwares Smart Switch (via HomeWizard App)
If you have connected your SH4-99559 switches to a Smartwares Smart Switch (e.g., HomeWizard Link), you can control them via the free HomeWizard app on your smartphone or tablet.
- Open the HomeWizard app on your device.
- Navigate to the device list or specific room where your shutter switch is located.
- Tap the "UP" or "DOWN" icon to control the shutter/blind.
- The app may also offer options for setting schedules or scenes for automated control.
Maintenance
The Smartwares SH4-99559 Wireless Built-in Shutter Switch Kit requires minimal maintenance.
- Cleaning: If the module is exposed (e.g., during inspection), gently wipe it with a dry, soft cloth. Do not use liquid cleaners or abrasive materials.
- Firmware Updates: If connected to a Smartwares Smart Switch and the HomeWizard app, ensure your Smart Switch firmware is up to date for optimal performance and security.
- Regular Checks: Periodically check the physical connections during other electrical maintenance to ensure they remain secure.
No user-serviceable parts are inside the module. Do not attempt to open or repair the device yourself.
Troubleshooting
If you encounter issues with your Smartwares SH4-99559 switches, refer to the following common problems and solutions:
| Problem | Possible Cause | Solution |
|---|---|---|
| Shutter does not respond to remote/app. |
|
|
| Shutter moves in the wrong direction (Up button lowers, Down button raises). | Up and Down motor wires are reversed. |
|
| Switch indicator light is off. | No power to the module. |
|
Technical Specifications
| Model Number: | SH4-99559 |
| Brand: | Smartwares |
| Input Voltage: | 230 Volts AC |
| Max Power Load: | 300 Watts |
| Current Rating: | 1 Ampere |
| Radio Frequency: | 433 MHz |
| Dimensions (L x W x H): | 2.5 x 5.3 x 5.3 cm (per module) |
| Weight: | 120 Grams (per module) |
| Material: | Plastic |
| Switch Type: | Smart Switch, 1-way |
| Number of Pieces in Kit: | 3 |
Warranty Information
Smartwares products are designed and manufactured to high-quality standards. This product comes with a limited warranty. Based on available information, spare parts availability is guaranteed for 1 year from the date of purchase.
For detailed warranty terms and conditions, please refer to the official Smartwares website or contact their customer service.
Support and Contact
For further assistance, technical support, or to inquire about additional Smartwares Plug & Connect products, please visit the official Smartwares website:
You may also find frequently asked questions and product documentation on their support pages.