
1. Introduction
Thank you for choosing the Makita HP333DWYE 12V Cordless Hammer Driver Drill. This manual provides essential information for the safe and efficient operation, maintenance, and care of your tool. Please read these instructions thoroughly before use and keep them for future reference.
The Makita HP333DWYE is a versatile tool designed for drilling, fastening, and hammer drilling applications in various materials including steel, wood, and masonry. Its compact and ergonomic design ensures comfortable use and reduced operator fatigue.
2. Safety Instructions
Always follow basic safety precautions to reduce the risk of fire, electric shock, and personal injury. Keep this manual accessible for quick reference.
- Work Area Safety: Keep the work area clean and well-lit. Cluttered or dark areas invite accidents. Do not operate power tools in explosive atmospheres, such as in the presence of flammable liquids, gases, or dust.
- Electrical Safety: Avoid body contact with earthed or grounded surfaces. Do not expose power tools to rain or wet conditions.
- Personal Safety: Always wear eye protection. Use hearing protection when operating the tool for extended periods. Dress properly; avoid loose clothing or jewelry. Secure long hair.
- Tool Use and Care: Do not force the power tool. Use the correct power tool for your application. Disconnect the battery pack from the power tool before making any adjustments, changing accessories, or storing power tools.
- Battery Pack Use and Care: Recharge only with the charger specified by the manufacturer. Do not use battery packs with any other power tools.
3. Product Components
Familiarize yourself with the main parts of your Makita HP333DWYE drill.

An overview of the Makita HP333DWYE 12V Cordless Hammer Driver Drill, showcasing its compact design, ergonomic grip, and attached 12V battery.
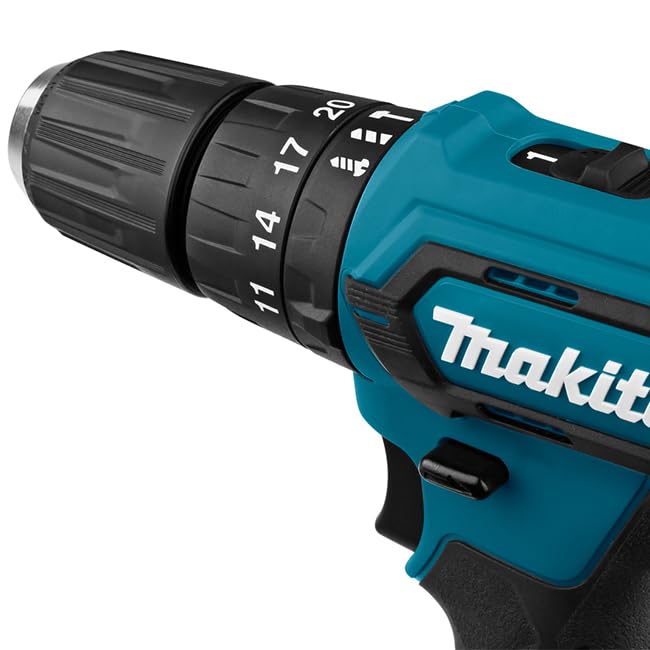
This image highlights the keyless chuck for bit changes, the adjustable clutch ring with 20 settings and drill mode, and the mechanical 2-speed selector located on top of the drill.
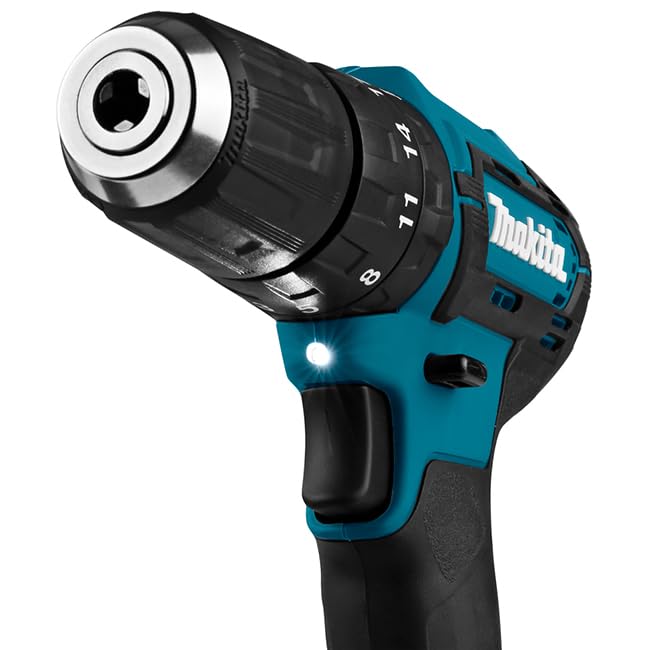
The image shows the variable speed trigger, the conveniently located reversing switch above the trigger, and the built-in LED light designed to illuminate the work area.
Key Components:
- Keyless Chuck: For quick and easy bit changes.
- Clutch Ring: Adjusts torque settings (1-20) and selects drill mode.
- Mode Selector: Switches between drilling, hammer drilling, and driving modes.
- Speed Selector: Mechanical switch for high (2) or low (1) speed.
- Trigger Switch: Controls tool speed and power.
- Reversing Switch: Changes rotation direction.
- LED Work Light: Illuminates the work area.
- Battery Pack: 12V max CXT slide battery.
- Belt Clip: For temporary tool hanging.
4. Setup
4.1 Battery Installation and Removal
- To Install: Align the battery pack with the groove in the tool housing and slide it in until it locks into place with a click.
- To Remove: Press the release button on the battery pack and slide it out of the tool.
4.2 Battery Charging
Use only the Makita-specified charger for your 12V max CXT battery packs. Refer to the charger's instruction manual for detailed charging procedures. Ensure the battery is fully charged before first use.
4.3 Bit Installation
- To Open Chuck: Rotate the chuck sleeve counter-clockwise until the jaws are wide enough to insert the bit.
- To Insert Bit: Insert the drill bit or driver bit into the chuck as far as it will go.
- To Tighten Chuck: Rotate the chuck sleeve clockwise to securely tighten the jaws around the bit. Ensure the bit is centered and firmly held.
5. Operating Instructions
5.1 Powering On/Off and Speed Control
- To Start: Pull the trigger switch. The tool speed increases with increased pressure on the trigger.
- To Stop: Release the trigger switch. The electric brake will stop the rotation quickly.
5.2 Reversing Switch
The reversing switch, located above the trigger, changes the direction of rotation. Push it from the left for clockwise rotation (forward) and from the right for counter-clockwise rotation (reverse). Always ensure the tool has come to a complete stop before changing the rotation direction.
5.3 Speed Selection
The mechanical 2-speed gearing allows selection between high and low speeds:
- Position '1' (Low Speed): For heavy-duty applications requiring high torque, such as driving large screws or drilling large holes.
- Position '2' (High Speed): For speedy drilling in light-duty applications.
To change speed, slide the speed change lever. Ensure the tool is stopped before changing speed to prevent gear damage.
5.4 Clutch Settings and Drilling Modes
The clutch ring allows adjustment of the fastening torque and selection of drilling modes:
- Clutch Settings (1-20): Rotate the clutch ring to align the desired number with the arrow on the tool body. Lower numbers provide less torque, suitable for smaller screws or softer materials. Higher numbers provide more torque.
- Drill Mode (drill bit icon): For general drilling in wood or metal. The clutch does not engage in this mode, providing maximum torque.
- Hammer Drill Mode (hammer icon): For drilling in masonry materials. This mode combines rotation with a hammering action.
Always select the appropriate clutch setting or mode for your application to prevent damage to the workpiece or the tool.
5.5 LED Work Light
The built-in LED light illuminates the work area when the trigger is pulled. It features pre-glow and afterglow functions, staying on briefly after the trigger is released to further illuminate the area.
5.6 Belt Clip
The durable, reversible belt clip can be attached to either side of the tool for convenient temporary hanging when not in use.
6. Maintenance
Regular maintenance ensures optimal performance and extends the life of your tool.
- Cleaning: Regularly clean the tool's ventilation openings to prevent dust accumulation. Use a soft, damp cloth. Do not use strong detergents or solvents.
- Battery Care: Store battery packs in a cool, dry place away from direct sunlight and heat. Do not store discharged batteries for extended periods.
- Inspection: Periodically check for loose screws, damaged cords, or worn parts. Have any damaged parts repaired by a Makita authorized service center.
- Storage: When not in use, store the tool, batteries, and charger in the provided carrying case in a secure, dry place out of reach of children.
7. Troubleshooting
If you encounter issues with your drill, refer to the following common troubleshooting steps:
- Tool does not start: Ensure the battery pack is fully charged and correctly installed. Check if the reversing switch is in the neutral (locked) position.
- Reduced power or speed: The battery may be low. Recharge the battery. Ensure the correct speed setting is selected for the task.
- Bit not tightening in chuck: Ensure the chuck sleeve is rotated clockwise firmly. Check for debris inside the chuck jaws.
- Overheating: Allow the tool to cool down. Avoid continuous heavy-duty operation. Ensure ventilation slots are clear.
For persistent issues, contact a Makita authorized service center.
8. Specifications
| Feature | Specification |
|---|---|
| Model Number | HP333DWYE |
| Power Source | Battery Powered |
| Voltage | 12 Volts |
| Battery Capacity | 1.5 Ah |
| Maximum Rotational Speed | 1700 RPM |
| No Load Speed (High) | 0-1,700 RPM |
| No Load Speed (Low) | 0-450 RPM |
| Impacts Per Minute (IPM) | 0-25,500 IPM |
| Maximum Torque | 28 Newton Meters |
| Chuck Capacity | 0.8 - 10 mm (1/32 - 3/8 inches) |
| Drilling Capacity (Steel) | 10 mm (3/8 inches) |
| Drilling Capacity (Wood) | 21 mm (13/16 inches) |
| Drilling Capacity (Masonry) | 8 mm (5/16 inches) |
| Clutch Settings | 20 + Drill Mode |
| Item Weight | 1.5 kg (1500 Grams) |
| Product Dimensions | 36.1L x 28W x 10.4H Centimeters |
| Included Components | Tool, 2 Batteries, 1 Charger, Carrying Case |
| Country of Origin | China |
9. Warranty and Support
9.1 Warranty Information
This Makita HP333DWYE Cordless Hammer Driver Drill comes with a 6-month warranty against manufacturing defects from the date of purchase. Please retain your purchase receipt as proof of purchase for warranty claims. The warranty does not cover damage caused by misuse, abuse, normal wear and tear, or unauthorized repairs.
9.2 Customer Support
For technical assistance, service, or warranty claims, please contact Makita Power Tools India Pvt. Ltd. or an authorized Makita service center.
Manufacturer/Importer Contact:
Makita Power Tools India Pvt. Ltd.
Unit II, Sy. No.93/3 93/4, Koralur Village, Kasaba Hobli,
Hoskote Taluk, Bangalore 560 067, India.
Contact No. +91-80-2205-8200
Always use genuine Makita replacement parts and accessories to ensure compatibility and maintain tool performance and safety.


