1. Product Overview
The TrustFire T11R is a compact yet powerful rechargeable LED flashlight designed for various applications, including outdoor activities, emergency preparedness, and daily use. It features a LUMINUS SST-40 LED chip, delivering a maximum brightness of 1800 lumens and a beam distance of up to 276 meters. Its robust construction and versatile features make it a reliable lighting tool.

Image: The TrustFire T11R flashlight demonstrating its powerful beam in a dark outdoor environment.
2. Package Contents
Please check the package to ensure all items are present:
- TrustFire T11R Flashlight (with pre-installed battery) x1
- USB-C Charging Cable x1
- Multi-language User Manual x1
- Spare Waterproof O-ring x1
- Lanyard x1

Image: All items included in the TrustFire T11R flashlight package, neatly arranged.
3. Specifications
| Feature | Specification |
|---|---|
| Light Source | LUMINUS SST-40 LED |
| Max Light Output | 1800 Lumens |
| Beam Distance | 276 Meters |
| Runtime | Up to 28 days (Moonlight mode) |
| Power Source | Rechargeable Lithium-ion Battery |
| Charging Port | USB Type-C |
| Waterproof Rating | IP68 |
| Impact Resistance | 1 Meter |
| Material | Aerospace-grade 6061 Aluminum Alloy |
| Dimensions (D x W x H) | 30mm x 30mm x 129mm |
| Item Weight | 130g |
| Special Features | Dual Switch, Battery Level Indicator, Overcharge Protection, Smart Temperature Control |
4. Setup
4.1 Initial Charging
Before first use, fully charge the flashlight. The T11R comes with a pre-installed rechargeable battery.
- Locate the USB Type-C charging port on the flashlight.
- Connect the provided USB-C cable to the flashlight and a compatible USB power source (e.g., computer, wall adapter, power bank).
- The indicator light on the neck switch will show the charging status: Red indicates charging, Green indicates charging is complete.

Image: The TrustFire T11R flashlight being charged via its USB-C port, showing the indicator light.
4.2 Attaching the Lanyard and Clip
Attach the lanyard to the tail cap for secure carrying. The stainless steel two-way clip can be attached to either end of the flashlight body for convenient carrying on pockets, belts, or bags.

Image: The TrustFire T11R flashlight demonstrating its versatile two-way clip for various carrying options.
5. Operating Instructions
5.1 Dual Switch Operation
The T11R features both a tail switch and a side switch for flexible control.
- Tail Switch: Press to turn the flashlight ON/OFF. A half-press allows for momentary illumination; release to turn off.
- Side Switch: Used for cycling through brightness modes and activating special modes.

Image: A visual guide to the dual switch system (tail and side switches) on the TrustFire T11R.
5.2 Mode Switching
The T11R offers multiple lighting modes to suit different needs:
- From OFF, press the Tail Switch to turn ON.
- With the light ON, press the Side Switch to cycle through modes: Moonlight → Medium → High → Turbo. The flashlight has a mode memory function and will turn on in the last used illumination mode.
- Strobe Mode: From any illumination mode, press and hold the Side Switch for 2 seconds to activate Strobe mode. Press again to return to the previous illumination mode.
- SOS Mode: From Strobe mode, press and hold the Side Switch for 2 seconds to activate SOS mode. Press again to return to the previous illumination mode.
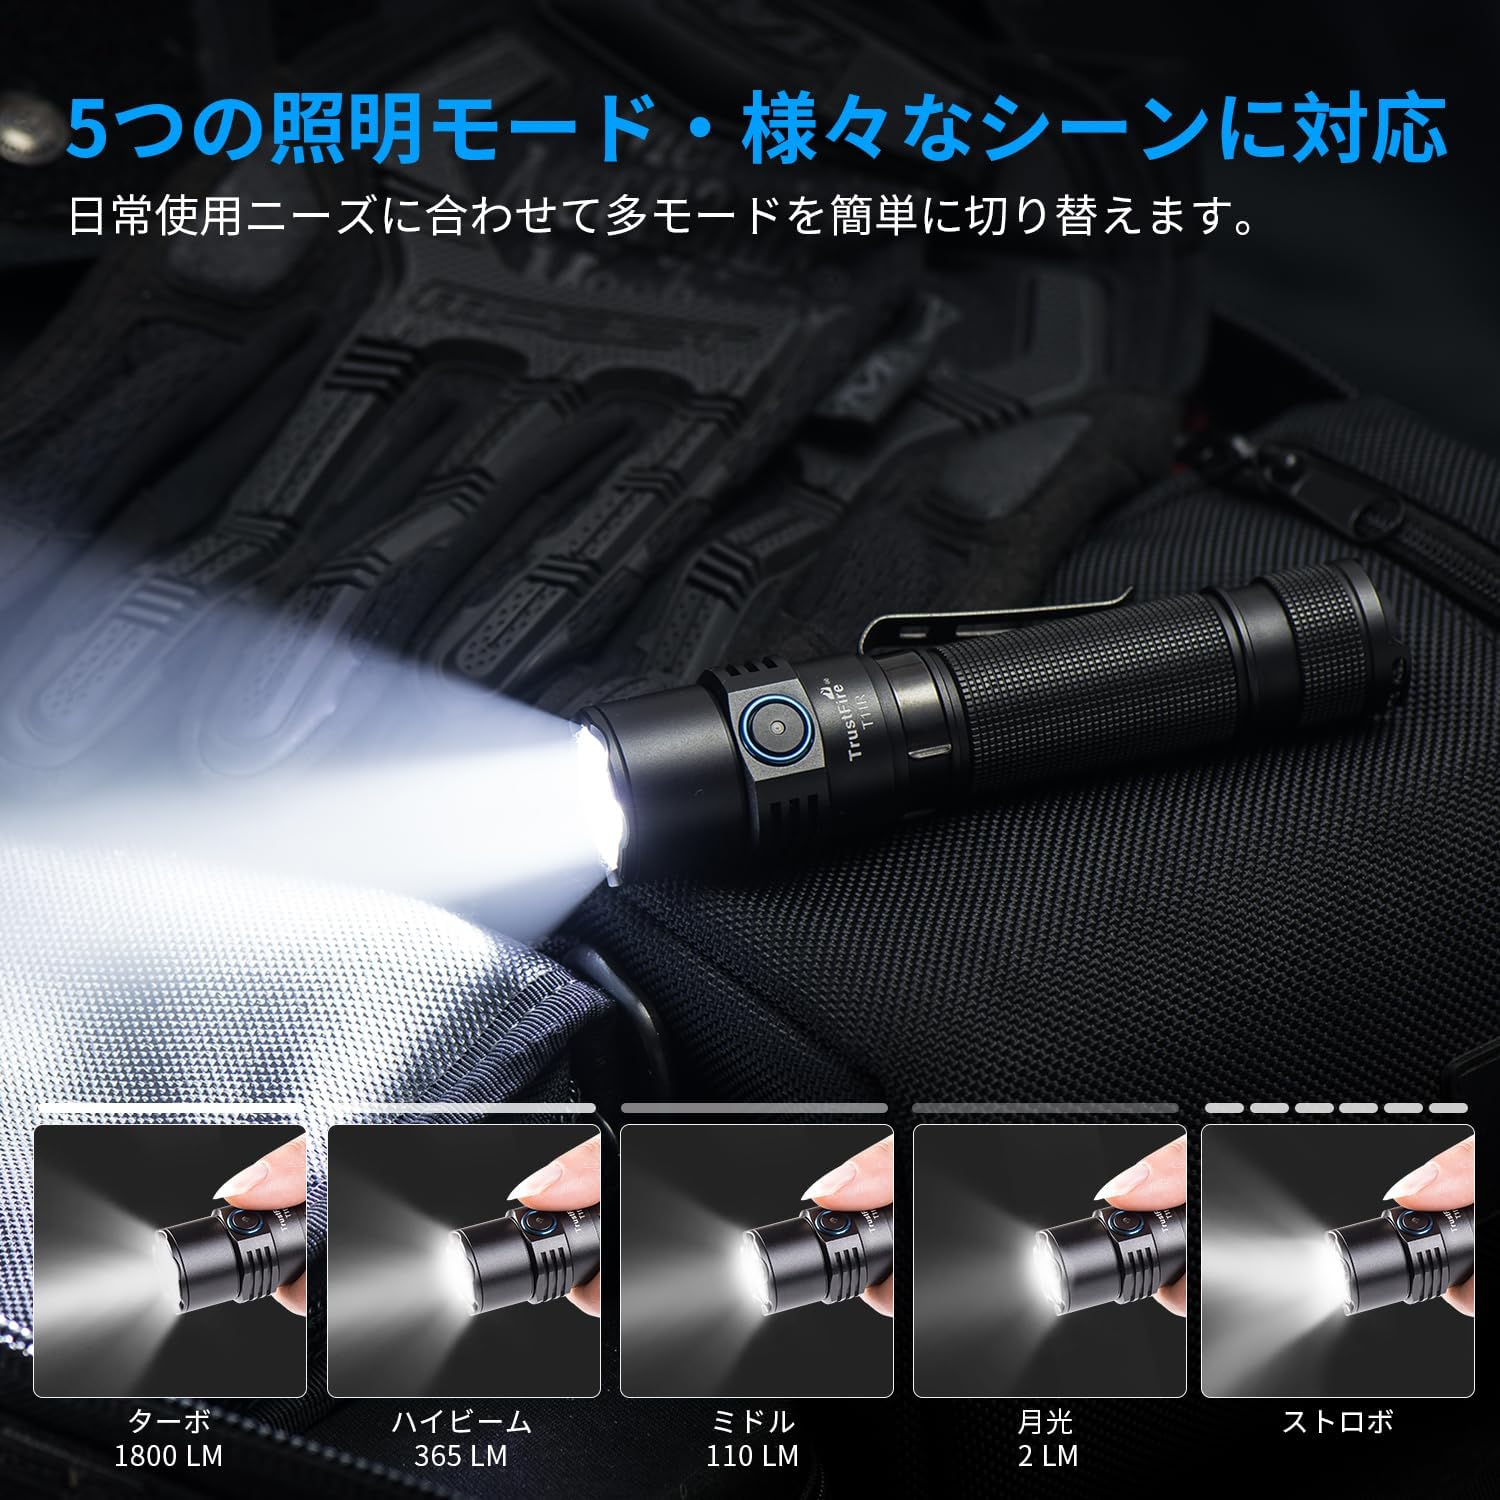
Image: The TrustFire T11R flashlight showcasing its various brightness levels and special modes.
5.3 Battery Level Indicator
The indicator light on the neck switch displays the battery level:
- Green: Battery capacity > 50%
- Orange: Battery capacity 20% - 50%
- Red: Battery capacity 5% - 20%
- Flashing Red: Battery capacity < 5%. The light will flash three times every minute.

Image: The TrustFire T11R flashlight's battery indicator light, illustrating different colors for various charge levels.
6. Maintenance
6.1 Charging
Regularly charge the flashlight to maintain optimal battery performance. Avoid completely draining the battery for extended periods.
6.2 Cleaning
Clean the flashlight body with a soft, damp cloth. Do not use abrasive cleaners or solvents. Keep the lens clean for maximum light output.
6.3 O-ring Maintenance
To maintain the IP68 waterproof rating, periodically inspect and lubricate the O-rings with silicone grease. Replace O-rings if they appear damaged or worn. A spare O-ring is included in the package.

Image: The TrustFire T11R flashlight in water, highlighting its IP68 waterproof and impact-resistant design.
7. Troubleshooting
- Flashlight not turning on:
- Ensure the battery is fully charged.
- Check if the tail cap is tightened securely.
- Verify that the battery is inserted with the correct polarity.
- Light is dim or flickering:
- Charge the battery.
- Clean the battery contacts and threads with a clean cloth.
- Water ingress:
- Check the O-rings for damage or improper seating. Replace if necessary.
- Ensure all parts are tightly screwed together.
If you encounter any issues not covered here, please contact TrustFire customer support for assistance.
8. Warranty & Support
The TrustFire T11R flashlight comes with a 3-year warranty from the date of purchase, covering manufacturing defects. This warranty does not cover damage caused by misuse, unauthorized modification, or normal wear and tear.
For warranty claims, technical support, or any product-related inquiries, please contact TrustFire customer service through the retailer where you purchased the product or visit the official TrustFire website for contact information.
Please retain your proof of purchase for warranty purposes.