M0607462157183
QS-WIFI-D02-TRIAC-2C Smart Wi-Fi DIY Module User Manual
Model: M0607462157183
1. Introduction
This user manual provides detailed instructions for the installation, operation, and maintenance of the QS-WIFI-D02-TRIAC-2C Smart Wi-Fi DIY Module. This module is designed to convert traditional switches into smart switches, enabling remote control via mobile applications and voice assistants.
Please read this manual thoroughly before installation and use to ensure proper functionality and safety.
2. Product Features
- Transforms traditional switches into smart switches.
- Compatible with EU/UK switch boxes.
- Wireless control via smartphone (Smart Life / Tuya App).
- Voice control compatibility with Amazon Alexa and Google Assistant.
- Supports AC 220-250V / 10 Amps maximum load.
- Wi-Fi connectivity (2.4GHz 802.11 b/g/n) without the need for a separate hub.
- Allows for scheduling and automation of lights and appliances.
3. Specifications
| Parameter | Value |
|---|---|
| Material | ABS |
| Color | White |
| Input Voltage | 220-240 V, 50 Hz |
| Maximum Load Capacity | 100 kg (Note: This specification may refer to a general circuit load capacity rather than the module's direct electrical load. Refer to Charging Power and Nominal Current for electrical limits.) |
| Charging Power | 2300 W |
| Nominal Current | 10 A |
| Wi-Fi Standard | 2.4 GHz 802.11 b/g/n |
| Terminal Platform | Android / iOS |
| Item Size | 46 x 46 x 17 mm |
| Operation Mode | ON-OFF |
| Circuit Type | 2-way |
| Mounting Type | Wall Mount |
| Control Method | Remote, Voice |
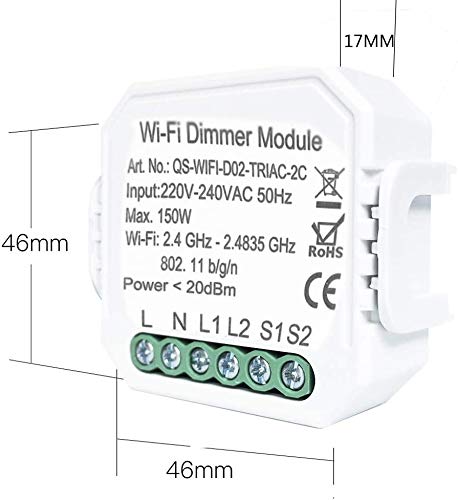
Figure 3.1: Module Dimensions. The image shows the module with dimensions of 46mm x 46mm x 17mm, highlighting its compact size.
4. Safety Information
WARNING: Electrical installation should only be performed by a qualified electrician or a person with sufficient knowledge of electrical systems to avoid electric shock or fire hazards.
- Ensure power is disconnected at the circuit breaker before installation or maintenance.
- Do not exceed the maximum load capacity of 10 Amps or 2300 Watts.
- This module is designed for indoor use only.
- Keep the device away from water, moisture, and high temperatures.
- Verify correct wiring connections according to the provided diagrams. Incorrect wiring can damage the device or connected appliances.
5. Setup and Installation
The QS-WIFI-D02-TRIAC-2C module is designed for easy integration into existing electrical systems, typically behind a traditional wall switch.
5.1. Wiring Diagram
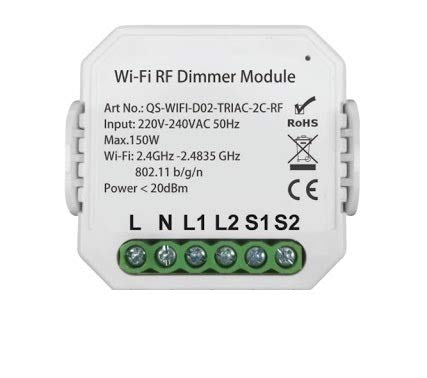
Figure 5.1: Module Terminals. The image displays the front of the module, showing the input/output terminals labeled L, N, L1, L2, S1, S2 for wiring connections.
Refer to the labels on the module for correct wiring:
- L: Live Input
- N: Neutral Input
- L1/L2: Load Output (for connecting to the light/appliance)
- S1/S2: Switch Input (for connecting to the traditional wall switch)
Note: This module is primarily designed for use with push-button switches, not toggle switches.
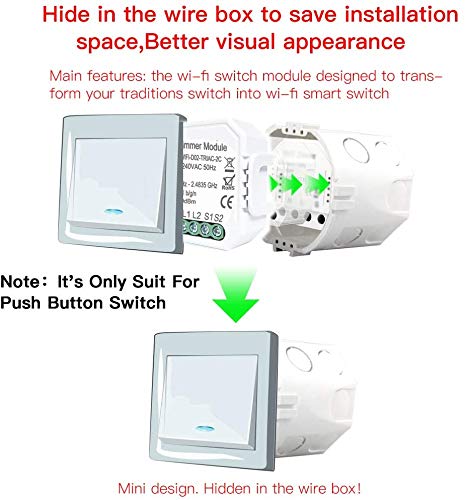
Figure 5.2: Hidden Installation. This image illustrates how the compact module can be hidden within a standard wire box behind a traditional wall switch, improving visual appearance and saving space.
5.2. Pairing with Smart Life / Tuya App
- Download the "Smart Life" or "Tuya Smart" app from your mobile device's app store (Android/iOS).
- Register or log in to your account.
- Ensure your mobile device is connected to a 2.4GHz Wi-Fi network.
- Power on the module. The indicator light on the module should blink rapidly, indicating it's in pairing mode. If not, press and hold the reset button (usually a small button on the module) for 5-10 seconds until it blinks rapidly.
- In the app, tap "+" to add a device. Select "Electrical" > "Switch (Wi-Fi)" or "Light Source (Wi-Fi)".
- Follow the on-screen instructions to connect the module to your Wi-Fi network. This typically involves confirming the blinking indicator and entering your Wi-Fi password.
- Once successfully added, you can rename the device and assign it to a room.
6. Operating Instructions
6.1. Manual Control
After installation, the connected traditional wall switch will continue to function normally, allowing you to turn the light/appliance ON or OFF manually.
6.2. App Control
Open the Smart Life or Tuya Smart app. Tap on the device name to access its control interface. From here, you can:
- Turn the connected light/appliance ON/OFF remotely.
- Set schedules or timers for automatic ON/OFF operations.
- Create scenes to control multiple smart devices simultaneously.
- Monitor the status of the light/appliance.
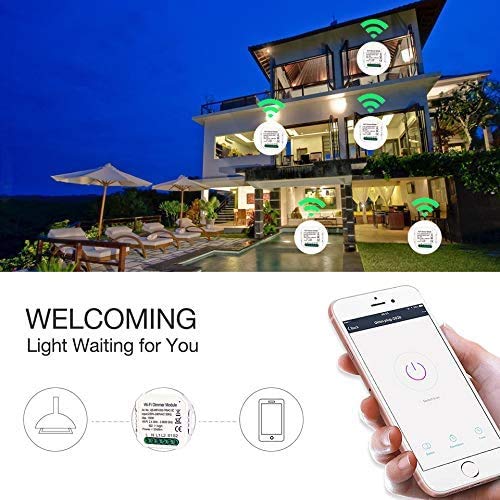
Figure 6.1: App Control Interface. The image shows a smartphone displaying the Smart Life/Tuya app, with a large power button to control the connected light, illustrating remote operation.
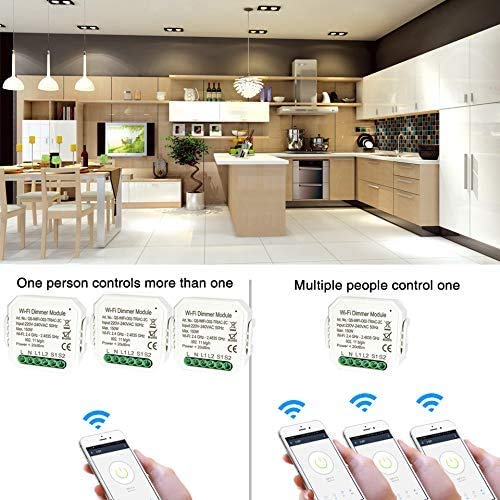
Figure 6.2: Multi-User/Multi-Device Control. This diagram illustrates the flexibility of the system: one user can control multiple modules, and multiple users can control a single module, enabling shared home control.
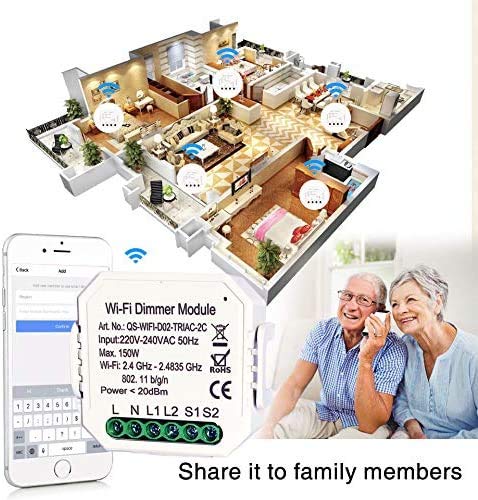
Figure 6.3: Family Sharing. The image depicts how control of the smart module can be shared among family members through the app, allowing multiple users to manage the smart home devices.
6.3. Voice Control (Alexa / Google Assistant)
To enable voice control, you need to link your Smart Life/Tuya Smart account with Amazon Alexa or Google Assistant.
- Open the Amazon Alexa app or Google Home app.
- Navigate to "Skills & Games" (Alexa) or "Works with Google" (Google Home).
- Search for "Smart Life" or "Tuya Smart" skill/service.
- Enable the skill/service and link your Smart Life/Tuya Smart account using your app credentials.
- Discover devices. Once discovered, you can use voice commands such as:
- "Alexa, turn on [Device Name]"
- "Hey Google, turn off [Device Name]"
- "Alexa, set [Device Name] to 50%" (if dimming is supported by the connected load and module variant)
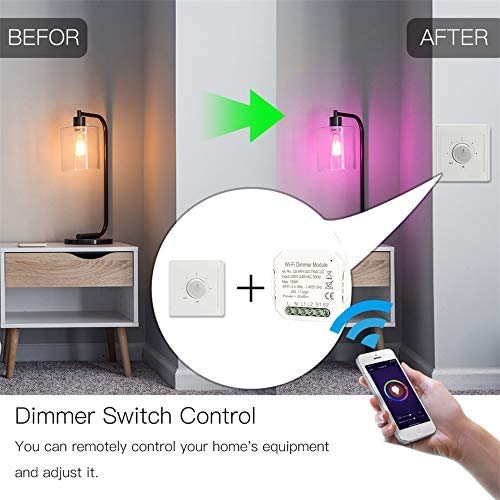
Figure 6.4: Dimmer Control Example. This image shows how the smart module can be integrated with a dimmer switch, allowing both manual and app-based control over light intensity.
7. Maintenance
- The module requires minimal maintenance.
- Ensure the module is kept in a dry environment.
- Periodically check wiring connections for tightness and signs of wear. Disconnect power before inspection.
- Clean the exterior of the module with a soft, dry cloth. Do not use harsh chemicals or abrasive cleaners.
- Keep the app updated to the latest version for optimal performance and security.
8. Troubleshooting
| Problem | Possible Cause | Solution |
|---|---|---|
| Module not responding / Light not turning ON/OFF via app. | No power to the module; Wi-Fi disconnected; App issue; Incorrect wiring. | Check circuit breaker. Verify Wi-Fi connection (2.4GHz). Restart app. Check wiring according to Section 5.1. |
| Module indicator light not blinking during pairing. | Not in pairing mode. | Press and hold the reset button on the module for 5-10 seconds until the indicator light blinks rapidly. |
| Cannot connect to Wi-Fi. | Incorrect Wi-Fi password; 5GHz Wi-Fi network; Weak signal. | Ensure correct password. Connect to a 2.4GHz Wi-Fi network. Move module closer to router or use a Wi-Fi extender. |
| Voice control not working. | Account not linked; Device not discovered; Incorrect voice command. | Ensure Smart Life/Tuya Smart account is linked in Alexa/Google Home app. Redo device discovery. Use correct device names and commands. |
| Traditional switch not working after installation. | Incorrect wiring to S1/S2 terminals. | Verify wiring to S1/S2 terminals as per Section 5.1. Ensure it's a compatible push-button switch. |
9. Warranty and Support
For warranty information and technical support, please refer to the retailer or manufacturer's official website where the product was purchased. Keep your purchase receipt as proof of purchase.
For common issues, please refer to the troubleshooting section of this manual or the FAQ section within the Smart Life/Tuya Smart application.
Ask a question about this manual
Ask about setup, troubleshooting, compatibility, parts, safety, or missing instructions. Manuals+ will review the question and use this page’s manual context to help answer it.