
1. Introduction
This manual provides detailed instructions for the installation, operation, and maintenance of your SHRISHMA A8025-18CB-5BN-L1 12V 0.21A Cooling Fan. Please read this manual thoroughly before use to ensure proper function and longevity of the product.
The SHRISHMA A8025-18CB-5BN-L1 is a compact and efficient cooling fan designed for various applications, particularly suitable for desktop systems requiring effective air circulation. It operates at 12V and draws 0.21A, providing forced air cooling.
2. Safety Information
Always observe the following safety precautions to prevent injury or damage to the product:
- Ensure the power supply is disconnected before installation or maintenance.
- Do not touch the fan blades while the fan is operating.
- Verify that the voltage and current ratings of your power source match the fan's specifications (12V, 0.21A).
- Keep the fan away from water or excessive moisture.
- Install the fan in a well-ventilated area to prevent overheating.
- Handle with care to avoid damaging the fan blades or wiring.
3. Package Contents
The package should contain the following items:
- 1 x SHRISHMA A8025-18CB-5BN-L1 Cooling Fan
- (Additional mounting hardware or screws may be included depending on the specific retail package.)
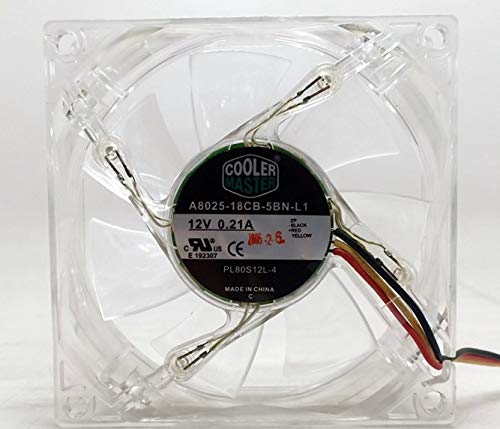
Figure 1: SHRISHMA A8025-18CB-5BN-L1 Cooling Fan. This image shows the transparent fan with a central label indicating "COOLER MASTER", model "A8025-18CB-5BN-L1", "12V 0.21A", and wiring connected to a 3-pin connector.
4. Specifications
| Feature | Detail |
|---|---|
| Model Number | A8025-18CB-5BN-L1 |
| Brand | SHRISHMA |
| Product Dimensions | 3.15"L x 0.98"W x 3.15"H (80mm x 25mm x 80mm) |
| Voltage | 12 Volts |
| Current | 0.21 Amps (as per label) |
| Wattage | 5 watts |
| Power Connector Type | 3-Pin |
| Cooling Method | Forced Air |
| Compatible Devices | Desktop |
| Material | Copper (referring to internal components/heatsink, fan housing is typically plastic) |
| Manufacturer | Bomin Technology |
| UPC | 791742982456 |
5. Setup and Installation
Follow these steps to properly install your cooling fan:
- Prepare the System: Before beginning installation, ensure your system (e.g., desktop computer) is completely powered off and unplugged from the electrical outlet.
- Open the Chassis: Carefully open the computer case or device chassis to access the fan mounting area.
- Identify Mounting Location: Determine the appropriate location for the fan. This fan is 80x80x25mm, so ensure there is adequate space and mounting holes available. Observe the airflow direction arrows (if present on the fan frame) to ensure proper air intake or exhaust.
- Mount the Fan: Position the fan in the desired location. Secure it using appropriate fan screws (not typically included with the fan itself, but usually provided with the chassis or as separate hardware). Do not overtighten the screws.
- Connect Power: Locate an available 3-pin fan header on your motherboard or fan controller. Carefully align the 3-pin connector from the fan with the header and push it firmly into place. Ensure correct polarity (usually indicated by a notch or color coding). The wiring typically follows: Black (Ground), Red (12V Power), Yellow (RPM Signal).
- Cable Management: Route the fan cable neatly to avoid interference with other components or airflow.
- Close Chassis: Once the fan is securely mounted and connected, close the computer case or device chassis.
- Power On: Reconnect the power cable and power on your system. Verify that the fan spins freely and quietly.
6. Operating Instructions
The SHRISHMA A8025-18CB-5BN-L1 cooling fan operates automatically once connected to a power source. Its primary function is to provide consistent airflow to cool components within your system.
- Continuous Operation: The fan is designed for continuous operation when the system is powered on.
- Speed Control (if applicable): If connected to a motherboard or fan controller with speed control capabilities, the fan's RPM may be adjusted via BIOS settings or software utilities. Refer to your motherboard or controller manual for specific instructions. This fan is a 3-pin fan, which typically provides RPM monitoring but not PWM speed control. Voltage-based speed control might be possible if supported by your motherboard.
- Monitoring: You can monitor the fan's RPM (revolutions per minute) through system monitoring software or BIOS settings, if your motherboard supports this feature on the connected header.
7. Maintenance
Regular maintenance helps ensure optimal performance and extends the lifespan of your cooling fan.
- Dust Removal: Periodically (e.g., every 3-6 months), power off and unplug your system. Open the chassis and use compressed air or a soft brush to gently remove dust accumulation from the fan blades and frame. Hold the fan blades stationary while using compressed air to prevent over-spinning the motor.
- Inspection: Visually inspect the fan for any signs of damage, such as cracked blades or frayed wires. Ensure the fan is securely mounted.
- Cleaning: For stubborn dirt, a slightly damp cloth can be used on the fan frame, but ensure no moisture enters the motor housing. Allow the fan to dry completely before powering on the system.
8. Troubleshooting
If you encounter issues with your cooling fan, refer to the following common problems and solutions:
| Problem | Possible Cause | Solution |
|---|---|---|
| Fan not spinning | No power, loose connection, faulty fan header, fan failure. |
|
| Fan making unusual noise | Dust accumulation, loose mounting, worn bearing, obstruction. |
|
| Insufficient cooling | Incorrect airflow direction, dust buildup, fan speed too low. |
|
9. Warranty and Support
SHRISHMA products are manufactured to high-quality standards. For specific warranty terms and conditions, please refer to the documentation provided at the time of purchase or contact your retailer. Keep your proof of purchase for warranty claims.
For technical support or inquiries, please contact the vendor or retailer from whom you purchased this product. They can provide assistance with installation, troubleshooting, and warranty services.