1. Introduction
The GOgroove BlueVIBE GTV Wireless TV Headphones are designed to provide a clear and immersive audio experience for television viewing without disturbing others. Featuring 2.4GHz RF technology, these headphones offer a stable wireless connection with no audio delay, a range of up to 100 feet, and a long-lasting 10-hour battery life. The comfortable, sound-isolating ear cups ensure extended listening comfort. This manual provides detailed instructions for setting up, operating, and maintaining your BlueVIBE GTV headphones.
Video 1: GOgroove BlueVIBE GTV Overview. This video provides a visual overview of the GOgroove BlueVIBE GTV Wireless TV Headset, demonstrating its components and basic functionality.
2. What's in the Box
Please verify that all items are present in your package:
- GOgroove BlueVIBE GTV Wireless Headphones
- 2.4GHz Wireless Transmitter
- Headphone Charging Cable (USB to Micro-USB)
- Transmitter Charging Cable (USB to Micro-USB)
- 2 x AC Wall Adapters (for charging cables)
- 3.5mm AUX Audio Cable
- RCA to 3.5mm Audio Cable
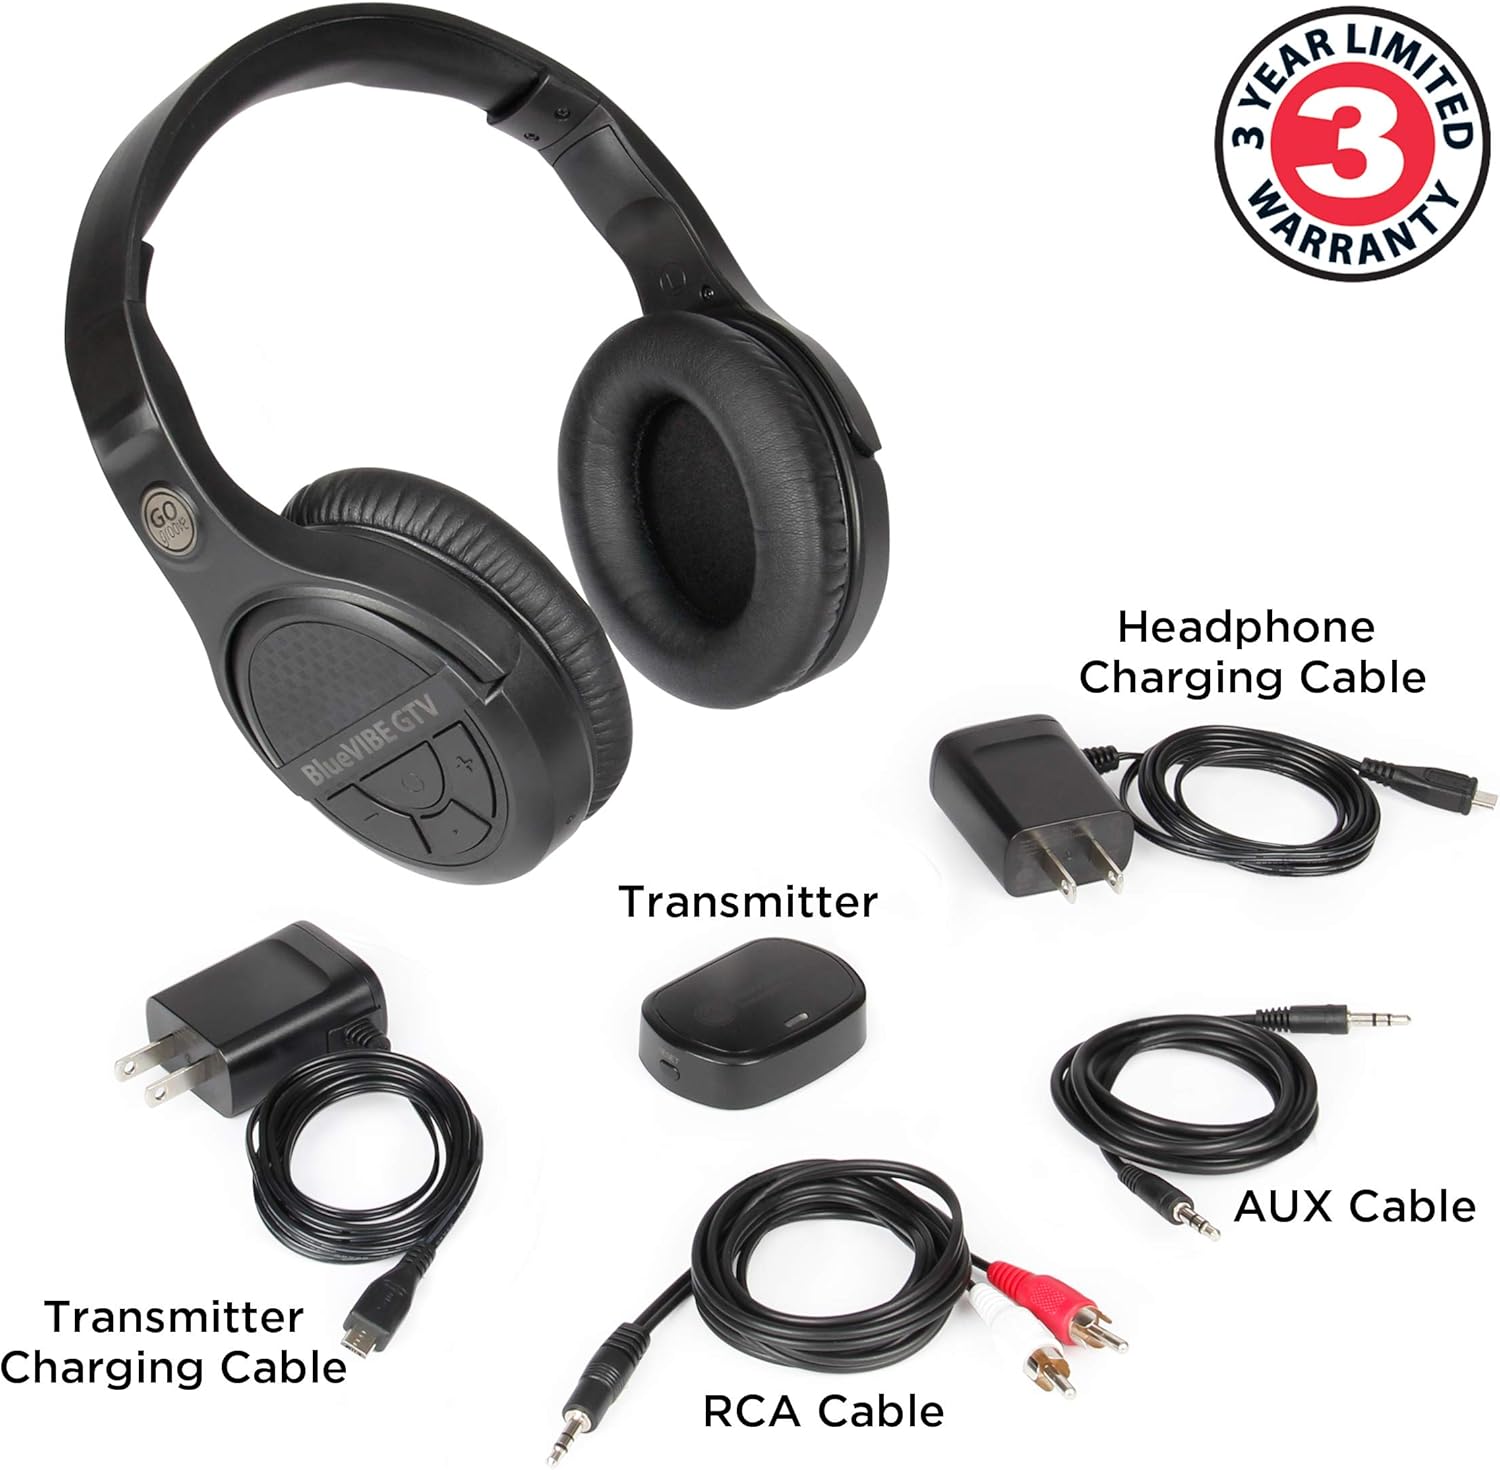
Image 1: Package Contents. This image displays all components included with the GOgroove BlueVIBE GTV Wireless TV Headphones: the headphones, the transmitter, and all necessary charging and audio cables.
3. Setup
3.1. Charging the Headset
Before initial use, ensure the headphones are fully charged. A full charge takes approximately 3 hours and provides up to 10 hours of wireless audio listening.
- Connect the Headphone Charging Cable to the USB Charging Port on the headphones.
- Plug the other end of the charging cable into one of the provided AC Wall Adapters, then plug the adapter into a power outlet.
- The red LED light on the headphones will illuminate during charging and turn off once fully charged.

Image 2: Charging Diagram. This diagram illustrates the correct method for charging both the headphones and the transmitter using the provided cables and AC adapters.
3.2. Connecting the Transmitter to Your TV
The 2.4GHz transmitter requires power and an audio connection to your television. Your TV must have either a 3.5mm AUX headphone port or RCA (red and white) audio output ports.
- Power the Transmitter: Connect the Transmitter Charging Cable to the USB Power Port on the transmitter. Plug the other end into the second AC Wall Adapter and then into a power outlet near your TV. The blue LED on the transmitter will light up.
- Connect Audio (Option 1: 3.5mm AUX): If your TV has a 3.5mm headphone output, connect one end of the 3.5mm AUX Audio Cable to the AUX Input on the transmitter and the other end to your TV's 3.5mm headphone output jack.
- Connect Audio (Option 2: RCA): If your TV has RCA audio output ports (red and white), connect the 3.5mm end of the RCA to 3.5mm Audio Cable to the AUX Input on the transmitter. Connect the red and white RCA plugs to the corresponding 'Audio Out' or 'Output' RCA ports on your TV. Ensure you connect to output ports, not input ports.

Image 3: Auto Connect. This image highlights the plug-and-play design and automatic connection between the headphones and the transmitter.
3.3. Powering On/Off the Headset
Once the transmitter is connected to your TV and powered on, and the headphones are charged, you can power on the headset.
- Power On: Press and hold the Power Button on the headphones for approximately 3 seconds until the blue LED indicator flashes. The headphones and transmitter will automatically pair.
- Power Off: When you are finished listening, press and hold the Power Button on the headphones for approximately 3 seconds until the LED indicator turns off.

Image 4: Headphone and Transmitter Controls. This image labels the various buttons and ports on both the headphones and the transmitter for easy identification and operation.
4. Operating the Headphones
4.1. Adjusting the Volume
For optimal sound quality and control, it is recommended to adjust your TV's volume first, then fine-tune the headphone volume.
- Turn the volume of your TV up to approximately 90% of its maximum.
- Use the Volume Up (+) and Volume Down (-) buttons located on the headphones to adjust the listening volume to your preferred level.

Image 5: Enjoying TV with Headphones. This image shows a user comfortably wearing the headphones while watching TV, highlighting the product's intended use for individuals who may be hard of hearing.

Image 6: Undisturbed Viewing. This image illustrates how the headphones allow users to watch TV without disturbing others in the same room, promoting a peaceful shared environment.
5. Maintenance
Proper care and maintenance will ensure the longevity of your GOgroove BlueVIBE GTV headphones.
- Cleaning: Use a soft, dry cloth to clean the headphones and transmitter. Avoid using abrasive cleaners or solvents.
- Storage: Store the headphones in a cool, dry place away from direct sunlight and extreme temperatures.
- Battery Care: To prolong battery life, avoid fully discharging the headphones frequently. Charge them regularly, even if not in constant use.
- Cable Care: Handle all cables gently. Avoid sharp bends or excessive pulling to prevent damage.

Image 7: Premium Ear Cup Padding. This image highlights the soft, comfortable ear cup padding, emphasizing the design for extended wear.
6. Troubleshooting
If you encounter any issues with your GOgroove BlueVIBE GTV headphones, please refer to the following common solutions:
- No Audio:
- Ensure both the headphones and transmitter are powered on and fully charged.
- Verify that the audio cable (3.5mm AUX or RCA) is securely connected to the transmitter's AUX Input and the correct audio output port on your TV. Ensure it's an 'Audio Out' port, not an 'Audio In' port.
- Check your TV's audio settings to ensure external audio output is enabled and not muted. Increase the TV's volume to at least 90%.
- Adjust the volume on the headphones using the +/- buttons.
- If using RCA cables, ensure the red and white plugs are connected to the correct corresponding output jacks on the TV.
- Poor Audio Quality/Static:
- Ensure the transmitter is placed in a clear line of sight with the headphones, minimizing obstructions.
- Move the transmitter away from other wireless devices (e.g., Wi-Fi routers, cordless phones) that might cause interference.
- Check all cable connections for looseness or damage.
- Headphones Not Pairing:
- Ensure both the headphones and transmitter are powered on.
- If they do not automatically pair, try powering both devices off and then on again.
- Perform a reset on the transmitter by pressing the Reset Button with a small pointed object (like a paperclip).
- Short Battery Life:
- Ensure the headphones are fully charged (red LED turns off).
- Battery performance can decrease over time with extensive use.
7. Specifications
| Connectivity Technology | 2.4GHz RF Wireless |
| Wireless Range | Up to 100ft (unobstructed line of sight) |
| Audio Delay | No Audio Delay |
| Battery Life | Up to 10 Hours |
| Charging Time | Approximately 3 Hours |
| Headphones Jack | 3.5 mm Jack (for wired connection if desired) |
| Compatible Devices | Television (with 3.5mm AUX or RCA audio output) |
| Earpiece Shape | Over Ear |
| Noise Control | Sound Isolation |
| Item Weight | 7 ounces (0.44 Pounds) |
| Product Dimensions | 8 x 6.5 x 3.25 inches |

Image 8: Key Features. This image highlights the core features of the BlueVIBE GTV headphones, including comfort, connectivity, and sound quality.
8. Warranty & Support
The GOgroove BlueVIBE GTV Wireless TV Headphones come with a 1-year limited warranty. You can extend this to a complimentary 3-year warranty by registering your product within 30 days of sale.
To activate your extended warranty and receive free advanced technical support, please visit:
For further assistance or technical support, please refer to the contact information provided on the GOgroove website.


