
LIVINGbasics B08LVD49ZH
LIVINGbasics Portable Baby Playard and Changing Table User Manual
Model: B08LVD49ZH
Introduction
This manual provides essential instructions for the safe assembly, operation, and maintenance of your LIVINGbasics Portable Baby Playard and Changing Table. Designed for convenience and safety, this versatile product serves as a playard, bassinet, and changing table, suitable for home, travel, and outdoor use.

Figure 1: LIVINGbasics Portable Baby Playard and Changing Table in playard mode with changing table attachment.

Figure 2: Overview of the 3-in-1 functionality: Bassinet, Baby Playard, and Changing Table.
Safety Information
Always prioritize your child's safety. Read and understand all instructions before assembly and use. Keep this manual for future reference.
- Never leave infant in product with sides down.
- Ensure all locking mechanisms are engaged before placing a child in the playard.
- Do not use if any parts are broken, torn, or missing.
- Do not use a mattress other than the one provided by the manufacturer.
- Maximum weight recommendation for bassinet: 9 kg (20 lbs).
- Maximum weight recommendation for playard: 15 kg (33 lbs).
- Always use the safety straps on the changing table.
- Keep small parts and packaging materials away from children.

Figure 3: Components and materials: 300D cationic cloth, alloy body, environmental protection PP plastic, and breathable mesh for safety and durability.
Parts List
Ensure all parts are present before beginning assembly:
- Main Playard Frame with Mesh Sides
- Removable Bassinet Insert
- Flip-away Diaper Changing Table
- Mattress Pad (multi-textured)
- Mobile with Hanging Toys
- Support Poles for Bassinet (if separate)
- Travel Bag
Setup and Assembly
Follow these steps to assemble your playard. For a visual guide, please refer to the instructional video below.
Video 1: Comprehensive guide on assembling, folding, and using the LIVINGbasics Portable Baby Playard and Changing Table.
Assembling the Playard
- Step 1: Keep the playard upright. Ensure the playard is standing vertically before proceeding.
- Step 2: Hold up the four side rails. Lift the short side rails first, then the long side rails, until they click into place. Ensure they are fully locked.
- Step 3: Ensure all four sides are locked. Verify that all four top rails are rigid and securely locked. If not, lift the center of the rail until it locks.
- Step 4: Press the bottom of the playard to complete the installation. Push down firmly on the center of the playard floor until it lies flat and is secure.

Figure 4: Step-by-step visual guide for playard assembly.
Installing the Bassinet Insert
The bassinet insert provides a higher sleeping surface for infants.
- Ensure the playard is fully assembled and locked.
- Unzip the bassinet fabric from the top rail.
- Insert the support poles into the designated sleeves on the bassinet fabric.
- Secure the bassinet insert to the playard frame using the provided clips or zippers around the top perimeter.
- Place the mattress pad inside the bassinet insert.
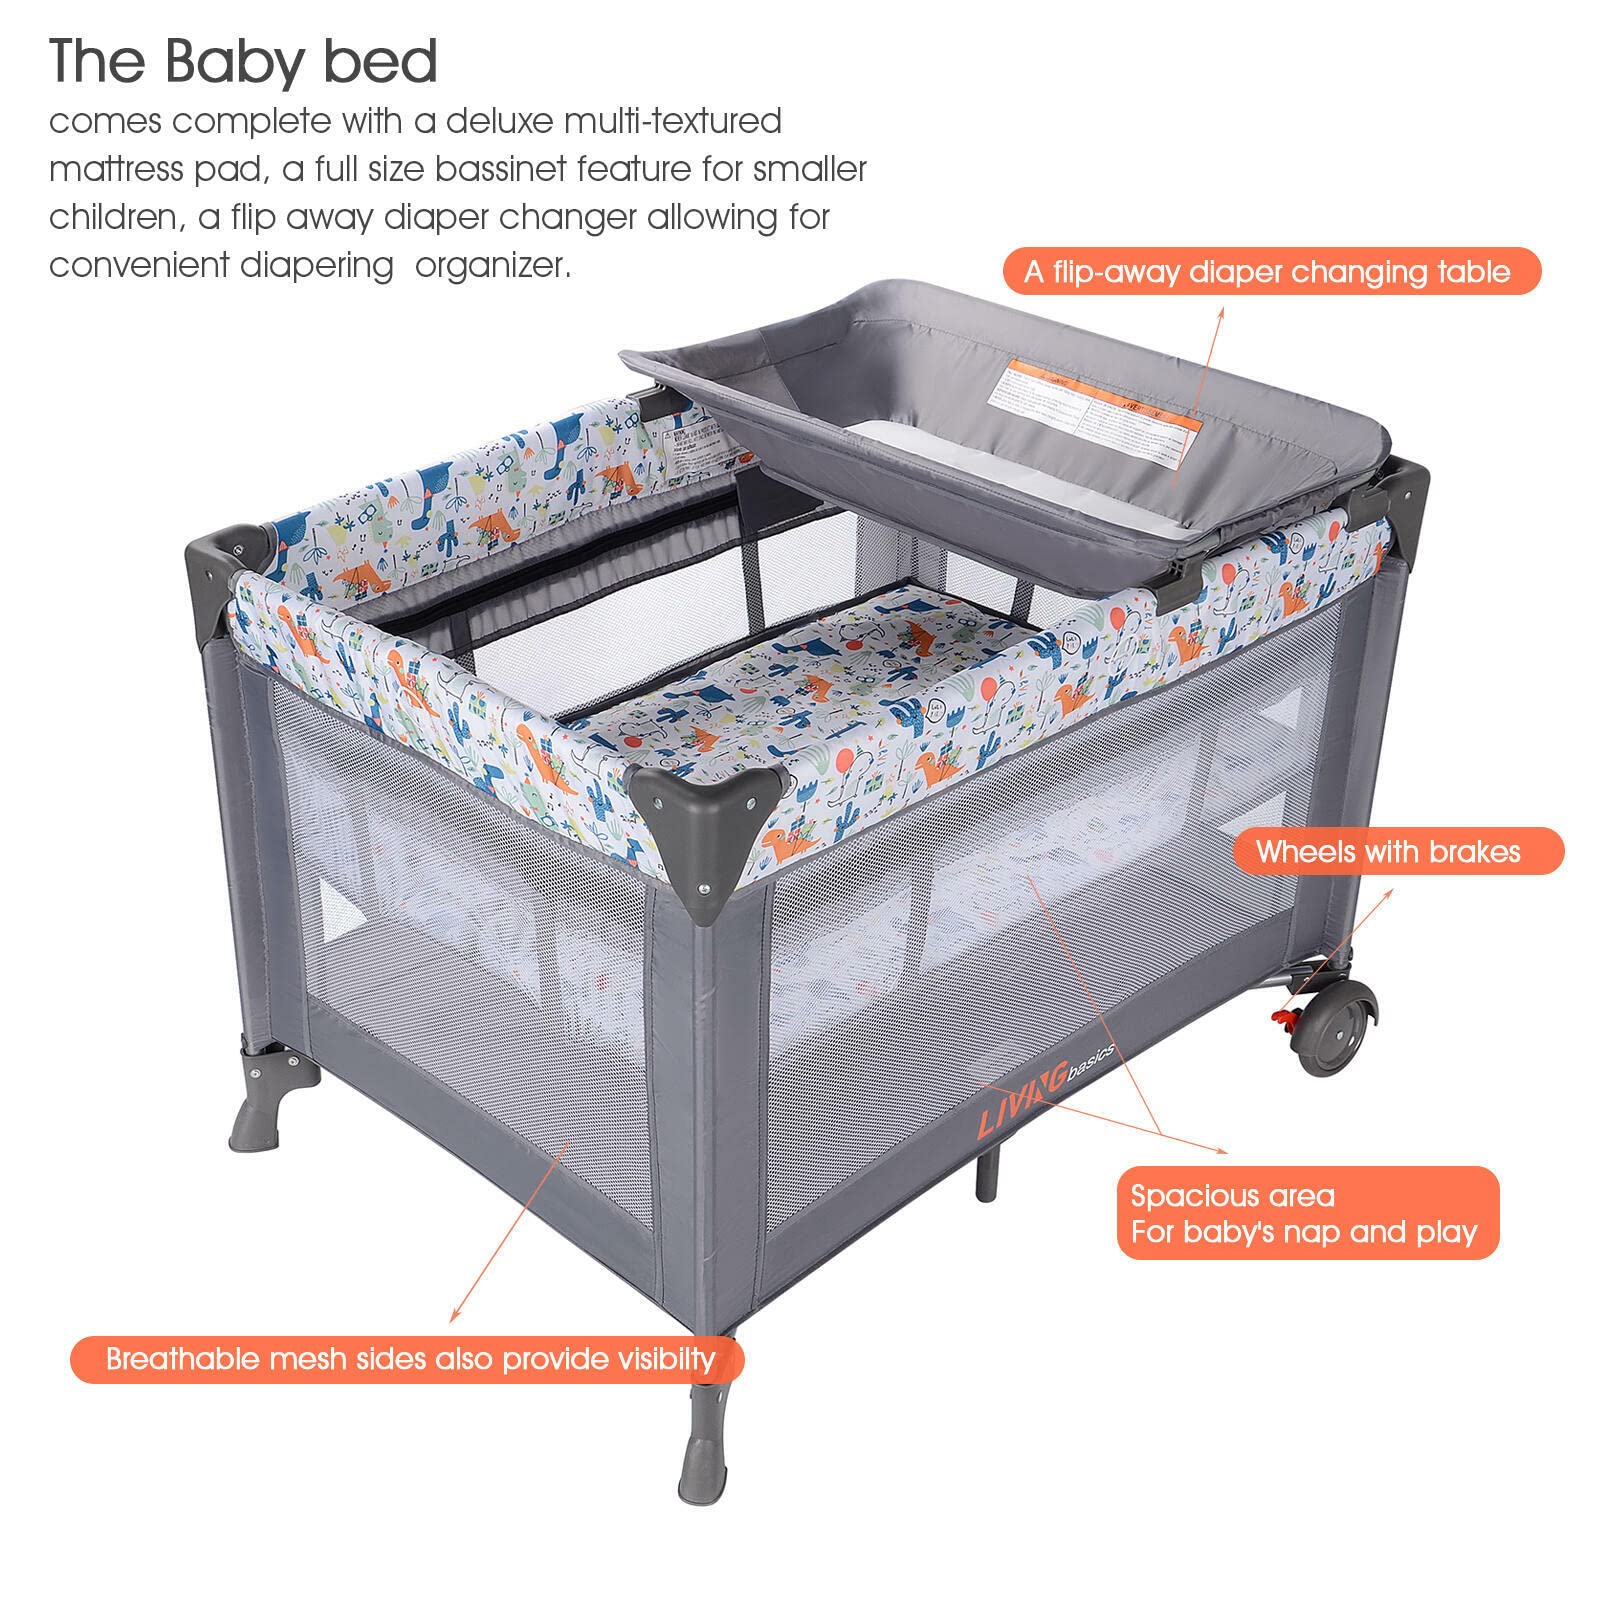
Figure 5: The playard configured with the bassinet insert and flip-away changing table.

Figure 6: The bassinet provides a safe and cozy sleeping space for your baby.
Attaching the Changing Table
The changing table easily attaches to the top of the playard for convenient diaper changes.
- Align the changing table's attachment points with the corresponding slots on the playard's top rails.
- Press down firmly until the changing table clicks securely into place.
- To remove, press the release buttons on the attachment points and lift.
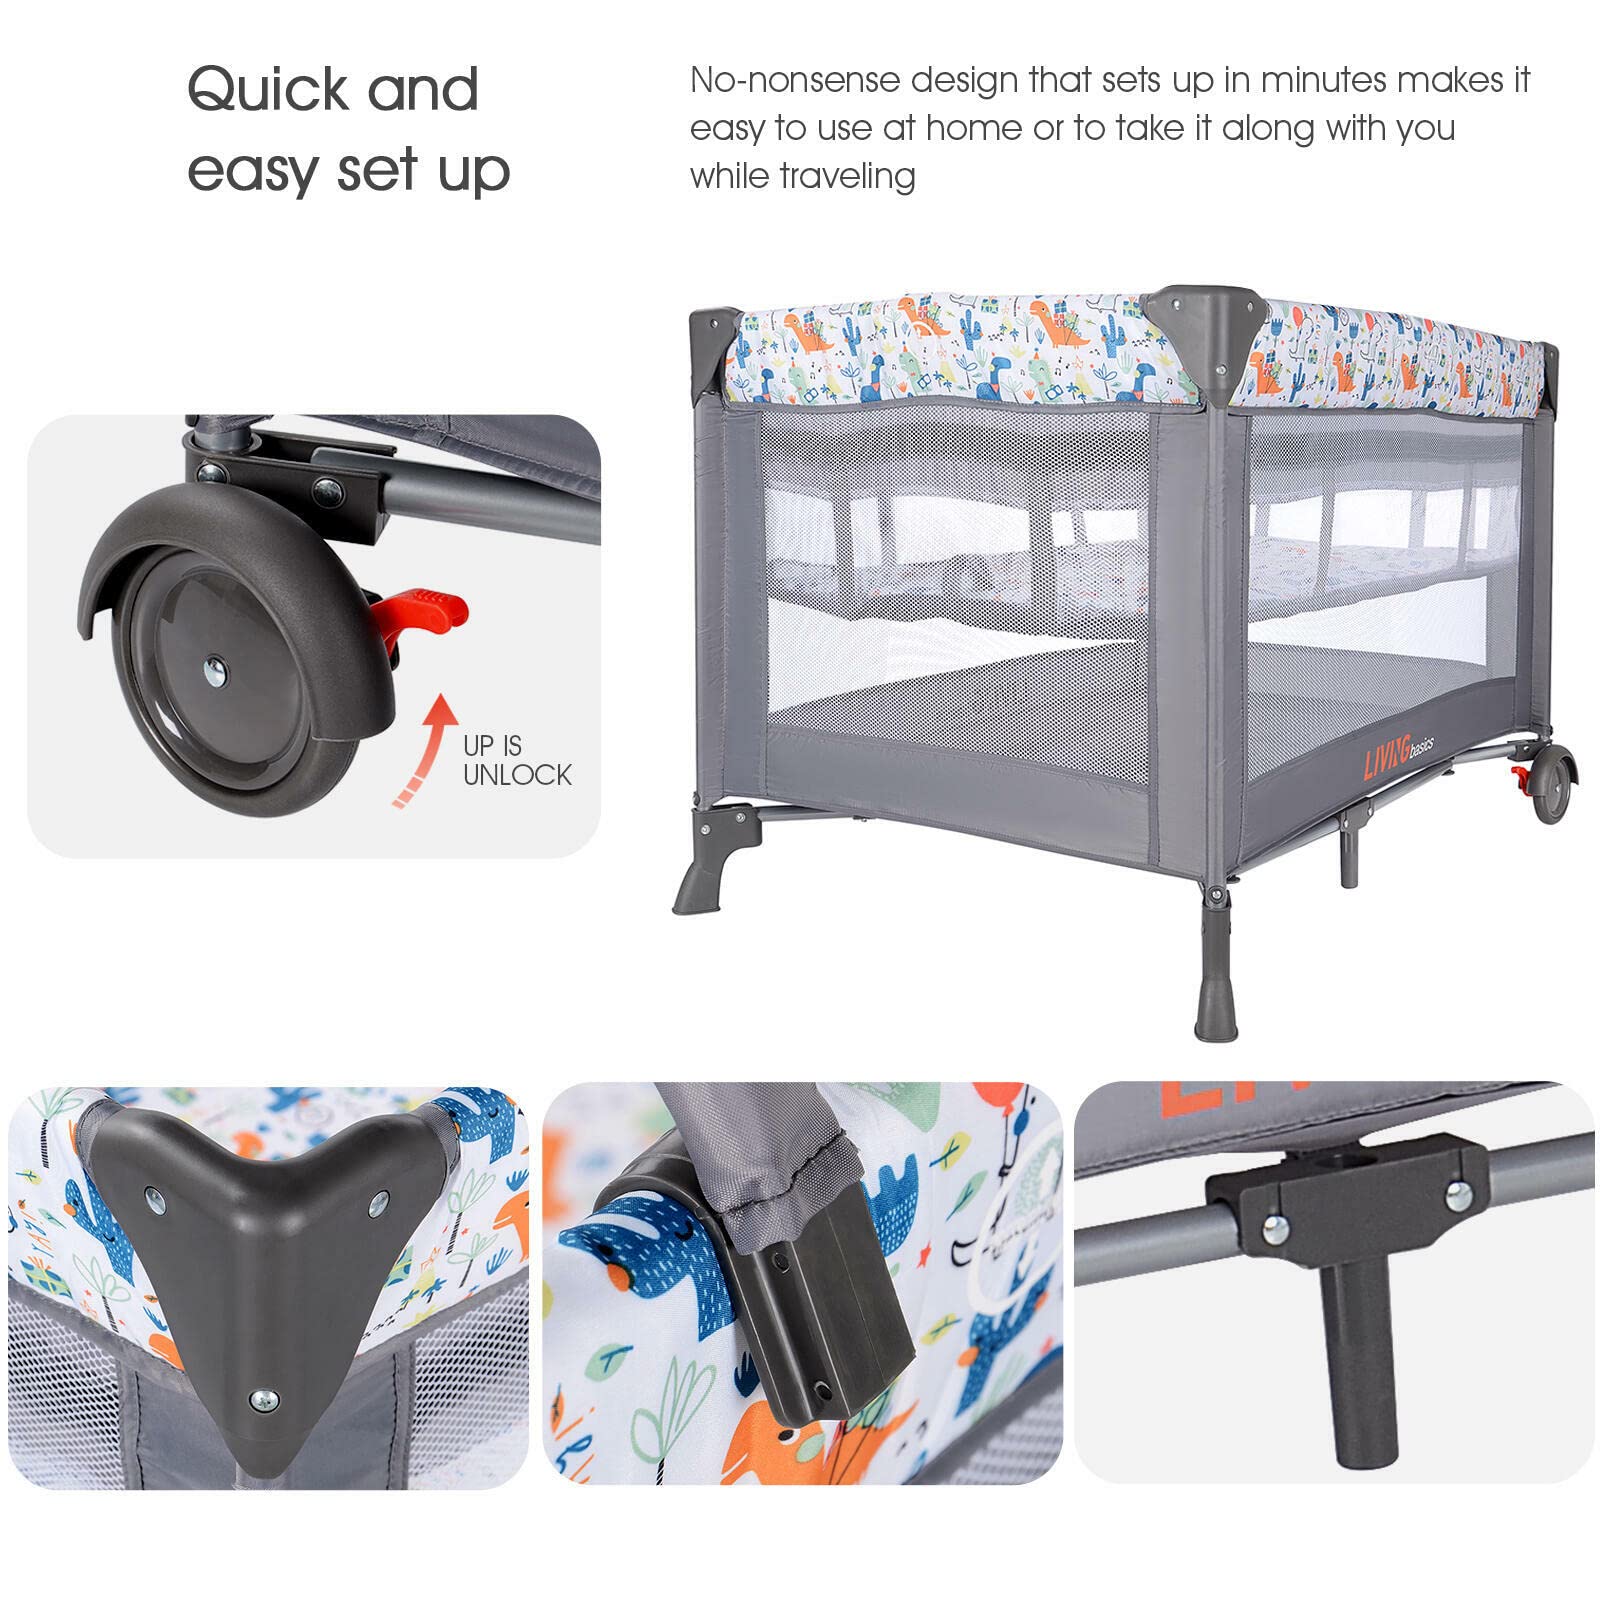
Figure 7: Detail of the wheel lock mechanism (UP is UNLOCK) and corner connection points, essential for secure setup.
Operating Instructions
Your LIVINGbasics Playard offers multiple configurations to suit your needs.
Playard Mode
For older infants and toddlers, the playard provides a spacious and secure area for play and rest. Ensure the bassinet and changing table attachments are removed for full playard use.
Bassinet Mode
Ideal for newborns and younger infants, the bassinet insert raises the sleeping surface, making it easier to access your baby. Always ensure the bassinet is securely attached and the mattress pad is flat.
Changing Table Mode
The convenient flip-away changing table allows for quick and easy diaper changes. Always use the safety straps and keep one hand on your baby at all times while using the changing table.

Figure 8: Visual representation of the playard's versatility in Playard, Bassinet, and Changing Table modes.

Figure 9: The playard provides a safe and comfortable space for your child to play.
Folding and Storage
The playard is designed for easy folding and portability.
- Step 1: Remove all accessories. After removing the changing table, bassinet insert, and mattress pad, pull up on the loop located at the center of the playard floor.
- Step 2: Grasp the connecting of long rail and feel the locking mechanism underneath the joint. Squeeze and release the locking mechanism and push downward. Repeat for all four rails.
- Step 3: Unlock the short rail. Ensure all side rails are unlocked and slightly bent inward.
- Step 4: Move railings toward center and wrap the travel cot tightly with the mattress. Gather the playard inward and secure it with the mattress pad wrapped around it.

Figure 10: Step-by-step visual guide for folding the playard.
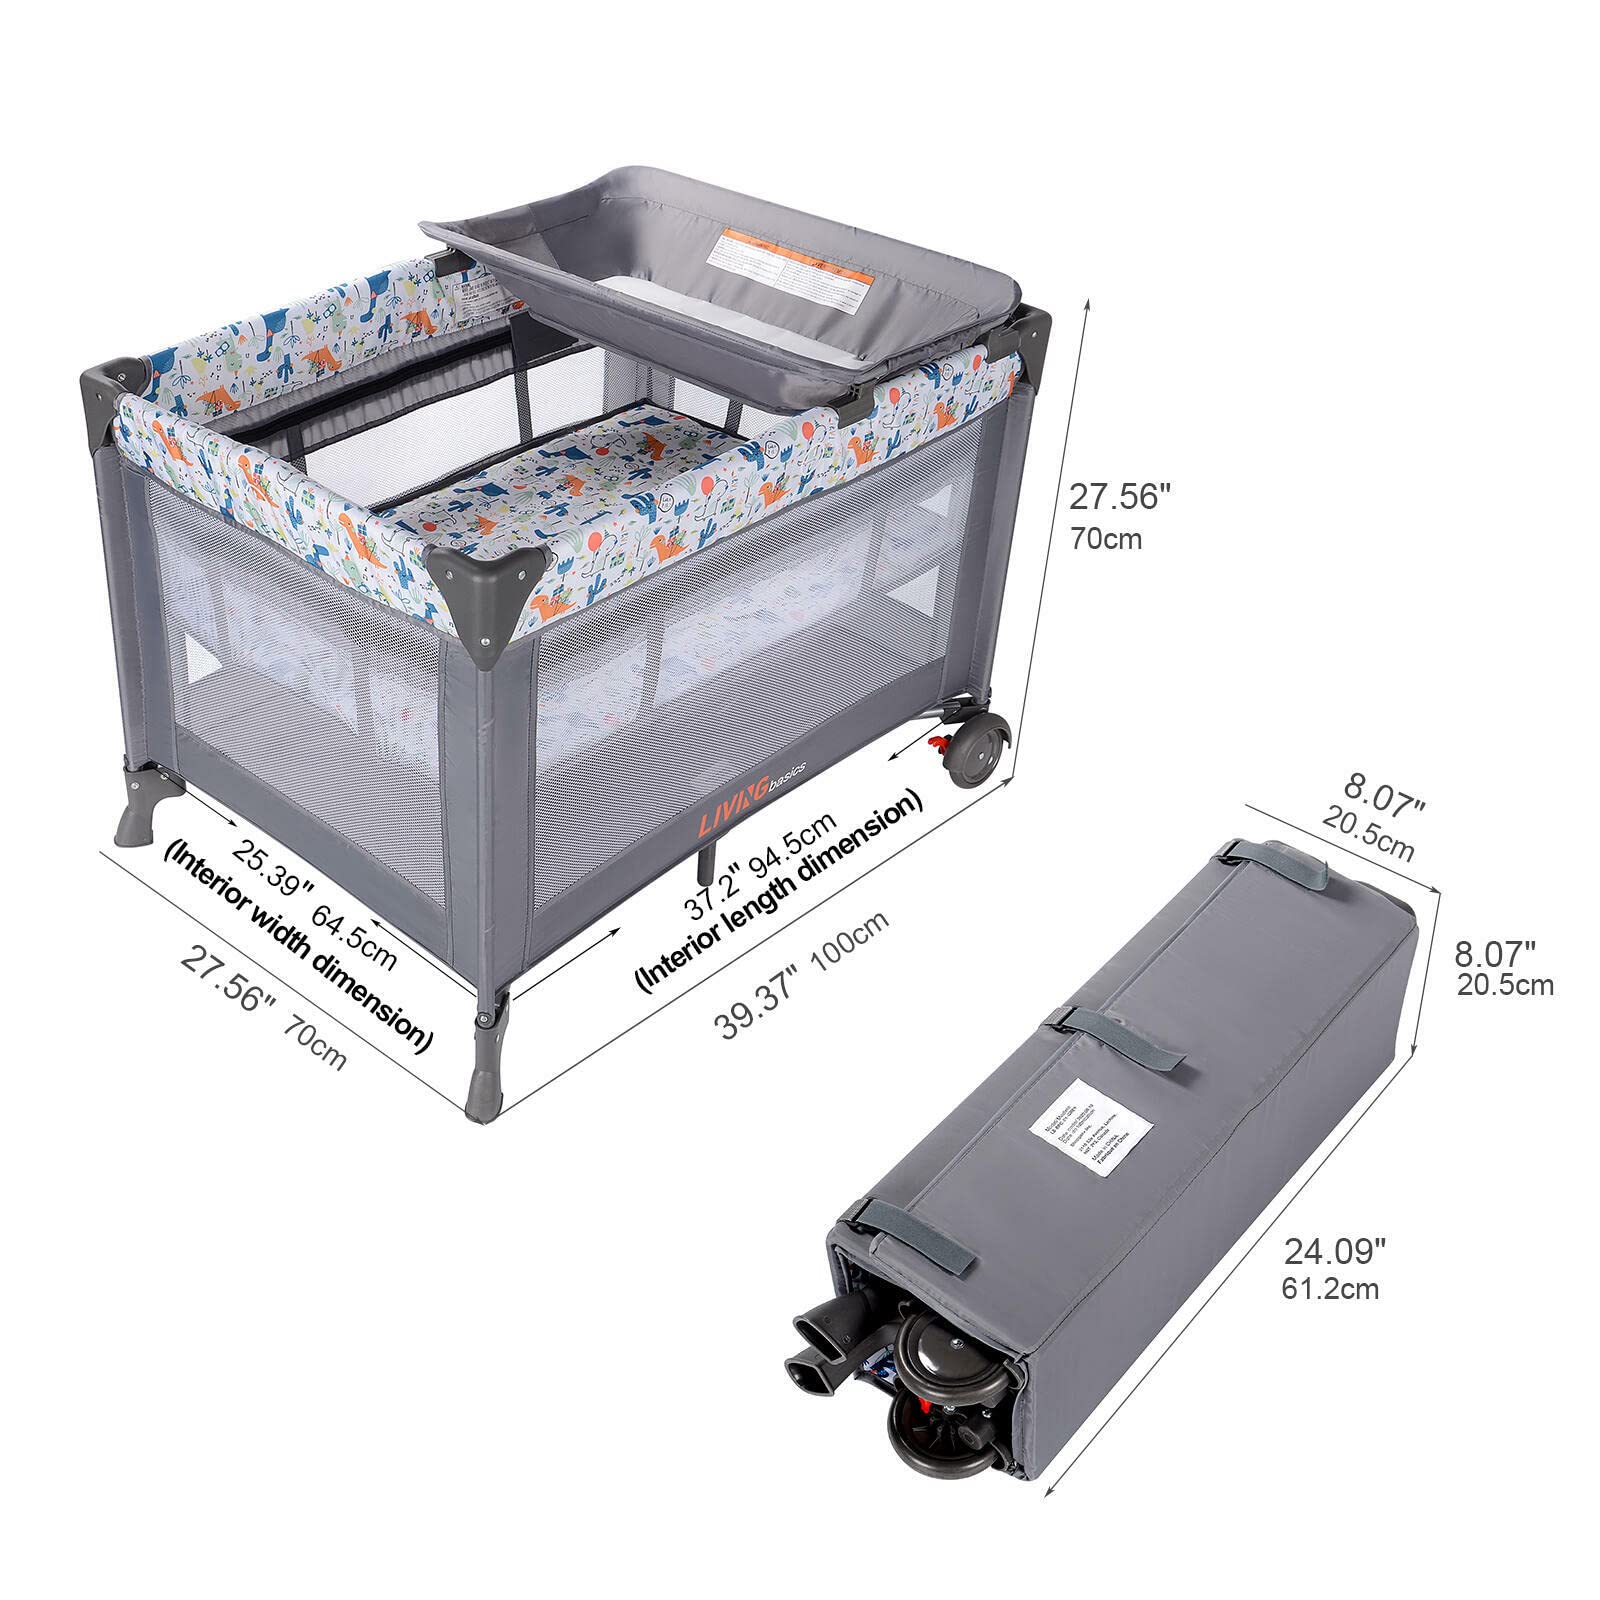
Figure 11: The playard's expanded and folded dimensions for easy storage and transport.
Maintenance and Cleaning
To keep your playard clean and hygienic:
- Wipe surfaces with a damp cloth and mild soap.
- Allow all components to air dry completely before folding or storing.
- Do not use abrasive cleaners or bleach.
- Regularly check for loose screws, worn parts, or torn fabric.
Troubleshooting
| Problem | Possible Cause | Solution |
|---|---|---|
| Playard sides do not lock into place. | The center of the playard floor is not fully pushed down, or side rails are not lifted correctly. | Ensure the playard floor is not pushed down before attempting to lock the side rails. Lift each side rail firmly until it clicks into place. Then, push the center of the playard floor down. Refer to the "Correct opening mode" section in the assembly video. |
| Playard is difficult to fold. | Side rails are still locked, or the center loop is not pulled up sufficiently. | Ensure all side rails are unlocked by squeezing the release mechanisms and slightly bending them inward. Pull the center loop of the playard floor firmly upwards. |
| Changing table or bassinet not secure. | Not properly attached or clips/zippers not fully engaged. | Verify that all attachment points (clips, zippers) are fully engaged and secure. Ensure the playard frame is fully assembled and locked before attaching accessories. |
Specifications
| Feature | Detail |
|---|---|
| Product Dimensions (Expanded) | 100 x 70 x 70 cm (39.4 x 27.6 x 27.6 inches) |
| Folded Size | 20.5 x 20.5 x 61.2 cm (8.1 x 8.1 x 24.1 inches) |
| Item Weight | 12 kg (26.46 lbs) |
| Maximum Weight Recommendation (Playard) | 15 kg (33 lbs) |
| Maximum Weight Recommendation (Bassinet) | 9 kg (20 lbs) |
| Material Type | Plastic, Steel Pipe, Cloth (300D cationic cloth, environmental protection PP plastic) |
| Color | Grey with patterned fabric |
| Features | Foldable, Removable Bassinet, Changing Table, Wheels with Brakes, Breathable Mesh Sides |
Figure 12: Detailed dimensions of the playard, including interior and exterior measurements, and folded size.
Warranty and Support
For warranty information or product support, please contact LIVINGbasics customer service. Keep your purchase receipt as proof of purchase.
- Manufacturer: LIVINGbasics
- Place of Business: Lachine, Quebec H8T 2Y3, CA
- For further assistance, please visit the LIVINGbasics Store on Amazon.
Ask a question about this manual
Ask about setup, troubleshooting, compatibility, parts, safety, or missing instructions. Manuals+ will review the question and use this page’s manual context to help answer it.