Introduction
This manual provides detailed instructions for the setup, operation, and maintenance of your Hojo Digital LED DS-3620 Alarm Clock. Please read this manual thoroughly before using the device to ensure proper function and longevity.
Product Features
- Digital LED display with time, date, day, and temperature.
- Smart sensor light for automatic backlight adjustment in dark environments.
- Three distinct alarm settings.
- Snooze function.
- Voice control for backlight activation.
- Compact and portable design.
Package Contents
Upon unpacking, please ensure all items are present and in good condition:
- 1 x Hojo Digital LED DS-3620 Alarm Clock
- Batteries (if included, as per product specifications)
- This User Manual
Note: The clock may come in a random color.
Setup
1. Battery Installation
- Locate the battery compartment cover on the back of the clock.
- Slide or unclip the cover to open.
- Insert the required batteries (typically AAA, check compartment for specific type) according to the polarity indicators (+ and -).
- Replace the battery compartment cover securely.
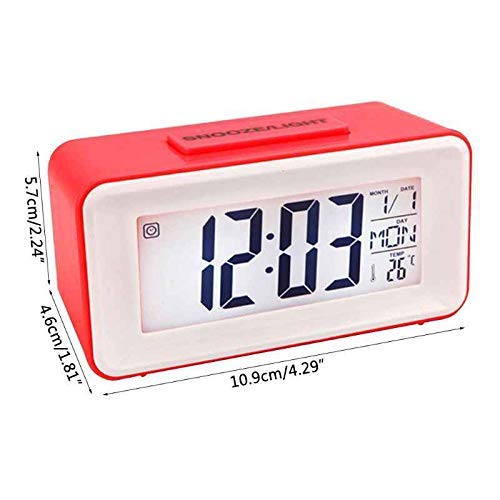
Image: Rear view of the Hojo DS-3620 alarm clock, highlighting the battery compartment and control buttons for setup.
2. Initial Power On
Once batteries are installed, the LCD display should illuminate, showing default time and date settings.
Operating Instructions
Control Buttons Overview
The clock features several control buttons, typically located on the back:
- MODE: Cycles through time, alarm, and date settings.
- SET: Enters setting mode for the currently displayed item.
- UP / DOWN: Adjusts values during setting mode.
- SNOOZE/LIGHT: Activates snooze during an alarm or temporarily illuminates the display backlight.
- C/F: Toggles temperature display between Celsius and Fahrenheit.
- 12/24: Toggles time display between 12-hour and 24-hour format.
- ON/OFF Switch: Located on the side/back, controls the alarm function.
Setting Time and Date
- Press the MODE button until the time display is active.
- Press and hold the SET button until the hour digits begin to flash.
- Use the UP or DOWN buttons to adjust the hour.
- Press SET again to move to the minute digits, then adjust with UP or DOWN.
- Continue pressing SET to cycle through year, month, and date settings, adjusting each with UP or DOWN.
- Press SET one last time or wait a few seconds for the settings to save and exit setting mode.
Setting Alarms (Up to 3)
- Press the MODE button repeatedly until "ALARM 1" (or A1) is displayed.
- Press and hold the SET button until the alarm hour digits flash.
- Use UP or DOWN to set the desired alarm hour.
- Press SET to move to the alarm minute digits, then adjust with UP or DOWN.
- Press SET again to save the alarm time.
- To activate the alarm, ensure the alarm ON/OFF switch on the back is in the "ON" position. An alarm icon should appear on the display.
- Repeat for ALARM 2 and ALARM 3 if available.
Snooze Function
When an alarm sounds, press the large SNOOZE/LIGHT button on top of the clock. The alarm will pause for approximately 5 minutes and then sound again.
Backlight and Voice Control
- Manual Backlight: Press the SNOOZE/LIGHT button to temporarily illuminate the display.
- Smart Sensor Light: The clock automatically adjusts backlight intensity in dark environments. To enable/disable this feature, locate the sensor switch (often labeled "SENSOR" or represented by an icon) on the back or side of the clock.
- Voice Control Backlight: In dark conditions, a sound (e.g., a clap or tap) can activate the backlight for a few seconds. Ensure the voice control feature is enabled (check for a dedicated switch or setting if available).

Image: Front view of the Hojo DS-3620 alarm clock, displaying the time, date, day of the week, and temperature. The casing is blue and white.
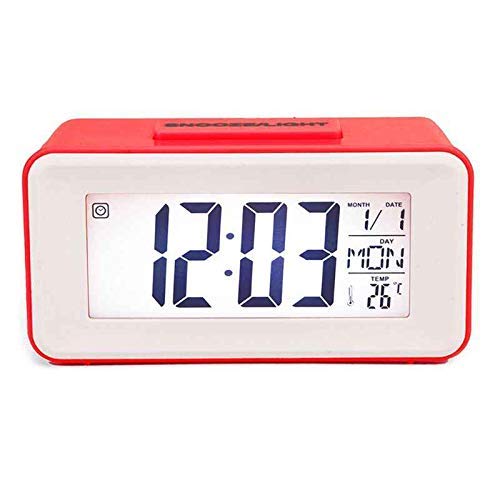
Image: Front view of the Hojo DS-3620 alarm clock in a red casing, showing the digital display with time, date, day, and temperature.
Maintenance
Cleaning
Wipe the clock's exterior with a soft, dry cloth. Do not use abrasive cleaners or solvents, as these can damage the finish or display.
Battery Replacement
Replace batteries when the display dims or functions become unreliable. Always replace all batteries at the same time with new ones of the same type.
Storage
If storing the clock for an extended period, remove the batteries to prevent leakage and potential damage to the device.
Troubleshooting
| Problem | Possible Cause | Solution |
|---|---|---|
| Display is blank or dim. | Low or dead batteries; incorrect battery installation. | Replace batteries with new ones, ensuring correct polarity. |
| Alarm does not sound. | Alarm is not set; alarm ON/OFF switch is in "OFF" position; low battery. | Verify alarm settings; ensure alarm switch is "ON"; replace batteries. |
| Backlight not working. | Sensor light disabled; voice control not active; low battery. | Check sensor switch; ensure voice control is enabled; replace batteries. |
| Incorrect time/date. | Time/date not set correctly after battery installation or power interruption. | Follow "Setting Time and Date" instructions to reset. |
Specifications
| Model Number | DS-3620 |
| Brand | Hojo |
| Display Type | Digital LED |
| Power Source | Battery Powered |
| Material | Plastic |
| Dimensions (LxWxH) | 11 x 4.7 x 5.5 cm (approximately) |
| Weight | 100 g (approximately) |
| Special Features | Alarm, Snooze, Backlight, Thermometer, Voice Control, Perpetual Calendar |
Warranty and Support
For warranty information or technical support, please refer to the contact details provided with your purchase documentation or visit the official Hojo store online. Keep your purchase receipt as proof of purchase for warranty claims.
Hojo Store: Visit the Hojo Store on Amazon.in