1. Product Overview
The DROK DC Buck Converter is a high-performance, digitally controlled step-down power module designed to convert a higher DC input voltage to a lower, adjustable DC output voltage and current. It features an integrated LED display for real-time monitoring of voltage, current, capacity, and time. This module is equipped with advanced microprocessor control for precise adjustments and includes a cooling fan and heat sink for efficient thermal management.

Image 1: Top view of the DROK DC Buck Converter module.
2. Safety Instructions
Please read and understand these safety instructions before operating the device. Failure to follow these instructions may result in electric shock, fire, or damage to the product.
- Input Voltage: Ensure the input voltage is within the specified range of DC 10V-65V. Exceeding this range can damage the module.
- Output Load: Do not exceed the maximum output current of 12A or maximum output power of 720W.
- Polarity: Always observe correct input and output polarity. Incorrect connections can cause severe damage.
- Ventilation: Ensure adequate ventilation around the module, especially the cooling fan and heat sink, to prevent overheating.
- Environment: Avoid operating the module in environments with high humidity, dust, or extreme temperatures.
- Installation: Installation and wiring should only be performed by qualified personnel.
- Isolation: Ensure the module is properly isolated from other components to prevent accidental short circuits.
3. Product Components and Diagram
Familiarize yourself with the main components of the DROK DC Buck Converter:

Image 2: Labeled diagram of the DROK DC Buck Converter.
- Input + / Input -: Terminals for connecting the DC power source (10V-65V).
- Output + / Output -: Terminals for connecting the load.
- Display Interface: LED screen showing real-time voltage, current, capacity, and time.
- Cooling Fan: Activates automatically to dissipate heat during operation.
- Operation Key Buttons: Used for setting output voltage, current, and other parameters.
- Working Status Indicators: LEDs for OUT (Output active), CV (Constant Voltage mode), and CC (Constant Current mode).
4. Specifications
| Parameter | Value |
|---|---|
| Input Voltage Range | DC 10V - 65V |
| Adjustable Output Voltage Range | DC 0V - 60V |
| Adjustable Output Current Range | 0A - 12A |
| Maximum Output Power | 720W |
| Output Voltage Setting Resolution | 10mV |
| Output Current Setting Resolution | 10mA |
| Typical Efficiency | 94% (Input 54V, Output 30V, Current 5A) |
| Voltage Display Error | ±1% + 20mV |
| Current Display Error | ±1% + 20mA |
| Response Time | <50ms |
| Dimensions (L x W x H) | 104mm x 83mm x 57mm (115mm length with cooling fan) |
| Weight | 10.8 ounces (approx. 306g) |
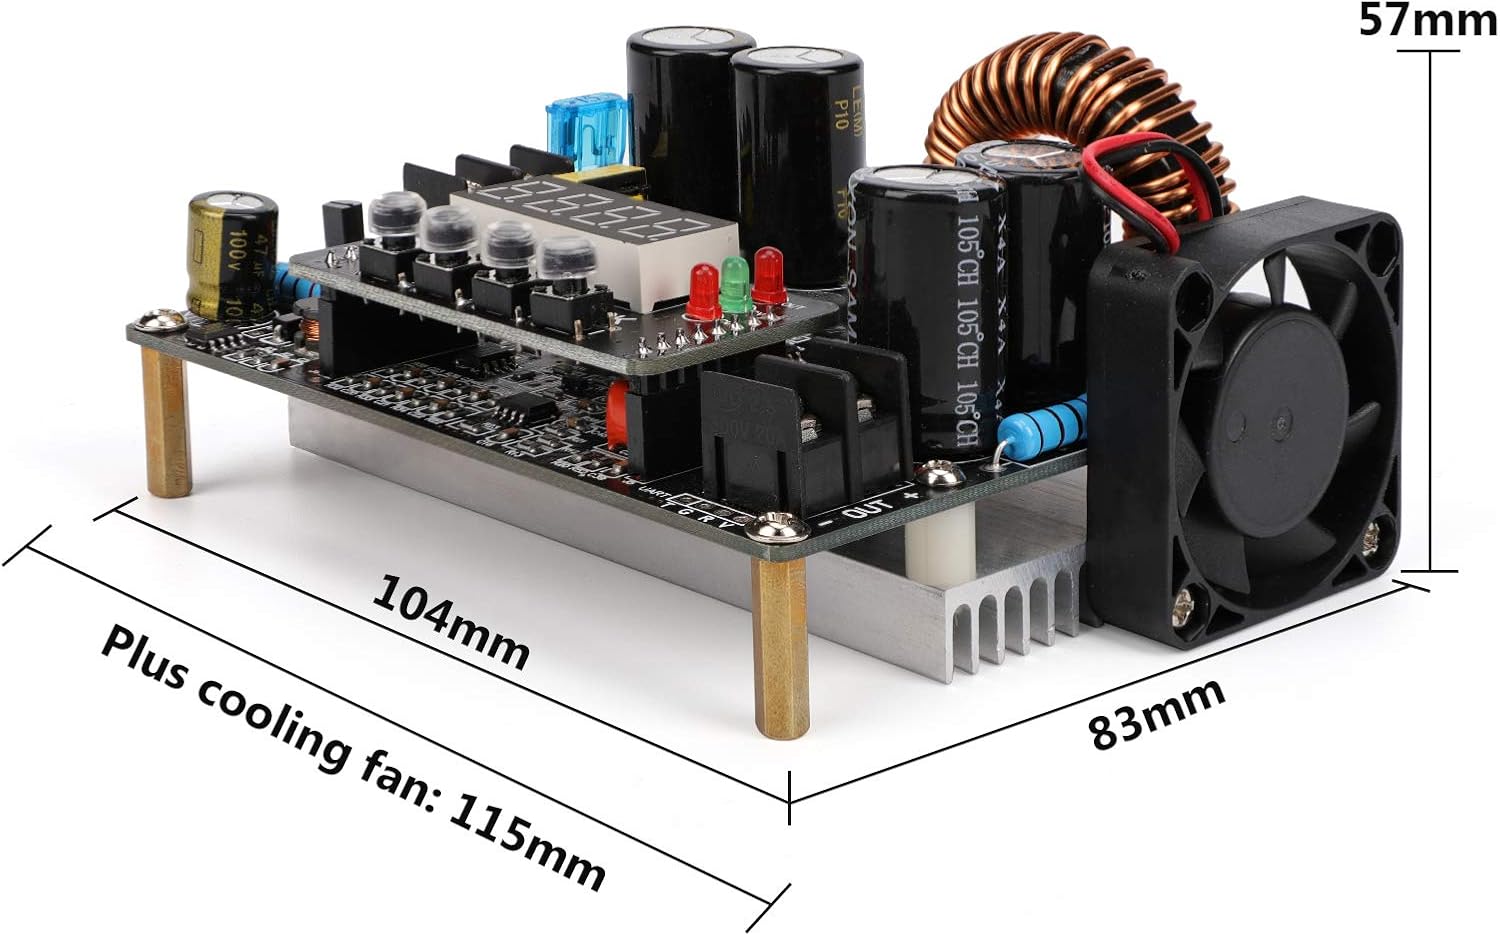
Image 3: Physical dimensions of the converter module.
5. Setup
5.1 Wiring Connections
- Input Power: Connect your DC power source (10V-65V) to the 'IN+' and 'IN-' terminals. Ensure correct polarity.
- Output Load: Connect your load device to the 'OUT+' and 'OUT-' terminals. Again, verify correct polarity.
- Secure Connections: Ensure all wire connections are tight and secure to prevent loose contacts or short circuits.
5.2 Mounting
Mount the module in a stable location that allows for proper airflow, especially around the cooling fan and heat sink. Avoid enclosed spaces that could lead to heat buildup.

Image 4: Cooling fan and cooling pad for thermal management.
6. Operating Instructions
6.1 Power On
Once wired correctly, apply power to the input terminals. The LED display will illuminate, showing the current output voltage or other default parameters.
6.2 Adjusting Output Voltage and Current
The module features operation key buttons for precise adjustment:
- Voltage Setting: Press the 'SET' button to enter voltage adjustment mode. Use the adjustment buttons (usually up/down arrows or rotary encoder, if present) to increase or decrease the voltage value. Press 'OK' to confirm and save the setting.
- Current Setting: Similarly, press 'SET' to cycle to current adjustment mode. Adjust the current value using the appropriate buttons and confirm with 'OK'.
- Real-time Display: The LED display shows real-time output voltage and current. It can also display capacity and time, which can be cycled through using the buttons.
6.3 Status Indicators
The module includes LED indicators to show its operating status:
- OUT: Illuminates when the output is active.
- CV (Constant Voltage): Illuminates when the module is operating in constant voltage mode.
- CC (Constant Current): Illuminates when the module is operating in constant current mode.
6.4 Advanced Features
- Automatic Output: The module can be configured to automatically enable output upon power input. Refer to the specific button sequence for this setting.
- Button Lock Mode: To prevent accidental changes to settings, the parameter adjustment buttons can be locked. Consult the device's specific button combination for this function.
7. Maintenance
Regular maintenance ensures optimal performance and longevity of your DROK DC Buck Converter:
- Cleaning: Keep the module clean and free from dust and debris. Use a soft, dry cloth for cleaning. Do not use liquid cleaners.
- Cooling System: Periodically check that the cooling fan and heat sink fins are free from obstructions to ensure efficient heat dissipation.
- Connections: Regularly inspect all input and output wiring connections for tightness and signs of wear or corrosion.
- Storage: When not in use for extended periods, store the module in a dry, cool, and dust-free environment.
8. Troubleshooting
If you encounter issues with your DROK DC Buck Converter, refer to the following common problems and solutions:
| Problem | Possible Cause | Solution |
|---|---|---|
| No display / No power | No input power; Incorrect input polarity; Loose connections. | Check input power source; Verify input wiring polarity; Secure all connections. |
| No output voltage/current | Output disabled; Output short circuit; Overload protection activated; Incorrect output settings. | Ensure output is enabled; Check load for short circuits; Reduce load; Verify output voltage/current settings. |
| Output voltage/current unstable | Input power fluctuation; Loose connections; Overheating. | Use a stable input power source; Check all wiring; Ensure proper ventilation and cooling. |
| Module overheating | Insufficient ventilation; Cooling fan obstructed or faulty; Exceeding power limits. | Ensure clear airflow; Clean fan/heat sink; Reduce load to stay within specifications. |
| Display error | Measurement error within specified tolerance; Internal fault. | Note the specified error margin; If persistent and significant, contact support. |
9. Warranty and Support
DROK products are designed for reliability and performance. For technical assistance, warranty claims, or any questions regarding your DC Buck Converter, please contact DROK customer service through the retailer where you purchased the product or visit the official DROK website for support information.