
1. Introduction
This manual provides comprehensive instructions for the setup, operation, maintenance, and troubleshooting of your Dreambox DM920 UHD 4K receiver. Please read this manual carefully before using the device to ensure proper functionality and to maximize your viewing experience.
2. Product Overview
2.1 Key Features
- Ultra-fast Dual Core processor (12000 DMIPS)
- 8 GB Flash (MMC) and 2 GB RAM
- Support for H.265 UHD decoding
- Two plug-and-play tuner slots for DVB-S/S2 or DVB-C/T2
- 3-inch color LCD display
- Internal 2.5-inch HDD slot (up to 15mm height)
- Dreambox Linux OS Enigma2
- HbbTV and PVR (Personal Video Recorder) functionality
- Multiple connectivity options including HDMI 2.0, HDMI 1.4a In, USB 3.0, Network (100/1000 Mbits), S/PDIF
- Integrated smart card reader and two Common Interface (CI) slots
- SD card reader
- DiSEqC 1.0 / 1.1 / 1.2 and USALS support
2.2 Package Contents
Ensure all items are present in the package:
- Dreambox DM920 UHD 4K Receiver
- Remote Control
- HDMI Cable
- USB Cable
- Power Adapter
- User Manual (this document)
2.3 Front Panel
The front panel features a 3-inch color LCD display for status information and menu navigation. Behind a hinged panel, you will find a Common Interface (CI) slot, a smart card reader, and a USB port for convenient access.
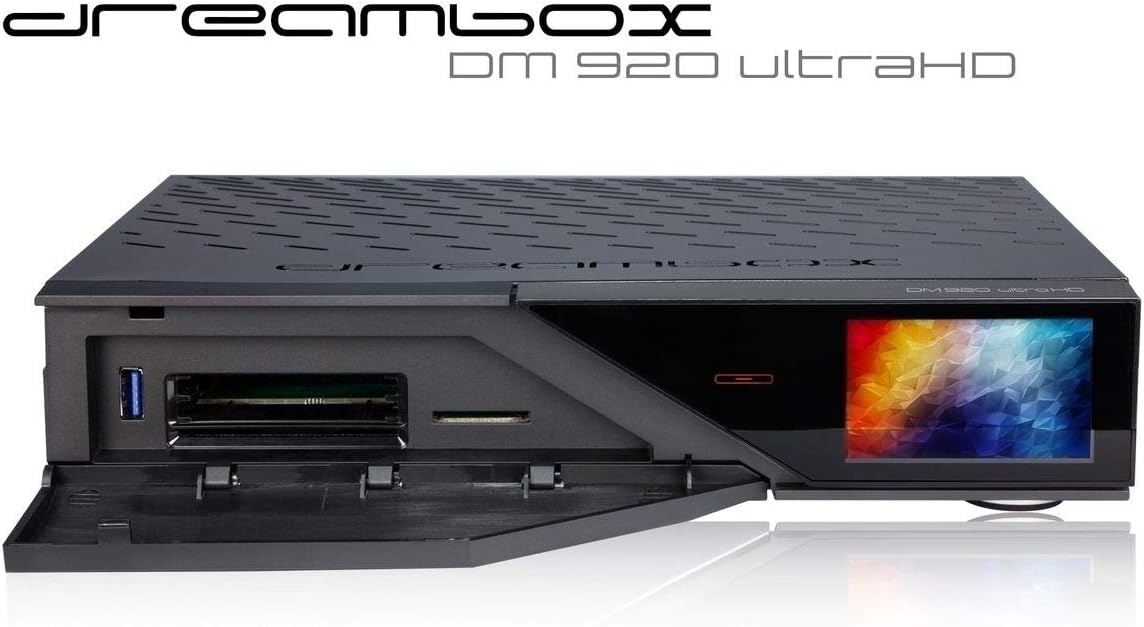
Image: Front view of the Dreambox DM920 UHD 4K receiver with its front access panel open, showing the Common Interface (CI) slot, smart card reader, and a USB port.
2.4 Rear Panel Connections
The rear panel provides various ports for connecting the receiver to your television, antenna, network, and other peripherals.
- HDMI Out 2.0: Connects to your television or display.
- HDMI In 1.4a: For connecting external HDMI sources.
- USB 3.0 Ports: For external storage or other USB devices.
- RJ45 (LAN) 100/1000 Mbits: For network connectivity.
- S/PDIF: Digital audio output.
- Tuner Slots: Two slots for DVB-S/S2 or DVB-C/T2 tuners.
- Power Input: For the power adapter.
- Power Switch: To turn the device on or off.

Image: Rear view of the Dreambox DM920 UHD 4K receiver, highlighting the array of input and output ports for connectivity.
2.5 Remote Control
The included remote control allows full navigation and control of the Dreambox DM920 UHD 4K receiver. Familiarize yourself with the button layout for optimal use.

Image: The Dreambox remote control, displaying its ergonomic design and clearly labeled buttons for various functions.
3. Setup
3.1 Unpacking and Placement
- Carefully remove the receiver and all accessories from the packaging.
- Place the receiver on a flat, stable surface with adequate ventilation. Avoid placing it near heat sources or in direct sunlight.
3.2 Connecting to Your Television
- Connect one end of the supplied HDMI cable to the HDMI Out 2.0 port on the rear of the Dreambox.
- Connect the other end of the HDMI cable to an available HDMI input on your television.
- Select the corresponding HDMI input on your television.
3.3 Connecting Tuners (Antenna/Cable)
- Depending on your tuner configuration (DVB-S/S2 for satellite or DVB-C/T2 for cable/terrestrial), connect your antenna or cable feed to the appropriate tuner input(s) on the rear panel.
- Ensure connections are secure.
3.4 Network Connection
- For internet access and network features, connect an Ethernet cable from your router or network switch to the RJ45 (LAN) port on the rear of the receiver.
3.5 Internal 2.5-inch HDD Installation (Optional)
The Dreambox DM920 UHD supports internal installation of a 2.5-inch hard disk drive (up to 15mm height) for PVR functionality and media storage. Refer to the detailed installation guide for specific steps, which typically involves opening the casing and securing the drive.
3.6 Power On
- Connect the power adapter to the Power Input on the receiver and then to a wall outlet.
- Flip the Power Switch on the rear panel to the ON position.
- The receiver will begin its boot sequence. Follow the on-screen instructions for initial setup, including language selection and tuner configuration.
4. Operating Instructions
4.1 Basic Operation
- Power On/Off: Use the power button on the remote control or the main power switch on the rear panel.
- Channel Selection: Use the number buttons, CH+/CH- buttons, or the program list from the remote control.
- Volume Control: Use the VOL+/VOL- buttons on the remote.
4.2 Menu Navigation
Use the directional (arrow) buttons and the OK button on the remote control to navigate through the Enigma2 operating system menus. The MENU button typically opens the main menu, and the EXIT button returns to the previous screen or live TV.
4.3 Tuner Configuration and Channel Scan
After initial setup, you may need to configure your tuners and perform a channel scan. Access the "Tuner Configuration" or "Service Searching" option within the main menu to set up your satellite or cable parameters and scan for available channels.
4.4 Recording (PVR Function)
With an installed internal HDD or connected external USB storage, you can record TV programs. Use the REC button on the remote control to start recording the current program. Scheduled recordings can be set via the Electronic Program Guide (EPG).
4.5 Media Playback
The Dreambox DM920 UHD supports playback of various media formats (mp3, ogg, aac, flac, mkv, mp4, avi, mpg, date, vob, ts, mov, m2ts, flv, jpg, bmp) from connected USB drives or the internal HDD. Access the "Media Player" application from the main menu to browse and play your media files.
4.6 Network Features (HbbTV)
When connected to the internet, the receiver supports HbbTV, allowing access to interactive services and catch-up TV from broadcasters. Specific HbbTV functions are typically accessed via a red button prompt on compatible channels.
5. Maintenance
5.1 Cleaning
To clean the receiver, disconnect it from the power supply. Use a soft, dry cloth to wipe the exterior. Do not use liquid cleaners or abrasive materials, as these can damage the finish or internal components.
5.2 Software Updates
Regular software updates are released to improve performance, add features, and fix bugs. It is recommended to keep your Dreambox's Enigma2 software updated. Check the system settings menu for available updates or visit the official Dreambox support website for instructions.
6. Troubleshooting
This section addresses common issues you might encounter with your Dreambox DM920 UHD receiver.
| Problem | Possible Cause | Solution |
|---|---|---|
| No picture/sound on TV. | Incorrect HDMI connection, wrong TV input selected, receiver not powered on. | Check HDMI cable connections. Ensure TV is on the correct HDMI input. Verify receiver is powered on. |
| "No Signal" message. | Antenna/cable not connected, tuner not configured, poor signal strength. | Check antenna/cable connections. Verify tuner configuration in settings. Perform a channel scan. |
| Remote control not responding. | Dead batteries, obstructed IR sensor, remote not paired (if applicable). | Replace batteries. Ensure clear line of sight to receiver's IR sensor. |
| Receiver freezes or crashes. | Software issue, overheating, incompatible plugin. | Restart the receiver. Ensure adequate ventilation. Check for and install software updates. |
7. Specifications
| Feature | Detail |
|---|---|
| Processor | Dual Core 12K DMIPS |
| Flash Memory | 8 GB (MMC) |
| RAM | 2 GB |
| Video Decoder | MPEG-2/H.264, H.265 UHD |
| Display | 3-inch Color LCD |
| Tuner Slots | 2 (for DVB-S/S2 or DVB-C/T2) |
| Internal HDD Support | 2.5-inch (up to 15mm height) |
| Operating System | Dreambox Linux OS Enigma2 |
| HbbTV | Yes |
| PVR Function | Yes |
| Smart Card Reader | 1 slot |
| Common Interface (CI) | 2 slots |
| SD Card Reader | Yes |
| HDMI Output | 1x HDMI 2.0 |
| HDMI Input | 1x HDMI 1.4a |
| Digital Audio Output | 1x S/PDIF |
| Network Interface | 1x RJ45 (LAN) 100/1000 Mbits |
| USB Ports | USB 3.0 (quantity not specified, but typically 2-3) |
| DiSEqC Support | 1.0 / 1.1 / 1.2 and USALS |
| Unicable Support | Yes |
| Dimensions (W x D x H) | 270 x 187 x 60 mm |
| Supported Audio Formats | mp3, ogg, aac, flac, Dolby Digital, DTS |
| Supported Media Formats | mp3, ogg, aac, flac, mkv, mp4, avi, mpg, date, vob, ts, mov, m2ts, flv, jpg, bmp |
8. Warranty and Support
For warranty information, please refer to the documentation provided by your retailer or the manufacturer at the time of purchase. Specific warranty terms and conditions may vary by region and seller.
For technical support, software updates, and additional resources, please visit the official Dreambox support website or contact your authorized dealer.
Information regarding spare parts availability and guaranteed software updates is not available in this manual.


