Ryco Moto 4200A-4001
Ryco Moto UTV Turn Signal Assembly Kit Instruction Manual
Model: 4200A-4001
Product Overview
The Ryco Moto Turn Signal Assembly Kit is designed to enhance the safety and functionality of your UTV by providing integrated turn signals, horn, and a four-way flasher system. This kit repurposes existing taillights for rear turn signals and includes new front lights that function as both OEM headlights and sequential turn signals. It is a comprehensive solution for making your vehicle street legal.
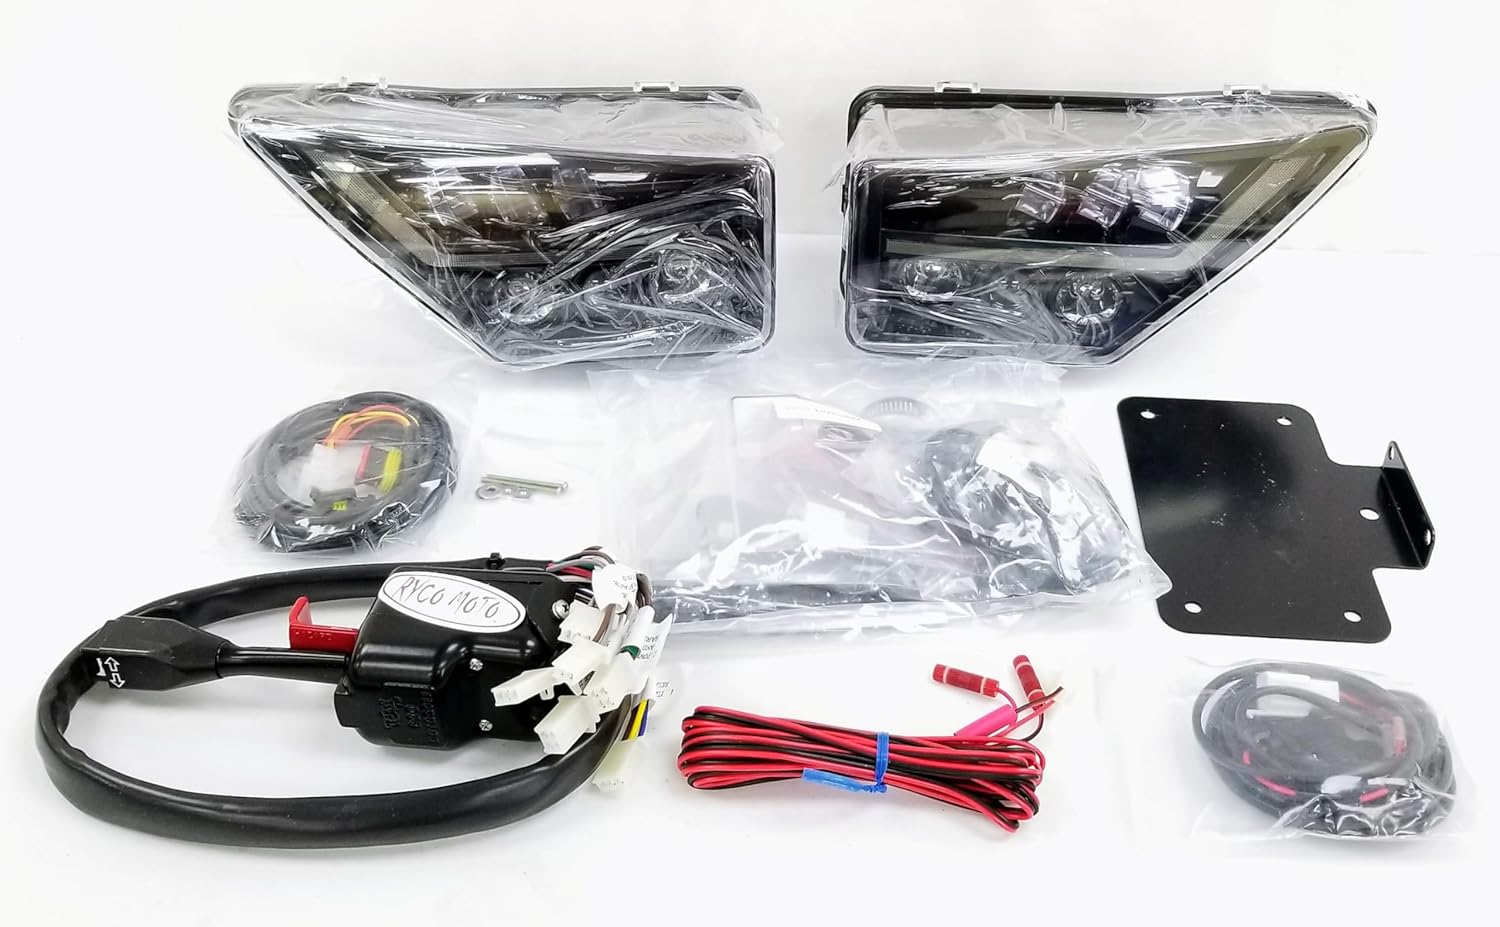
Figure 1: Overview of the Ryco Moto Turn Signal Assembly Kit components.
Compatibility
This kit is specifically designed for the following vehicle models:
- Kawasaki Teryx KRX 1000 (All 2020-2023 models)
- Kawasaki Teryx KRX4 1000 (All 2020-2023 models)
Important: Verify your vehicle's exact model and year before beginning installation to ensure compatibility. This kit is not compatible with all Kawasaki UTV models.
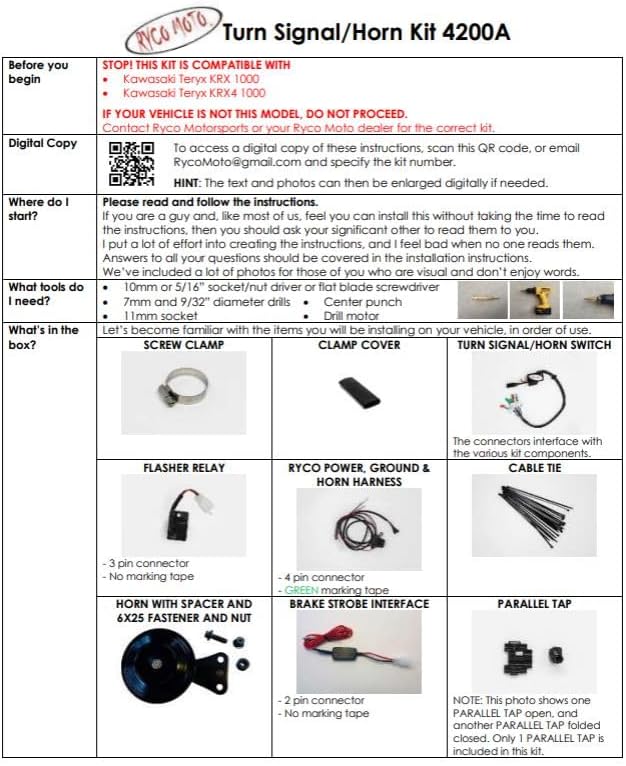
Figure 2: Compatibility chart for Ryco Moto Turn Signal Kits. Model 4200A-4001 is specifically for Teryx KRX/KRX4 1000.
What's in the Box
Before starting the installation, ensure all components listed below are present and undamaged:

Figure 3: Detailed diagram of kit contents.
- Steering Column-Mounted Switch: Combination turn signal and horn switch with integrated four-way flasher activator.
- Front LED Headlights: Two new headlight units that serve as OEM headlights and sequential turn signals.
- Wiring Harnesses: All necessary wiring and connectors for a complete installation.
- Electronic Flasher Relay: Ensures proper turn signal operation.
- 105 dB Horn: For audible signaling.
- Lighted License Plate Mount: For street legal compliance.
- Installation Hardware: Includes screw clamps, cable ties, and other small parts.


Figure 4: Front LED Headlights (left) and Steering Column Switch (right).
Setup and Installation
Installation of this kit typically takes 2-3 hours. A familiarity with electrical components and vehicle wiring is recommended. The process involves removing vehicle panels, routing wires, and making electrical connections (splicing and tapping into the vehicle wiring harness). Detailed step-by-step instructions are included with the physical product.
Required Tools:
- 10mm or 3/8" socket/nut driver or flat blade screwdriver
- 7mm and 9/32" drill bits
- Center punch
- Drill motor
- Wire strippers/crimpers
- Electrical tape or heat shrink tubing
General Installation Steps (Refer to detailed manual for specifics):
- Disconnect the vehicle's battery before starting any electrical work.
- Remove necessary body panels to access wiring and mounting locations.
- Mount the steering column switch securely.
- Install the new front LED headlight units.
- Route the wiring harnesses according to the provided diagrams, ensuring they are secured and protected from moving parts or heat.
- Connect the flasher relay and horn.
- Make all necessary electrical connections, including splicing into existing vehicle wiring as instructed.
- Install the lighted license plate mount.
- Test all functions before reassembling panels.
- Reinstall all removed panels and reconnect the battery.
Operating Instructions
Once installed, the Ryco Moto Turn Signal Assembly Kit operates similarly to a standard automotive turn signal system.
- Turn Signals: Move the steering column switch lever up for a right turn signal and down for a left turn signal. The front LED headlights will flash sequentially, and the rear taillights will flash.
- Horn: Press the button located on the end of the steering column switch lever to activate the horn.
- Four-Way Flashers (Hazard Lights): Press the red button or lever on the steering column switch to activate the four-way flashers. All turn signals (front and rear) will flash simultaneously. Press again to deactivate.
- Headlights: The new front LED units function as your primary headlights when the turn signals are not active.
Maintenance
The Ryco Moto Turn Signal Assembly Kit is designed for durability and requires minimal maintenance.
- Regular Inspection: Periodically check all wiring connections for tightness and signs of wear or corrosion.
- Cleaning: Keep the headlight lenses and switch clean from dirt and debris using a soft cloth and mild cleaner. Avoid abrasive materials.
- Waterproofing: The kit features waterproof components. However, avoid directing high-pressure water sprays directly at electrical connections during cleaning.
Troubleshooting
| Problem | Possible Cause | Solution |
|---|---|---|
| Turn signals do not work. | Loose wiring connection, faulty flasher relay, blown fuse. | Check all connections. Verify flasher relay is correctly installed and functioning. Inspect vehicle's fuse box for blown fuses related to lighting. |
| Horn does not sound. | Loose horn connection, faulty horn unit, wiring issue to horn button. | Ensure horn is securely connected. Test horn unit directly if possible. Check wiring from switch to horn. |
| Only some lights work. | Individual light unit failure, specific wiring branch issue. | Inspect connections to the non-working lights. Check for damaged wires or faulty light units. |
| Installation took longer than expected / Difficulty with wiring. | Complex wiring, lack of experience with electrical systems. | Refer to the detailed installation manual. If difficulties persist, consider consulting a professional automotive electrician. |
Specifications
- Brand: Ryco Moto
- Model: 4200A-4001
- Vehicle Service Type: UTV
- Special Feature: Waterproof
- Lens Material: Polycarbonate or Acrylic
- Item Weight: Approximately 9 pounds (4.08 kg)
- Assembly Required: Yes
- Manufacturer: Ryco Moto
Warranty and Support
For specific warranty information and technical support, please refer to the documentation included with your product or contact Ryco Moto directly through their official website or customer service channels. Keep your purchase receipt as proof of purchase for warranty claims.
Digital copies of instructions may be available by scanning a QR code provided in the physical manual or by contacting Ryco Moto customer support.
Ask a question about this manual
Ask about setup, troubleshooting, compatibility, parts, safety, or missing instructions. Manuals+ will review the question and use this page’s manual context to help answer it.