Introduction
This manual provides detailed instructions for the proper use and maintenance of the kwb 092100 Depth Gauge. This precision tool is designed for accurately measuring milling, cutting, and drilling depths for various applications, including routers and table saws. Please read this manual thoroughly before first use to ensure safe and effective operation.
Product Overview
The kwb 092100 Depth Gauge is an analogue adjustment gauge featuring a sturdy plastic housing and a stainless steel measuring tongue. It provides measurements in both millimeters and inches.

Figure 1: Front view of the kwb 092100 Depth Gauge, showing the main body, measuring scale, and locking screw.
Key Features:
- Analogue adjustment gauge for precise depth determination.
- Measuring range: 0 to 100 mm (0 to 5 inches).
- Sturdy plastic housing with round cushions for stable positioning.
- Includes a stainless steel measuring tongue (0-127 mm) with a 0-100 mm measuring range.
- Centre-sitting guide slot (107 x 5 mm).
- Additional locking screw (10 mm diameter, 16 mm length) for flexible adjustment.
Setup
The kwb 092100 Depth Gauge requires minimal setup. Ensure the measuring surfaces are clean and free of debris before use.
Unpacking:
- Carefully remove the depth gauge from its packaging.
- Inspect the tool for any visible damage. If damaged, do not use and contact customer support.
- Familiarize yourself with the components: the main body, the movable measuring tongue, and the locking screw.

Figure 2: The kwb 092100 Depth Gauge as it appears in its retail packaging.
Initial Adjustment:
The measuring tongue slides freely within the main body. The locking screw secures it in place for measurement.
- Loosen the brass locking screw by turning it counter-clockwise to allow the measuring tongue to move.
- Slide the measuring tongue to the desired position or fully retract it for storage.
- Tighten the locking screw by turning it clockwise to secure the tongue during measurement.
Operating Instructions
The kwb 092100 Depth Gauge is designed for accurate depth measurements on various workpieces and tools.
Measuring Milling Depths (e.g., Router):
- Place the base of the depth gauge firmly on the flat surface of the workpiece or router table, ensuring the round cushions provide a stable stand.
- Loosen the locking screw.
- Lower the measuring tongue until its tip touches the bottom of the routed groove or the tip of the router bit.
- Tighten the locking screw to fix the tongue's position.
- Carefully lift the depth gauge and read the measurement indicated on the scale, either in millimeters or inches.

Figure 3: Demonstrating the use of the depth gauge to measure the depth of a routed groove in a wooden workpiece.
Measuring Saw Blade Heights (e.g., Table Saw):
- Ensure the table saw is powered off and the blade is stationary.
- Place the base of the depth gauge firmly on the table saw's surface, straddling the saw blade.
- Loosen the locking screw.
- Lower the measuring tongue until its tip rests on the highest point of a saw blade tooth.
- Tighten the locking screw.
- Carefully lift the depth gauge and read the measurement on the scale. This indicates the blade height above the table.
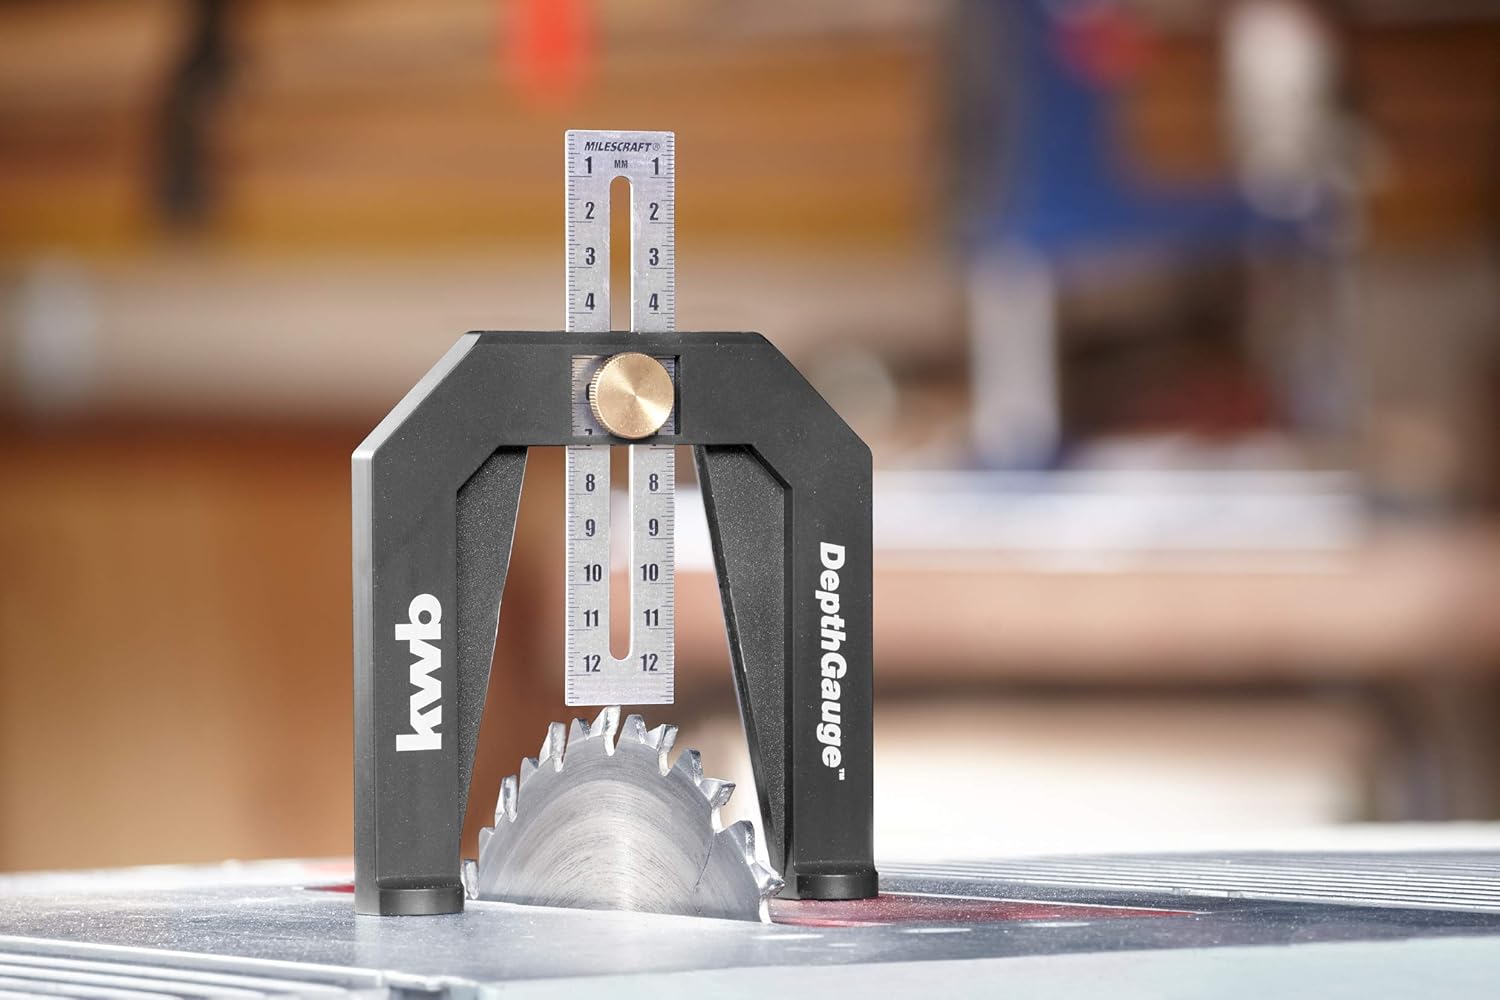
Figure 4: Illustrating the process of measuring the height of a table saw blade using the kwb depth gauge.
General Measurement Tips:
- Always ensure the depth gauge is perpendicular to the surface being measured for accurate readings.
- Apply gentle, consistent pressure when placing the gauge to avoid tilting.
- Read the measurement at eye level to minimize parallax error.
Maintenance
Proper maintenance ensures the longevity and accuracy of your kwb 092100 Depth Gauge.
Cleaning:
- After each use, wipe down the depth gauge with a clean, dry cloth to remove dust, sawdust, or other debris.
- For stubborn grime, a slightly damp cloth can be used, followed immediately by a dry cloth.
- Do not use abrasive cleaners or solvents, as these can damage the plastic housing or the scale markings.
Storage:
- Store the depth gauge in a clean, dry environment, away from direct sunlight and extreme temperatures.
- Keep it in its original packaging or a protective case to prevent scratches and damage to the measuring surfaces.
- Ensure the measuring tongue is fully retracted or secured with the locking screw during storage to prevent accidental bending or damage.
Troubleshooting
This section addresses common issues you might encounter with your depth gauge.
| Problem | Possible Cause | Solution |
|---|---|---|
| Inaccurate readings | Debris on measuring surfaces; Gauge not perpendicular; Locking screw loose; Damaged measuring tongue. | Clean surfaces thoroughly; Ensure gauge is flat and perpendicular; Tighten locking screw; Inspect for damage, replace if necessary. |
| Measuring tongue sticks or is difficult to move | Dust or debris in the slot; Locking screw too tight. | Clean the slot with a soft brush or compressed air; Loosen the locking screw. |
| Scale markings are unclear | Dirt or grime on the scale. | Gently wipe the scale with a clean, damp cloth, then dry immediately. |
Specifications
Detailed technical specifications for the kwb 092100 Depth Gauge.
| Attribute | Value |
|---|---|
| Model Number | 092100 |
| Measuring Range | 0 to 100 mm (0 to 5 inches) |
| Product Dimensions | 118 mm x 128 mm x 22 mm (approx. 12.8L x 11.8W Centimetres) |
| Weight | 140 Grams |
| Material (Body) | Plastic |
| Material (Measuring Tongue) | Stainless Steel |
| Locking Screw Diameter | 10 mm |
| Locking Screw Length | 16 mm |
Warranty and Support
For information regarding warranty coverage or technical support, please refer to the official kwb website or contact your local retailer. Keep your proof of purchase for warranty claims.
kwb Germany is committed to providing high-quality tools. For further assistance, please visit www.kwb.eu or contact their customer service.