
Juplink EC3-750
JUPLINK WiFi Range Extender - User Manual
Model: EC3-750
Product Overview
The JUPLINK WiFi Range Extender (Model EC3-750) is designed to expand your existing Wi-Fi network coverage, eliminating dead zones and providing reliable internet access throughout your home or office. This dual-band device supports both 2.4GHz and 5GHz frequencies, offering speeds up to 750Mbps. It features multiple working modes including Repeater, Access Point (AP), and Router mode, along with two Fast Ethernet ports for wired connections.

Figure 1: JUPLINK EC3-750 WiFi Range Extender with included interchangeable power plugs (US, UK, EU).
Package Contents
- JUPLINK EC3-750 WiFi Range Extender
- Interchangeable Power Plugs (US, UK, EU)
- Quick Installation Guide
Setup and Installation
1. Choosing a Location
For optimal performance, place the extender halfway between your router and the Wi-Fi dead zone. Avoid placing it too close to the router or in areas with weak existing Wi-Fi signals.

Figure 2: Illustration of correct and incorrect placement for the WiFi extender to ensure optimal signal reception and extension.
2. Powering On
- Select the appropriate power plug for your region and attach it to the extender.
- Plug the extender into a power outlet. The Power LED will illuminate.
3. Configuration Modes
The EC3-750 supports three working modes: Repeater Mode, AP Mode, and Router Mode.

Figure 3: The three operational modes of the JUPLINK EC3-750: Router Mode, Repeater Mode, and AP Mode, showing their respective network configurations.
Repeater Mode (Extender)
This mode extends the coverage of an existing wireless network. It's ideal for eliminating Wi-Fi dead zones.
- Connect your computer or mobile device to the extender's default Wi-Fi network (e.g., "JUPLINK_EXT").
- Open a web browser and enter the default IP address (check the Quick Installation Guide for the exact address, typically 192.168.10.1 or similar).
- Follow the on-screen instructions to select your existing Wi-Fi network and enter its password.
- The extender will reboot and begin extending your network.
AP Mode (Access Point)
In AP mode, the extender connects to a wired network (e.g., from a modem or router) and broadcasts a new wireless network. This is useful for adding Wi-Fi capability to a wired-only network.
- Connect an Ethernet cable from your modem/router to the WAN/LAN port on the extender.
- Connect your computer or mobile device to the extender's default Wi-Fi network.
- Access the web interface and select AP Mode. Configure the new Wi-Fi network name (SSID) and password.
Router Mode
In Router mode, the device acts as a primary router, connecting to a modem and creating a new wireless network for multiple devices.
- Connect an Ethernet cable from your modem to the WAN/LAN port on the extender.
- Access the web interface and select Router Mode. Configure your internet connection type (e.g., PPPoE, Dynamic IP, Static IP) and set up your new Wi-Fi network.
Operating the Extender
WPS Button
The WPS (Wi-Fi Protected Setup) button provides a quick and easy way to connect to your existing router without manual configuration.
- Plug in the extender near your main router.
- Press the WPS button on your main router.
- Within two minutes, press the WPS button on the JUPLINK extender.
- The extender will automatically connect to your router and extend its network.
Ethernet Ports
The extender is equipped with two Fast Ethernet ports (WAN/LAN and LAN) for wired connections. These ports allow you to connect devices like smart TVs, gaming consoles, or desktop computers directly to the extender for a stable wired connection.

Figure 4: The two Fast Ethernet ports (WAN/LAN and LAN) on the JUPLINK EC3-750, enabling high-speed wired connections for various devices.
Smart Signal Indicator
The signal indicator LEDs on the extender provide visual feedback on the strength of the Wi-Fi signal received from your main router, helping you find the optimal placement.
- Green/Strong Signal: Excellent reception.
- Orange/Moderate Signal: Good reception, but consider adjusting placement.
- Red/Weak Signal: Poor reception, move the extender closer to the router.
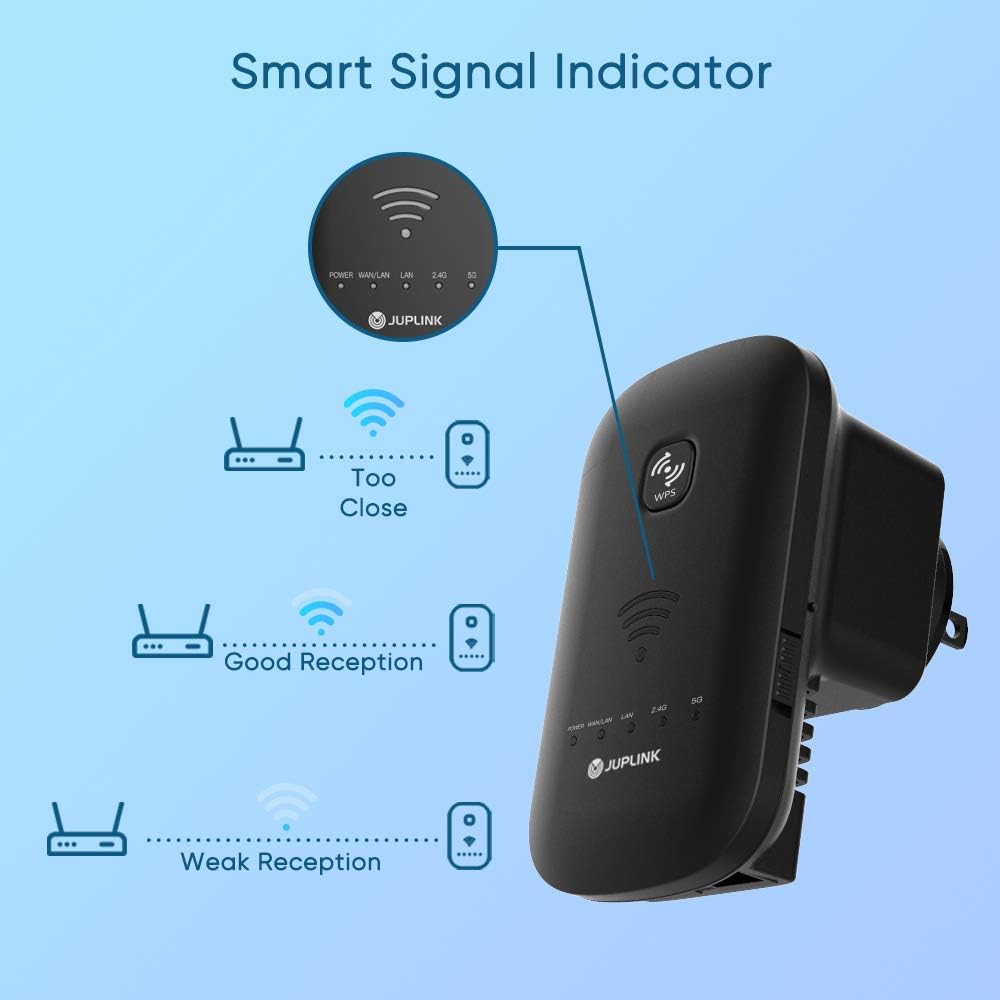
Figure 5: Explanation of the Smart Signal Indicator, showing how different LED colors correspond to signal strength (Too Close, Good Reception, Weak Reception).
Maintenance
- Keep the device clean and free from dust. Use a soft, dry cloth for cleaning.
- Ensure proper ventilation around the device to prevent overheating.
- Periodically check the manufacturer's website for firmware updates to ensure optimal performance and security.
- Avoid exposing the device to extreme temperatures, humidity, or direct sunlight.
Troubleshooting
No Power / Device Not Turning On
- Ensure the extender is securely plugged into a working power outlet.
- Verify that the power outlet itself is functional by plugging in another device.
Cannot Connect to the Extender's Wi-Fi
- Make sure you are selecting the correct Wi-Fi network name (SSID) for the extender.
- Double-check the Wi-Fi password.
- Try restarting the extender by unplugging it and plugging it back in.
Extended Network Has No Internet Access
- Ensure your main router has an active internet connection.
- Verify that the extender is properly connected to your main router (check signal indicator).
- Reconfigure the extender in Repeater mode, ensuring you select the correct main Wi-Fi network and enter its password accurately.
- Try moving the extender closer to your main router.
Slow Speed on Extended Network
- Relocate the extender to a position that offers a stronger signal from your main router (refer to the Smart Signal Indicator).
- Minimize interference from other electronic devices (e.g., microwaves, cordless phones).
- Ensure your main router is providing adequate speed.
Resetting the Extender
If issues persist, you may need to perform a factory reset. Locate the reset button (usually a small pinhole) on the extender. With the extender powered on, use a paperclip to press and hold the reset button for approximately 5-10 seconds until the LEDs flash. The extender will revert to factory default settings.
Specifications
| Brand | Juplink |
| Model Number | EC3-750 |
| Data Transfer Rate | Up to 750 Mbps (300 Mbps for 2.4GHz, 433 Mbps for 5GHz) |
| Frequency Band Class | Dual-Band (2.4GHz & 5GHz) |
| Working Modes | Repeater, AP, Router |
| Ethernet Ports | 2 x Fast Ethernet (WAN/LAN, LAN) |
| Dimensions | 14 x 8.5 x 10 cm |
| Item Weight | 190 g |
| Special Features | Access Point Mode, Smart Signal Indicator, WPS Button |

Figure 6: The EC3-750 Dual Band Wi-Fi Extender's capabilities, illustrating 300Mbps on the 2.4GHz band and 433Mbps on the 5GHz band for seamless connectivity.
Warranty and Support
For warranty information and technical support, please refer to the warranty card included in your product packaging or visit the official Juplink website. Keep your purchase receipt for warranty claims.
Manufacturer: Juplink
Date First Available: 19 October 2020
Related documentsEC3-750


Ask a question about this manual
Ask about setup, troubleshooting, compatibility, parts, safety, or missing instructions. Manuals+ will review the question and use this page’s manual context to help answer it.