Introduction
The GESD 12V 10A 120W Switching Power Supply is designed to convert AC input voltage to a stable DC 12V output. This unit is suitable for a wide range of applications requiring a reliable 12V DC power source, such as LED lighting, lamp strips, light box modules, security surveillance cameras, instrumentation, and 3D printers. It features robust safety mechanisms and a durable metal enclosure for efficient heat dissipation.

Figure 1: GESD 12V 10A 120W Switching Power Supply, showing its compact metal casing and terminal block.
Safety Information
WARNING: High Voltage Inside. Do not remove the cover. Professional installation by a qualified electrician is highly recommended.
- Ensure the input voltage switch (110V/220V) is correctly set before connecting the unit to a power source to prevent damage. For USA customers, the switch should be set to 110V.
- This unit is designed for IN-DOOR USE ONLY.
- Do not power the unit before completing all wire connections and voltage adjustments.
- Avoid operating the unit continuously over its rated current. It is recommended to work under 80% of the rated currency for optimal performance and longevity.
- The unit includes built-in EMI/RFI filters but is generally not suitable for direct connection with sensitive wireless communication equipment like ham radios due to potential interference.
- The power supply features automatic overload cut-off, over-voltage cut-off, automatic thermal cut-off, and short circuit protection for enhanced safety.

Figure 2: Visual representation of the power supply's integrated protection features, including lighting, over current, over voltage, and over heat protection.
Product Features
- Adjustable Output Voltage: The DC 12V output voltage is adjustable by approximately 10%.
- Dual Input Voltage: Supports AC 110V/220V input, selectable via a switch.
- Multiple Output Channels: Features two sets of output channels for versatile connectivity.
- Robust Safety Features: Includes automatic overload, over-voltage, thermal cut-off, and short circuit protection.
- High Efficiency & Reliability: 100% full load burn-in tested, with low temperature rise and low output ripple/noise.
- Durable Construction: Housed in a rugged metal enclosure with ventilation holes for efficient heat dissipation.
- Copper Wire Transformer: Utilizes a copper wire transformer for enhanced durability and longer life expectancy compared to aluminum alternatives.
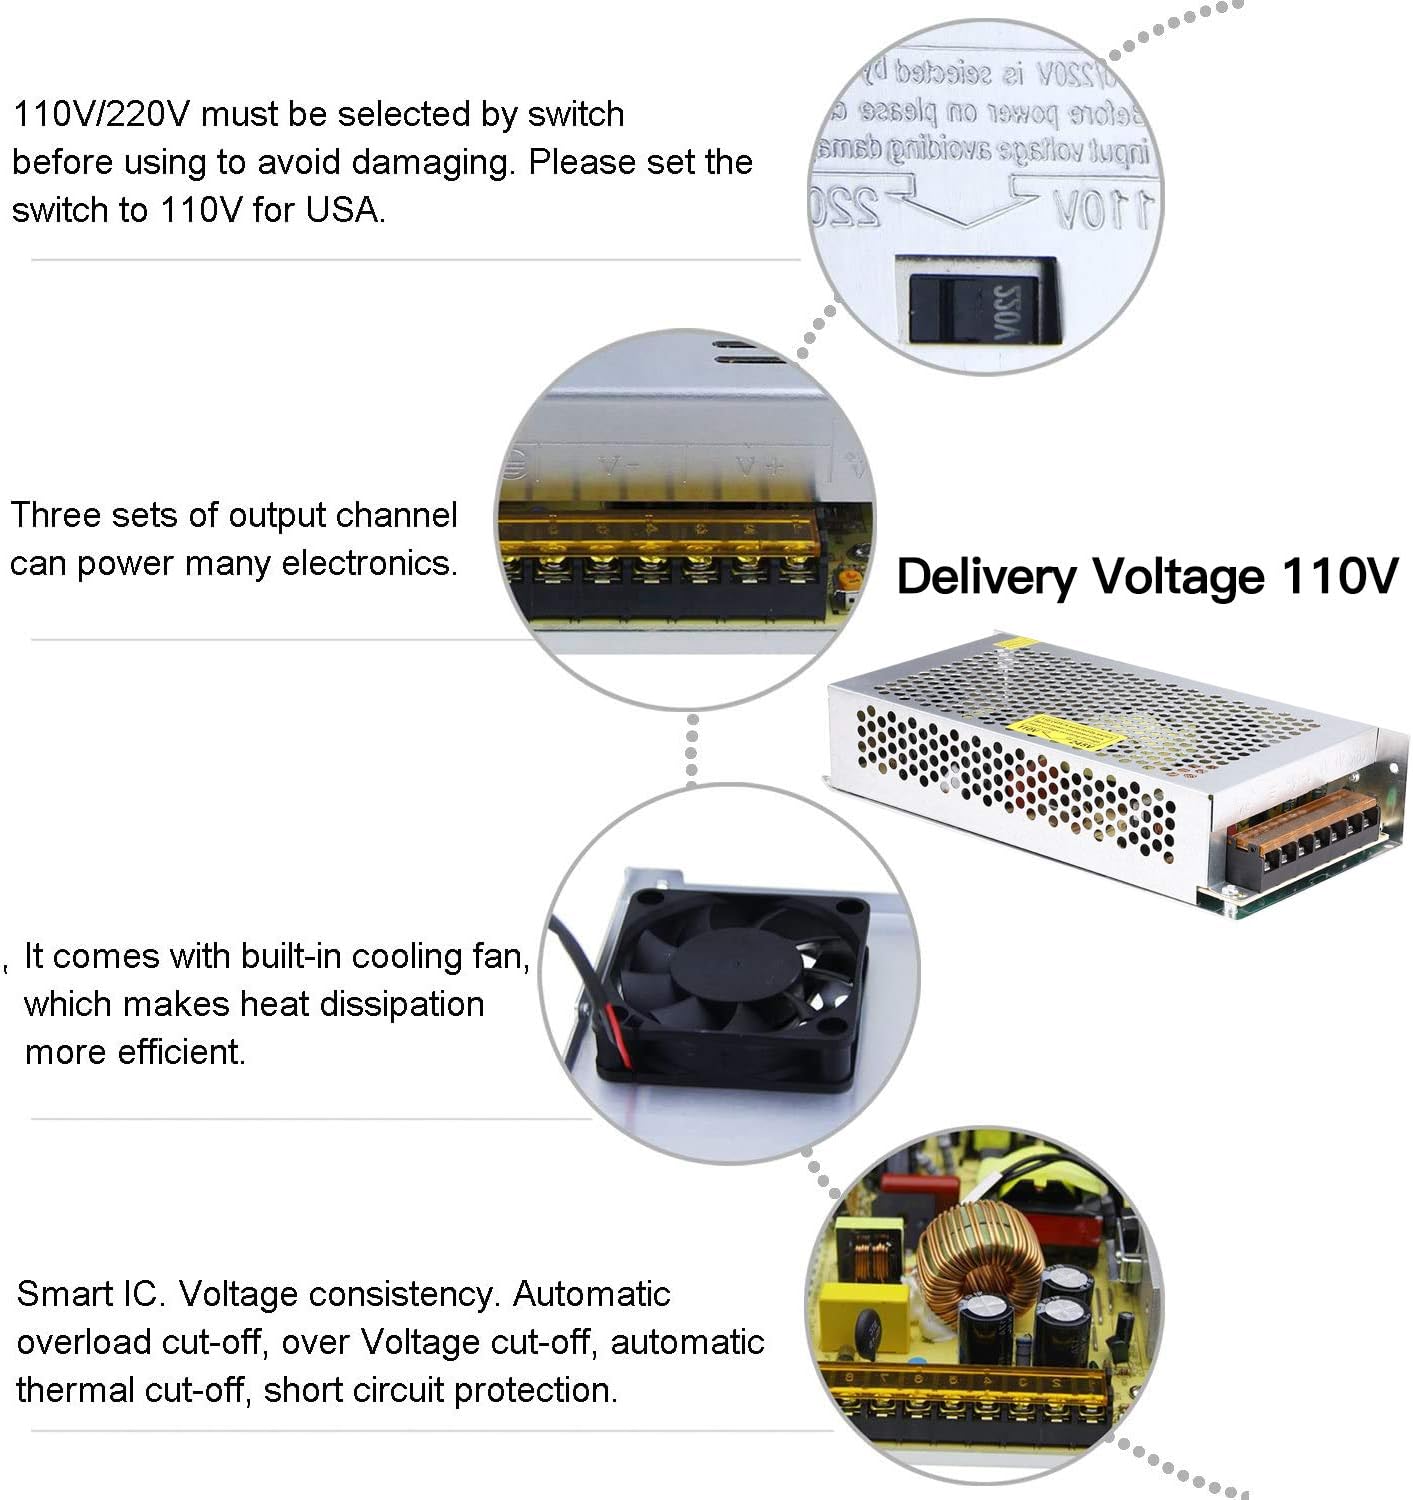
Figure 3: Key features of the power supply, highlighting the voltage selection switch, multiple output channels, internal cooling fan, and smart IC for protection.

Figure 4: Comparison illustrating the use of a copper wire transformer in the GESD power supply for improved longevity and performance.
Setup
- Unpacking: Carefully remove the power supply from its packaging. Inspect for any visible damage.
- Voltage Selection: Locate the voltage selector switch on the side of the unit. This switch allows you to select between 110V/115V and 220V/230V AC input. For users in the USA, ensure the switch is set to 110V. Incorrect voltage selection can damage the unit. The factory default output voltage is 110V.
- Mounting (Optional): The unit features screw holes (2.5mm diameter) for secure mounting if desired.
- Wiring: Connect your AC input (Line, Neutral, Ground) to the clearly labeled terminals on the power supply. Connect your DC load to the +V and -V output terminals. Ensure all connections are secure and correct before applying power.
- Professional Installation: Due to the high voltage components and the nature of the connections, professional installation by a qualified electrician is highly recommended to ensure safety and proper functionality.

Figure 5: The voltage selector switch on the side of the power supply, allowing selection between 110V AC (for US) and 220V AC (for Europe/UK).
Operating Instructions
- Power On: After ensuring all connections are secure and the voltage switch is correctly set, apply AC power to the unit.
- Voltage Adjustment: If fine-tuning of the output voltage is required, use the small adjustment potentiometer (labeled 'ADJ' or similar) on the unit. A small screwdriver may be needed for this.
- Load Management: The actual output current will depend on the circuit loads. While the unit is rated for 10A max, it is recommended to operate under 80% of the rated current (i.e., up to 8A) for prolonged periods and in environments with good cooling.
- Monitoring: Observe the connected devices for proper operation. The power supply is designed for stable output with minimal voltage fluctuations.
Maintenance
- Dusting: To ensure optimal performance and prevent overheating, it is recommended to dust the switcher out every 2 or 3 months, especially if operating in dusty environments.
- Ventilation: Ensure the power supply is placed in an area with adequate ventilation. The metal case with numerous holes is designed for efficient heat dissipation. Do not obstruct these vents.
- Inspection: Periodically inspect the wiring connections for any signs of wear, corrosion, or looseness. Tighten connections as necessary.
- No User Serviceable Parts: As stated in the safety information, there are no user-serviceable parts inside. Do not attempt to open the unit.

Figure 6: Illustration of the power supply's design for good heat dissipation, crucial for prolonging its operational life.
Troubleshooting
- No Power Output:
- Check if the AC input voltage switch is correctly set (110V for USA).
- Verify that the AC input power source is active.
- Ensure all wiring connections are secure and correct.
- Check for any tripped circuit breakers or blown fuses in your electrical system. - Intermittent Power:
- Ensure the load connected to the power supply does not exceed 80% of its rated capacity (i.e., 8A for the 10A model). Overloading can trigger protection mechanisms.
- Check for proper ventilation and ensure the unit is not overheating. - Unstable Output Voltage:
- Verify that the load is within the specified limits.
- Ensure the unit is not subjected to extreme temperatures or humidity outside its operating range. - Noise/Interference:
- While the unit has a built-in EMI filter, it may still cause interference with sensitive radio or wireless communication equipment. Consider using additional external filtering if this is an issue.
Specifications
| Parameter | Value |
|---|---|
| Input Voltage | AC 110V/220V (selectable) |
| Input Frequency | 50/60Hz |
| Output Voltage | DC 12V (adjustable ±10%) |
| Output Current | 10A max |
| Output Wattage | 120W max |
| Fix Screw Hole Diameter | 2.5mm (0.1 inch) |
| Working Temperature | -15 to 55°C |
| Environmental Humidity | 10-95% (non-condensing) |
| Material | Metal, Electronic Parts |
| Safety Compliance | CCC/FCC/CE/RoHS |
| Dimensions (L x W x H) | Approx. 19.9 cm x 9.9 cm x 4.2 cm (7.9 in x 3.9 in x 1.7 in) |
| Item Weight | 15.8 ounces |
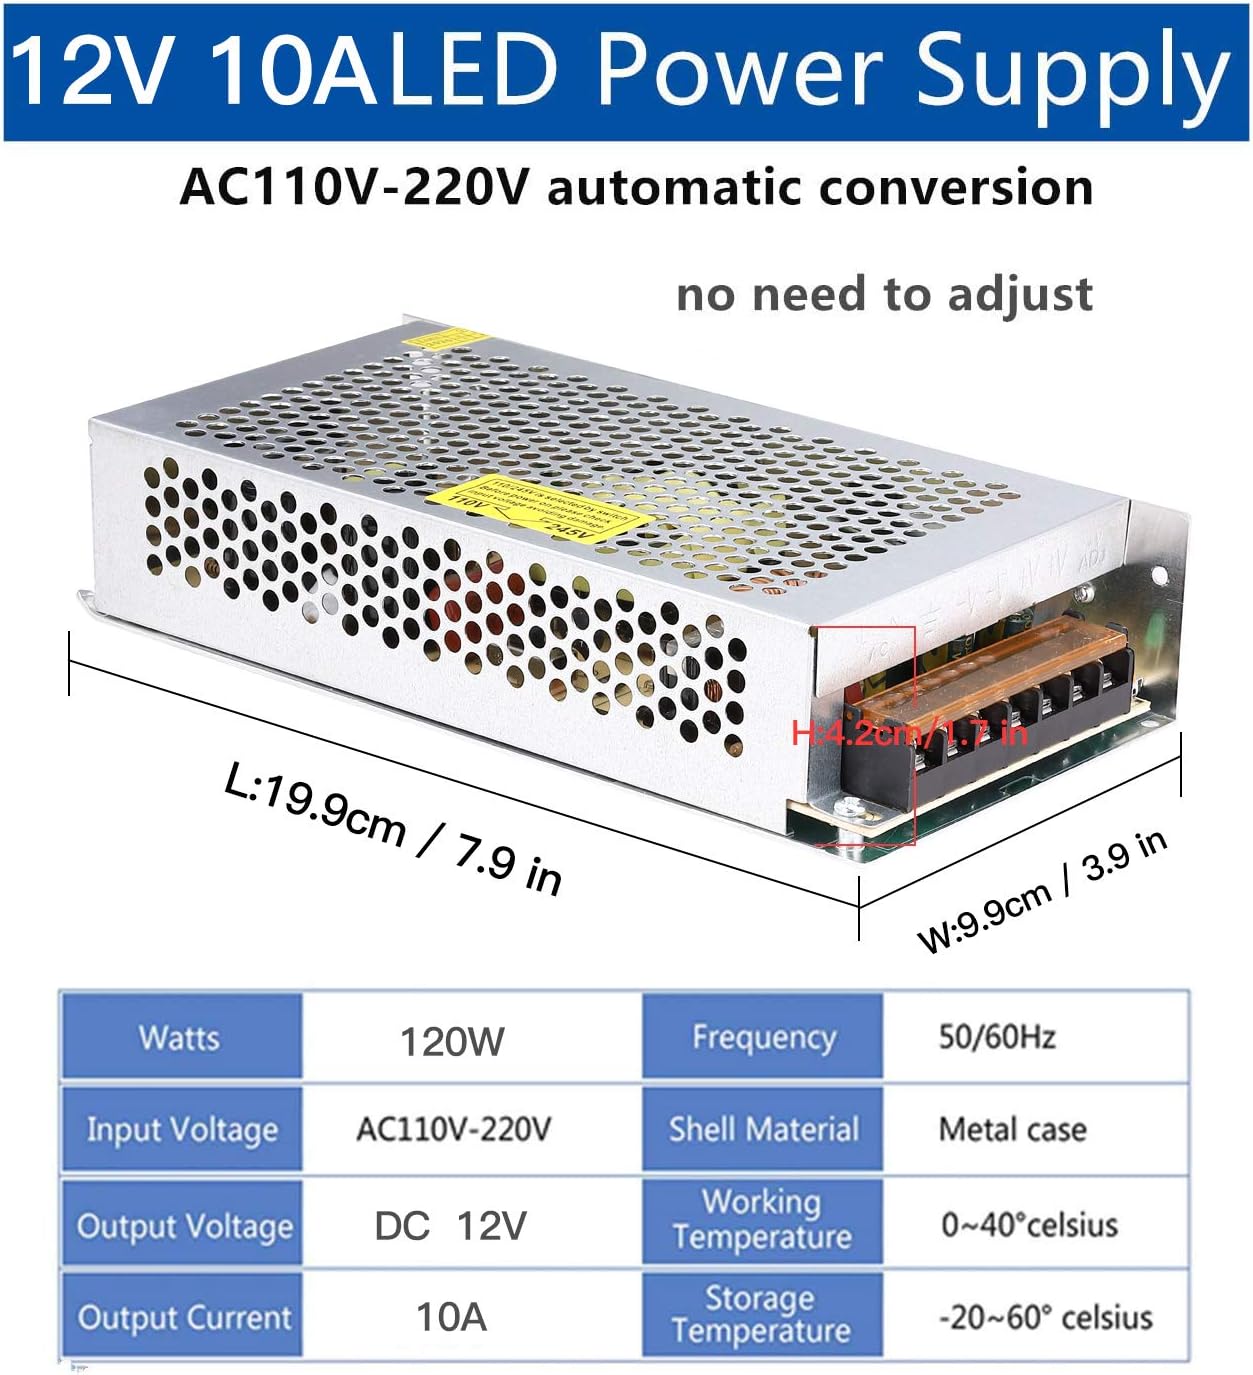
Figure 7: Detailed dimensions of the 12V 10A LED Power Supply, indicating length, width, and height.

Figure 8: The compact size of the power supply, emphasizing its suitability for various installations.
Applications
This GESD 12V 10A 120W Switching Power Supply is versatile and widely used in various electronic and industrial automation applications. Common uses include:
- LED Strips and LED Displays
- 3D Printers
- CCTV Cameras and Security Surveillance Systems
- Car Subwoofer Amplifiers and Audio Amplifiers
- Wireless Routers and ADSL Cats
- HUBs and other network equipment
- General audio/video power supply needs
- Industrial automation and electronic equipment

Figure 9: Examples of various 12V devices compatible with the power supply, including LED light strips, 12V pumps, car stereos, humidor LED lights, and radios.
Warranty and Support
For warranty information and technical support, please refer to the product packaging or contact GESD customer service directly. Keep your purchase receipt for any warranty claims.