Introduction
This manual provides detailed instructions for the installation, operation, and maintenance of your Bracwiser MD7421 PC Monitor Arm. This display arm is designed to support a single liquid crystal monitor, enhancing your workspace ergonomics and efficiency. Please read this manual thoroughly before installation and use to ensure proper setup and safe operation.
Safety Information
- Always read this manual before installation and operation.
- Carefully open the box and check all components to ensure they are complete and undamaged.
- Do not use damaged components or parts.
- Do not disassemble any components unless explicitly instructed.
- Ensure the monitor arm is securely fastened to the desk before attaching the monitor.
- Do not exceed the maximum load capacity of 10KG.
Package Contents
Verify that all the following components are included in your package:

This image displays all components included in the Bracwiser MD7421 monitor arm package, such as the arm, pole, mounting hardware, and the user manual.
- Monitor Arm Assembly
- Desk Clamp Components
- Grommet Base Components
- VESA Plate
- Hexagonal Wrenches (various sizes)
- Screws and Washers for VESA Mounting (G1, G2, H1, H2, F)
- Cable Management Clips
- User Manual
Setup
The Bracwiser MD7421 monitor arm offers two installation methods: Desk Clamp and Grommet Base. Choose the method that best suits your desk.
Pre-installation Checks:
- Monitor Compatibility: Supports 13-32 inch PC monitors.
- Weight Capacity: Maximum load of 10KG (22lbs).
- VESA Compatibility: Supports VESA patterns 75x75mm and 100x100mm.

This image visually explains the two primary installation methods: the C-clamp for desks up to 100mm thick and the grommet base for desks with a minimum hole diameter of 42mm.
1. Desk Clamp Installation
This method is suitable for desks up to 10cm (approximately 4 inches) thick.
- Attach the C-clamp components to the main pole assembly.
- Position the monitor arm on the edge of your desk.
- Tighten the C-clamp screw until the arm is securely fixed to the desk. Ensure it is stable and does not wobble.
2. Grommet Base Installation
This method requires a pre-existing hole in your desk with a minimum diameter of 4.2cm (approximately 1.65 inches). It supports desk thicknesses from 1.5cm to 10cm.
- Disassemble the C-clamp if it is already attached and install the grommet base components to the main pole assembly.
- Insert the pole through the hole in your desk.
- Secure the grommet base from underneath the desk using the provided hardware. Tighten firmly to ensure stability.
Attaching the Monitor
- Attach the VESA plate to the back of your monitor using the appropriate screws (G1, G2, H1, H2, F) and washers. Ensure the screws are not overtightened to avoid damaging the monitor.
- Slide the monitor (with the attached VESA plate) onto the arm's VESA mounting head until it clicks into place.
- Secure the monitor to the arm using the locking mechanism, if present, or by tightening any securing screws.
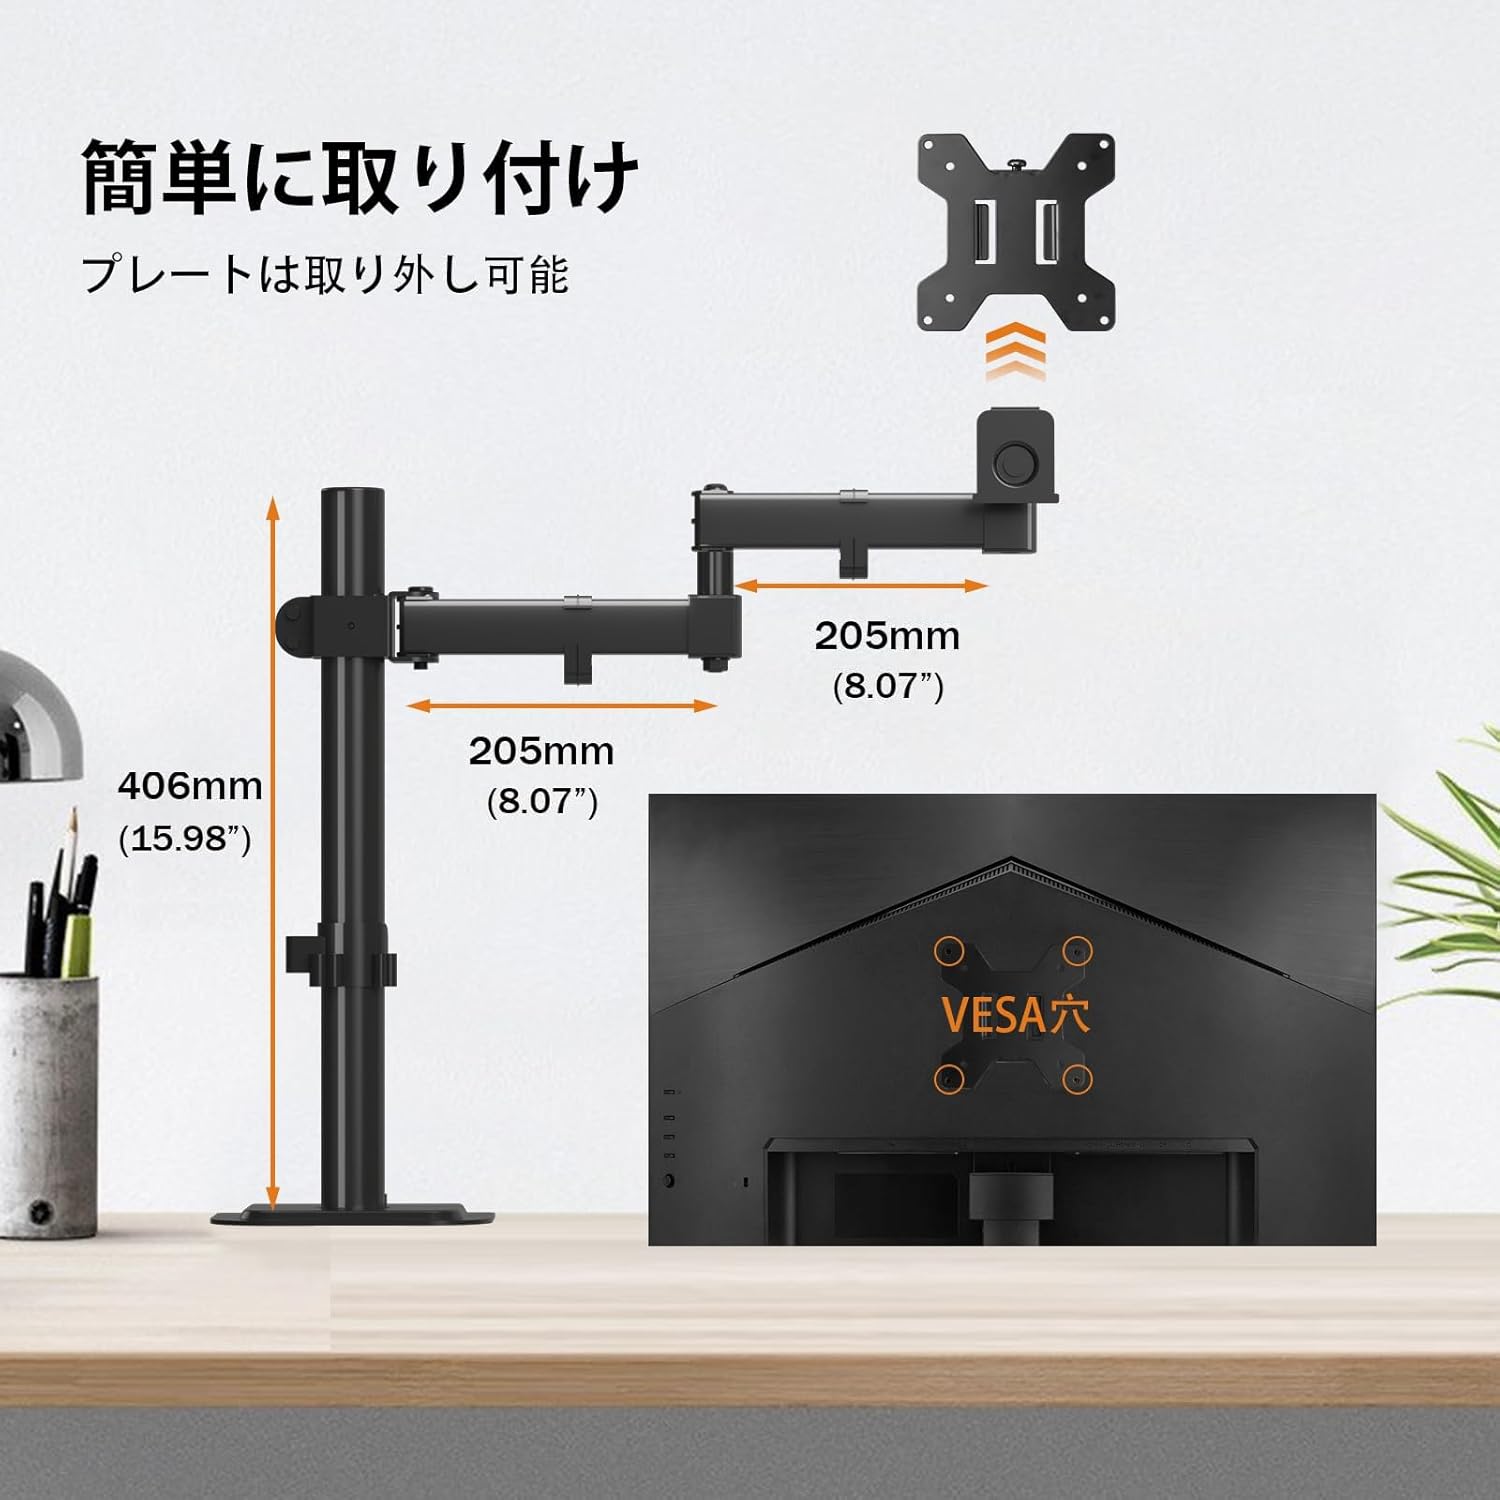
This diagram illustrates the key dimensions of the monitor arm, including arm length and pole height, along with details of the VESA mounting plate (75x75mm and 100x100mm compatibility).
Operating Instructions
The Bracwiser MD7421 monitor arm offers extensive adjustability to achieve your optimal viewing experience.
Adjusting Monitor Position:
- Height Adjustment: Loosen the clamp on the main pole to slide the arm assembly up or down. Re-tighten the clamp firmly at your desired height. The maximum height adjustment range is 406mm (15.98 inches).
- Tilt Adjustment: The VESA plate allows for 80° upward and 80° downward tilt. Use the included hexagonal wrench to adjust the bolt on the VESA plate to set and fix the tilt angle. If the monitor sags or is too low, remove the nut and turn the bolt counter-clockwise with the hexagonal wrench to raise the monitor. After adjustment, reattach the nut.
- Rotation: The monitor can be rotated 360° (portrait to landscape and vice versa).
- Swivel: The arm allows for 90° left and 90° right swivel.

A visual representation demonstrating the monitor arm's flexibility, allowing for 360-degree rotation, 90-degree left/right swivel, and 80-degree up/down tilt for optimal viewing.

A composite image showing the monitor arm configured in various positions, illustrating its versatility in adjusting monitor height, depth, and angle.
Cable Management
The monitor arm includes integrated cable management clips to keep your workspace tidy. Route your monitor and power cables along the arm and down the pole using these clips. This helps to reduce clutter and maintain a clean aesthetic.

This image highlights the arm's space-saving foldable design and a convenient storage slot for the included hexagonal wrench, ensuring tools are always accessible.
Maintenance
- Cleaning: Wipe the monitor arm with a soft, dry cloth. Avoid using abrasive cleaners or solvents.
- Periodic Checks: Periodically check all screws and connections to ensure they remain tight and secure. Re-tighten if necessary.
- Lubrication: No lubrication is typically required for the joints. If movement becomes stiff, ensure no debris is obstructing the joints.
Troubleshooting
- Monitor Sags or Tilts Downward: This usually indicates that the tilt adjustment bolt on the VESA plate is not tight enough. Use the included hexagonal wrench to tighten the bolt. If the issue persists, refer to the tilt adjustment instructions in the 'Operating Instructions' section to ensure proper tension.
- Arm is Not Stable: Ensure both the desk clamp/grommet base and the arm's pole clamp are securely tightened. Check that your desk thickness is within the supported range for your chosen installation method.
- Difficulty Adjusting Height: Loosen the pole clamp slightly before attempting to adjust the height. If the arm is too stiff, ensure no cables are caught in the mechanism.
- Monitor Does Not Fit VESA Plate: Double-check your monitor's VESA pattern (75x75mm or 100x100mm) against the arm's compatibility. Ensure you are using the correct screws and spacers for your monitor.
Specifications
| Feature | Specification |
|---|---|
| Brand | Bracwiser |
| Model Number | MD7421-JP |
| Compatible Devices | Monitor (13-32 inches) |
| Load Capacity | 10 KG (22 lbs) |
| VESA Compatibility | 75x75mm, 100x100mm |
| Material | Alloy Steel |
| Color | Black |
| Mounting Type | Tabletop Mount (Clamp & Grommet) |
| Movement Type | Articulating |
| Max Tilt Angle | 80 degrees (up/down) |
| Rotation | 360 degrees |
| Swivel | 90 degrees (left/right) |
| Max Desk Thickness (Clamp) | 10 cm |
| Desk Thickness (Grommet) | 1.5 cm to 10 cm |
| Min Grommet Hole Diameter | 4.2 cm |
Warranty and Support
Bracwiser offers a three-year warranty from the date of purchase for any defects or malfunctions of Bracwiser products.
To contact support, please follow these steps:
- Go to 'Account Service'.
- Navigate to 'Order History'.
- Select the 'Seller' for your Bracwiser MD7421 order.
- Click on 'Ask a question' and provide your order number and a detailed description of the issue.
Our team is committed to providing prompt and sincere assistance to resolve your concerns.