1. Introduction
Thank you for choosing the XTUGA ES USB/MP3/Bluetooth Professional Audio Mixer. This manual provides essential information for the safe and efficient operation of your mixer. Please read it thoroughly before use and retain it for future reference.
The XTUGA ES series mixers (ES802/ES1202) are designed for professional audio applications, offering features such as USB/MP3 playback and recording, Bluetooth connectivity, built-in digital effects, and +48V phantom power for condenser microphones. Its ultra-thin design and robust metal chassis make it suitable for various environments, including DJ setups, stage performances, and recording studios.
2. Safety Instructions
- Power Supply: Use only the specified power adapter. Ensure the voltage matches your local power supply.
- Ventilation: Do not block ventilation openings. Ensure adequate airflow around the unit to prevent overheating.
- Water and Moisture: Do not expose the mixer to rain, moisture, or any liquids. Do not place objects filled with liquids on the mixer.
- Heat Sources: Keep the mixer away from heat sources such as radiators, heat registers, stoves, or other apparatus (including amplifiers) that produce heat.
- Cleaning: Clean only with a dry cloth. Disconnect the power before cleaning.
- Servicing: Do not attempt to service this product yourself. Refer all servicing to qualified service personnel.
- Grounding: Ensure proper grounding to prevent electric shock.
- Cable Management: Protect power cords from being walked on or pinched, particularly at plugs, convenience receptacles, and the point where they exit from the apparatus.
3. Product Overview
The XTUGA ES series mixer features a compact, durable design with a comprehensive set of controls for versatile audio mixing. It includes multiple input channels, a 3-band equalizer per channel, built-in digital effects, and various connectivity options.

Figure 3.1: Front view of the XTUGA ES Series Professional Audio Mixer, showing all input channels, faders, EQ knobs, and the central control panel with USB/MP3 display.
Key Features:
- Channels: Available in 8 or 12 mono channel configurations with stereo inputs.
- Preamplifiers: High-quality microphone preamplifiers.
- Equalization: 3-band EQ on each mono channel for precise tone shaping.
- Connectivity: USB/MP3 playback and recording, Bluetooth function for wireless audio streaming.
- Phantom Power: +48V phantom power for condenser microphones.
- Digital Effects: Built-in digital effects processor.
- Monitoring: Headphone monitoring and dual 12-band main level display.
- Durable Design: Ultra-thin metal chassis for durability and portability.
4. Setup
4.1 Power Connection
- Ensure the mixer's power switch is in the "OFF" position.
- Connect the provided power adapter to the mixer's power input.
- Plug the power adapter into a suitable AC power outlet.
- Turn the mixer's power switch to "ON". The power indicator will illuminate.
4.2 Input Connections
The mixer supports various input sources:
- Microphones: Connect microphones to the XLR inputs (MIC) on each channel. For condenser microphones requiring phantom power, ensure the +48V button is activated (see Section 5.2).
- Line-Level Devices: Connect instruments, keyboards, or other line-level devices to the 1/4" TRS/TS LINE inputs on each channel.
- Stereo Inputs: Use the dedicated stereo input channels for devices like CD players or external media players.
4.3 Output Connections
- Main Output: Connect your main speakers or amplifier to the MAIN L/R outputs (XLR or 1/4" TRS).
- Headphone Output: Connect headphones to the PHONES output for monitoring.
- AUX Send: Use the AUX SEND output to connect to external effects processors or monitor speakers.
4.4 Computer Connection (USB)
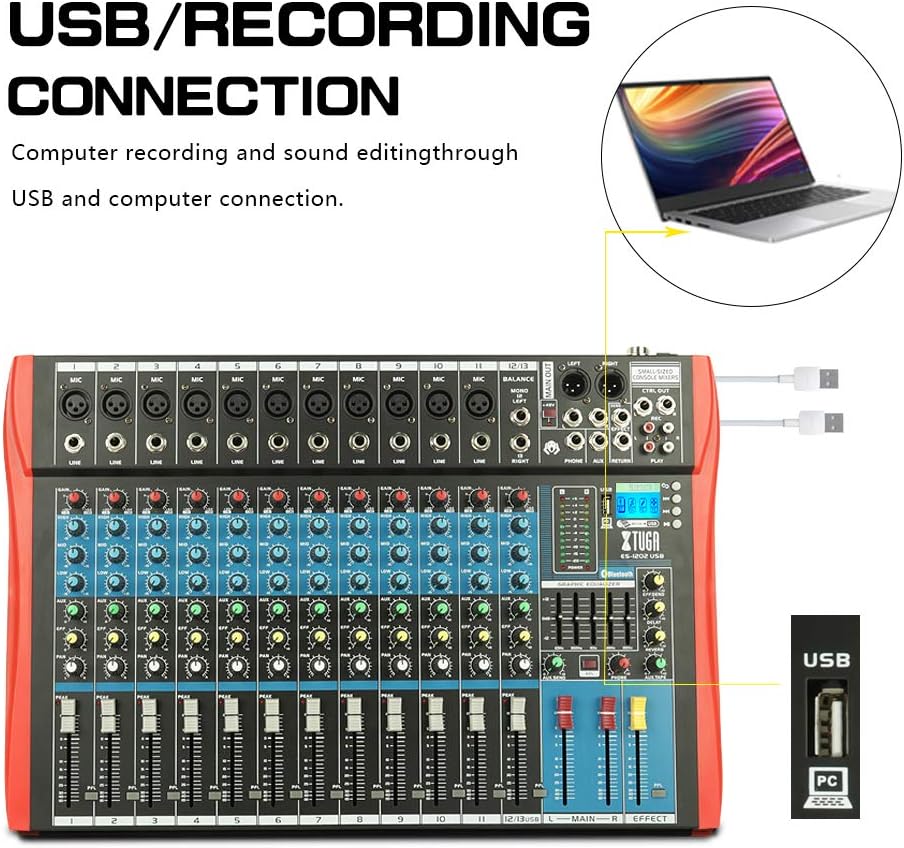
Figure 4.1: Diagram illustrating the USB connection for computer recording and sound editing. Connect the mixer's USB port to your computer using a standard USB cable.
To use the mixer with a computer for recording or playback:
- Connect a USB cable from the mixer's USB port to an available USB port on your computer.
- The mixer will typically be recognized as a standard audio device. No special drivers are usually required for basic functionality.
- Select the mixer as your input/output device in your computer's sound settings or digital audio workstation (DAW) software.
5. Operating Instructions
5.1 Channel Controls
- GAIN: Adjusts the input sensitivity for each channel. Set this to achieve a strong signal without clipping (the PEAK LED should only flash occasionally).
- EQ (HIGH, MID, LOW): 3-band equalizer for shaping the tone of each channel.

Figure 5.1: Visual representation of the 3-band EQ frequency response curves. The HIGH band boosts/cuts above 12kHz, the MID band sweeps from 250Hz to 6kHz, and the LOW band boosts/cuts below 80Hz.
- HIGH: Adjusts frequencies above 12 kHz (±15 dB).
- MID: Adjusts frequencies between 150 Hz and 3.5 kHz (±15 dB). This is a sweepable mid-range control.
- LOW: Adjusts frequencies below 80 Hz (±15 dB).
- EFFECT: Sends a portion of the channel signal to the built-in effects processor.
- PAN: Adjusts the stereo position of the channel signal (left to right).
- CHANNEL FADER: Controls the output level of each individual channel to the main mix.
- PEAK LED: Illuminates when the input signal is too high, indicating potential clipping. Reduce the GAIN if this LED lights up frequently.
5.2 +48V Phantom Power
The mixer provides +48V phantom power for condenser microphones. To activate:
- Ensure all channel faders and the main fader are set to their minimum positions.
- Connect your condenser microphone(s) to the XLR inputs.
- Press the +48V PHANTOM POWER button. An indicator light will confirm activation.
- Gradually raise the channel faders and main fader to the desired levels.
Caution: Do not activate phantom power when dynamic microphones or other devices not requiring +48V are connected, as this may cause damage.
5.3 Bluetooth Connection

Figure 5.2: Close-up of the Bluetooth and MP3 control panel, showing the digital LCD display and control buttons.
To connect a Bluetooth device:
- Press the "MODE" button on the MP3 player section until "Bluetooth" is selected on the digital display.
- On your mobile phone, tablet, or other Bluetooth-enabled device, search for available Bluetooth devices.
- Select "XTUGA MIXER" (or similar name) from the list to pair.
- Once paired, you can play audio from your device through the mixer.
5.4 USB/MP3 Playback and Recording
The mixer supports U-DISK MP3 playback and direct recording to a USB drive.
- MP3 Playback: Insert a USB flash drive containing MP3 files into the USB port. The mixer will automatically detect and begin playing the files. Use the control buttons (PLAY/PAUSE, PREV, NEXT) on the MP3 player section to navigate.
- Recording: To record the main mix to a USB drive, ensure a formatted USB drive is inserted. Press the "REC" button on the MP3 player section to start recording. Press it again to stop.
5.5 Digital Effects
The mixer includes a built-in digital effects processor. Use the "EFFECT" knob on each channel to send signal to the effects. The main "EFFECT" fader controls the overall level of the effects return to the main mix. Adjust the effect type and parameters using the dedicated controls in the effects section.
5.6 Monitoring
Connect headphones to the PHONES jack to monitor the main mix. The PHONES level knob controls the headphone volume. The main LED meters provide a visual indication of the main output level.

Figure 5.3: Close-up of the main LED level meters, showing output levels for Left (L) and Right (R) channels, along with the USB and PC connection ports.
6. Maintenance
- Cleaning: Regularly wipe the mixer's surface with a soft, dry, lint-free cloth. Do not use abrasive cleaners, solvents, or waxes.
- Storage: When not in use for extended periods, store the mixer in a cool, dry place, away from direct sunlight and extreme temperatures. Cover the unit to protect it from dust.
- Cable Care: Avoid bending or twisting cables excessively. Disconnect cables by pulling the plug, not the cable itself.
7. Troubleshooting
| Problem | Possible Cause | Solution |
|---|---|---|
| No sound output |
|
|
| Distorted sound |
|
|
| Bluetooth not connecting |
|
|
| USB/MP3 not playing or recording |
|
|
8. Specifications
| Feature | Specification |
|---|---|
| Brand | XTUGA |
| Model | ES802/1202 |
| Number of Channels | 8 or 12 (depending on model) |
| Connectivity Technology | Auxiliary, Bluetooth, USB |
| Power Source | Corded Electric |
| Frequency Response | Microphone line input to any output: ±1.5 dB, 20 Hz ~ 20 KHz |
| Total Harmonic Distortion + Noise | Sensitivity -30dB, Mix output +14dBu <0.02% @ 1 KHz or EQ (stereo input) |
| Crosstalk (1 KHz) | Channel mute > 90 dB, Fader off > 90 dB, AUX send port closed > 83 dB |
| Mono EQ (Q(MF): 1.5) | Low: 80Hz ± 15dB, Mid (sweepable): 150Hz-3.5KHz ± 15dB, High: 12 KHz ± 15 dB |
| Stereo EQ (Q(MF): 0.8) | Low: 80Hz ± 15dB, Mid: 720Hz ± 15dB, High: 12KHz ± 15dB |
| Power Consumption | Less than 35 W |
| Operating Temperature | 5°C to +40°C |
| Audio Input | XLR, Line, and Digital Inputs |
| UPC | 784124158662 |
| GTIN | 784124158662 |
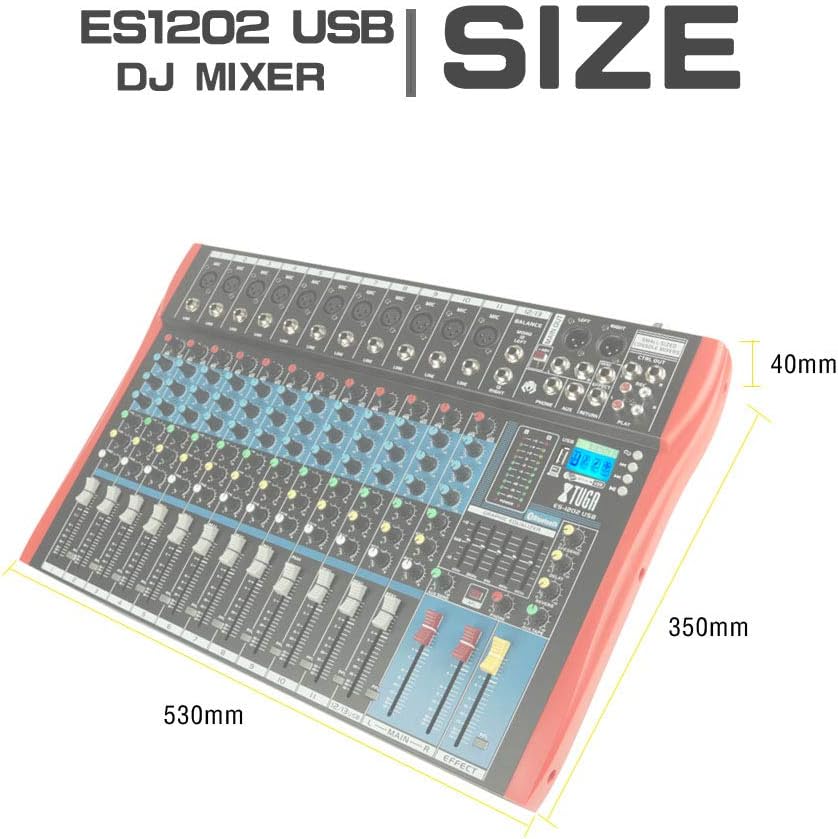
Figure 8.1: Dimensions of the XTUGA ES1202 USB Mixer, showing approximate measurements of 530mm (width), 350mm (depth), and 40mm (height).
9. Warranty and Support
9.1 Warranty Information
XTUGA products are designed and manufactured to high-quality standards. For specific warranty terms and conditions, please refer to the warranty card included with your product or contact your local XTUGA distributor or retailer. Keep your proof of purchase for warranty claims.
9.2 Customer Support
If you encounter any issues or have questions regarding your XTUGA ES USB/MP3/Bluetooth Professional Audio Mixer that are not covered in this manual, please contact XTUGA customer support or your authorized dealer for assistance. Please have your model number (ES802/1202) and purchase information ready when contacting support.