Amiko TSC 1270
Amiko TSC 1270 Field Control Device User Manual
Model: TSC 1270 | Brand: Amiko
1. Introduction
This user manual provides detailed instructions for the safe and efficient operation of the Amiko TSC 1270 Field Control Device. The TSC 1270 is a versatile signal meter designed for precise measurement and analysis of various digital and analog television signals, including DVBS/S2 (Satellite), DVBT/T2 (Terrestrial), DVBC/C2 (Cable), and ATV (Analog TV).
Please read this manual thoroughly before using the device to ensure proper functionality and to prevent damage.
2. Safety Information
Always adhere to the following safety guidelines to prevent injury or damage to the device:
- Do not expose the device to rain, moisture, or extreme temperatures.
- Avoid dropping or subjecting the device to severe impacts.
- Use only the original power adapter and accessories provided with the device.
- Do not attempt to open or repair the device yourself. Refer all servicing to qualified personnel.
- Ensure proper ventilation when operating the device.
- Disconnect the device from power sources before cleaning.
3. Package Contents
Upon opening the package, verify that all items listed below are present and in good condition:
- Amiko TSC 1270 Field Control Device
- Protective Carrying Case
- Shoulder Strap
- AC Power Adapter
- Car Charger
- USB Cable
- F-type to F-type adapter (2 units)
- User Manual (this document)
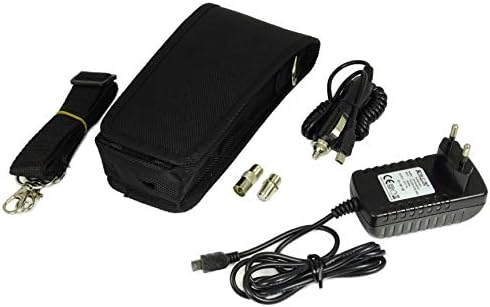
Figure 3.1: Included accessories for the Amiko TSC 1270. This image shows the protective carrying case, shoulder strap, AC power adapter, car charger, USB cable, and two F-type to F-type adapters.
4. Device Overview
Familiarize yourself with the various components and interfaces of the Amiko TSC 1270.
4.1 Front Panel and Display

Figure 4.1: Front view of the Amiko TSC 1270. This image displays the main screen, navigation buttons (up, down, left, right, OK), function keys (F1-F4), and dedicated buttons for Menu, Exit, and Power.
The front panel features a color LCD display for signal readings and menu navigation, along with a keypad for control. Keypad includes directional buttons, an OK button, four function keys (F1-F4), and dedicated buttons for Menu, Exit, and Power.
4.2 Side Panels and Ports
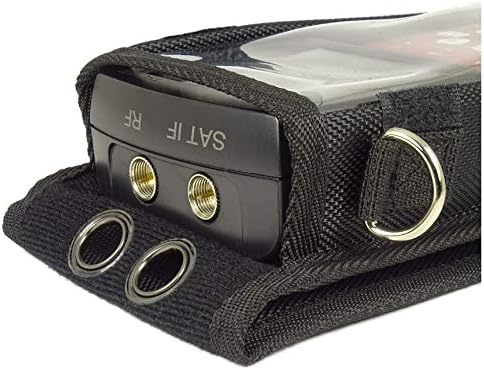
Figure 4.2: Top view of the Amiko TSC 1270. This image highlights the two SAT IF RF input ports, labeled for satellite signal connection.
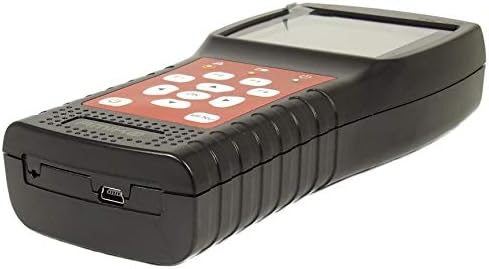
Figure 4.3: Side view of the Amiko TSC 1270. This image shows the Mini-USB port, used for firmware updates and data transfer.
The top side of the device houses the SAT IF RF input ports for connecting antennas or LNBs. A Mini-USB port is located on one of the side panels, primarily used for firmware updates and data transfer.
5. Setup
Follow these steps to prepare your Amiko TSC 1270 for first use:
- Charging the Device: Connect the provided AC power adapter to the device's charging port and plug it into a wall outlet. The device can also be charged using the car charger. Ensure the device is fully charged before extensive use.
- Powering On/Off: Press and hold the Power button located on the front panel to turn the device on or off.
- Initial Language Setting: Upon first power-on, you may be prompted to select your preferred language. Use the navigation buttons to select and the OK button to confirm.
- Connecting to Signal Source:
- For Satellite (DVBS/S2): Connect your LNB cable to one of the SAT IF RF input ports.
- For Terrestrial (DVBT/T2) or Cable (DVBC/C2): Connect your antenna or cable TV line to the appropriate SAT IF RF input port (using an adapter if necessary).
6. Operating Instructions
The Amiko TSC 1270 offers various modes for signal measurement and analysis.
6.1 Main Menu Navigation
Press the Menu button to access the main menu. Use the directional arrows (Up, Down, Left, Right) to navigate through options and OK to select. Press Exit to return to the previous screen or the main measurement interface.
6.2 Satellite Signal Measurement (DVBS/S2)
To measure satellite signals:
- From the main menu, select "Satellite" or "DVBS/S2 Mode".
- Choose the desired satellite from the pre-programmed list or add a new one.
- Select a transponder or manually enter frequency, symbol rate, and polarization.
- Adjust the dish antenna while observing the signal strength and quality indicators on the screen. The device provides real-time feedback, including BER (Bit Error Rate) and MER (Modulation Error Ratio).
- Use the compass and alignment tools displayed on the screen for precise dish positioning.
Figure 6.1: Amiko TSC 1270 display showing satellite alignment interface. This screen provides visual cues for azimuth and elevation, along with signal parameters for a selected satellite (e.g., HotBird 13E).
6.3 Terrestrial and Cable Signal Measurement (DVBT/T2, DVBC/C2, ATV)
For terrestrial and cable signals:
- Select the appropriate mode (DVBT/T2, DVBC/C2, or ATV) from the main menu.
- Scan for channels or manually enter channel frequencies.
- Optimize antenna/cable connection based on signal readings.
6.4 Advanced Features
- Spectrum Analyzer: Access the spectrum analyzer function to visualize signal distribution across frequencies.
- Constellation Diagram: View the constellation diagram for detailed signal quality analysis.
- Channel List Management: Edit, add, or delete channels and transponders.
- Firmware Update: Connect the device to a computer via USB to update firmware. Refer to the official Amiko website for the latest firmware and instructions.
7. Maintenance
Proper maintenance ensures the longevity and optimal performance of your Amiko TSC 1270.
- Cleaning: Use a soft, dry cloth to clean the device. For stubborn dirt, a slightly damp cloth can be used, but ensure no moisture enters the ports or screen. Do not use abrasive cleaners or solvents.
- Storage: When not in use, store the device in its protective carrying case in a cool, dry place, away from direct sunlight and extreme temperatures.
- Battery Care: To prolong battery life, avoid fully discharging the battery frequently. If storing for extended periods, charge the battery to approximately 50% every few months.
8. Troubleshooting
If you encounter issues with your Amiko TSC 1270, refer to the following common problems and solutions:
| Problem | Possible Cause | Solution |
|---|---|---|
| Device does not power on. | Low or depleted battery. Power button not pressed correctly. | Charge the device using the AC adapter. Press and hold the Power button for a few seconds. |
| No signal detected. | Incorrect cable connection. Wrong signal mode selected. Antenna/LNB issue. | Ensure cables are securely connected to the correct ports. Verify you are in the correct mode (DVBS/S2, DVBT/T2, DVBC/C2). Check antenna/LNB for damage or misalignment. |
| Screen frozen or unresponsive. | Software glitch. | Perform a soft reset by holding the Power button until the device restarts. If persistent, consider a firmware update. |
| Inaccurate signal readings. | Outdated firmware. Environmental interference. | Check for and install the latest firmware updates. Ensure no strong electromagnetic interference sources are nearby. |
If the problem persists after trying these solutions, please contact Amiko customer support.
9. Specifications
| Feature | Detail |
|---|---|
| Model Number | TSC 1270 (Internal: 7125b8d3-f110-4ea9-b6e5-8b477d3e480c) |
| Supported Signal Types | DVBS, DVBS2, DVBT, DVBT2, DVBC, DVBC2, ATV |
| Input Voltage | 12 Volts (DC) |
| Number of Channels | 4 (as per product specification, likely referring to internal processing channels or tuner capabilities) |
| Display | Color LCD |
| Connectivity | SAT IF RF Input, Mini-USB |
10. Warranty and Support
Information regarding warranty coverage and specific support contacts is not available in this document. For detailed warranty terms, technical support, or service inquiries, please refer to the warranty card included with your product or visit the official Amiko website. Keep your purchase receipt as proof of purchase for warranty claims.
Online Resources: For the latest firmware updates, FAQs, and additional support, please visit the official Amiko support page.