Introduction
This manual provides comprehensive instructions for the safe and efficient use of your GLOGLOW 99h9 Multi-Hole Paper Puncher. This device is designed for punching multiple holes in A4, B5, and A5 loose-leaf paper, facilitating the creation of custom report files and review materials. Please read these instructions carefully before operating the puncher.

Figure 1: The GLOGLOW 99h9 Multi-Hole Paper Puncher. This image shows the overall design of the puncher, featuring its pink handle and white base with visible punch pins.
Product Components
- Puncher Body: Main structure housing the punching mechanism.
- Punch Pins: Metal pins that create the holes.
- Movable Positioning Columns: Located on both sides, these assist in accurately positioning the paper for punching.
- Ruler with Scale Lines: Integrated ruler for precise paper alignment and hole distance adjustment.
- Scrap Box: A transparent box located at the bottom for collecting punched paper scraps.

Figure 2: View of the puncher's underside, highlighting the transparent scrap box. This box collects paper debris during operation.
Setup
- Unpacking: Carefully remove the puncher from its packaging. Inspect for any damage.
- Familiarization: Identify the punch pins, positioning columns, ruler, and scrap box as described in the "Product Components" section.
- Clear Workspace: Ensure your work surface is stable and clear of obstructions.
Operating Instructions
The GLOGLOW 99h9 puncher can punch up to 5 sheets of paper at a time. It supports A4 (30 holes), B5 (26 holes), and A5 (20 holes) paper sizes.
1. Preparing the Paper
- Gather the sheets of paper you wish to punch. Ensure they are neatly stacked and free from creases or folds.
- Do not exceed the maximum capacity of 5 sheets per punch to prevent damage to the puncher or uneven holes.
2. Adjusting for Paper Size and Hole Count
The puncher features movable positioning columns and a ruler to accurately set the hole distance for different paper sizes.
- Identify Paper Size: Determine if you are punching A4, B5, or A5 paper.
- Adjust Positioning Columns: Slide the movable positioning columns on both sides of the puncher to align with the markings for your desired paper size (A4, B5, or A5) on the ruler. The ruler has scale lines to assist in precise positioning.
- Set Hole Configuration:
- For A4 paper, the puncher is designed to create 30 holes.
- For B5 paper, the puncher is designed to create 26 holes.
- For A5 paper, the puncher is designed to create 20 holes.
To achieve the full number of holes for A4, B5, or A5, multiple punching actions are required, repositioning the paper between each punch. Refer to the diagrams below for detailed steps.

Figure 3: The puncher with its ruler extended, showing the markings for A4, B5, and A5 paper sizes. The red indicators on the ruler help in precise paper alignment.
3. Punching Process
- Insert the prepared paper stack into the puncher, ensuring it is flush against the positioning columns and aligned with the ruler.
- Press down firmly and evenly on the puncher handle to create the holes.
- Release the handle and carefully remove the punched paper.
- For paper sizes requiring more holes than the puncher can make in one go (e.g., A4, B5, A5), reposition the paper according to the specific guide for that size and repeat the punching process until all necessary holes are made.
Punching Guide for A5 (20 Holes)

Figure 4: Step-by-step guide for punching 20 holes on A5 paper. This diagram shows how to align the ruler, perform the first punch, then reposition the paper using the limit post for subsequent punches to achieve 20 holes.
- First Punch: Align the ruler scale and perform the first punch (e.g., 6 holes).
- Second Punch: Insert the second hole from the bottom onto the limit post and punch again (e.g., another 6 holes).
- Third Punch: Insert the second hole from the bottom onto the limit post and punch again (e.g., another 6 holes).
- Fourth Punch: Insert the sixth hole from the bottom onto the limit post and punch again (e.g., 2 more holes). Total: 6+6+6+2 = 20 holes.
Punching Guide for B5 (26 Holes)
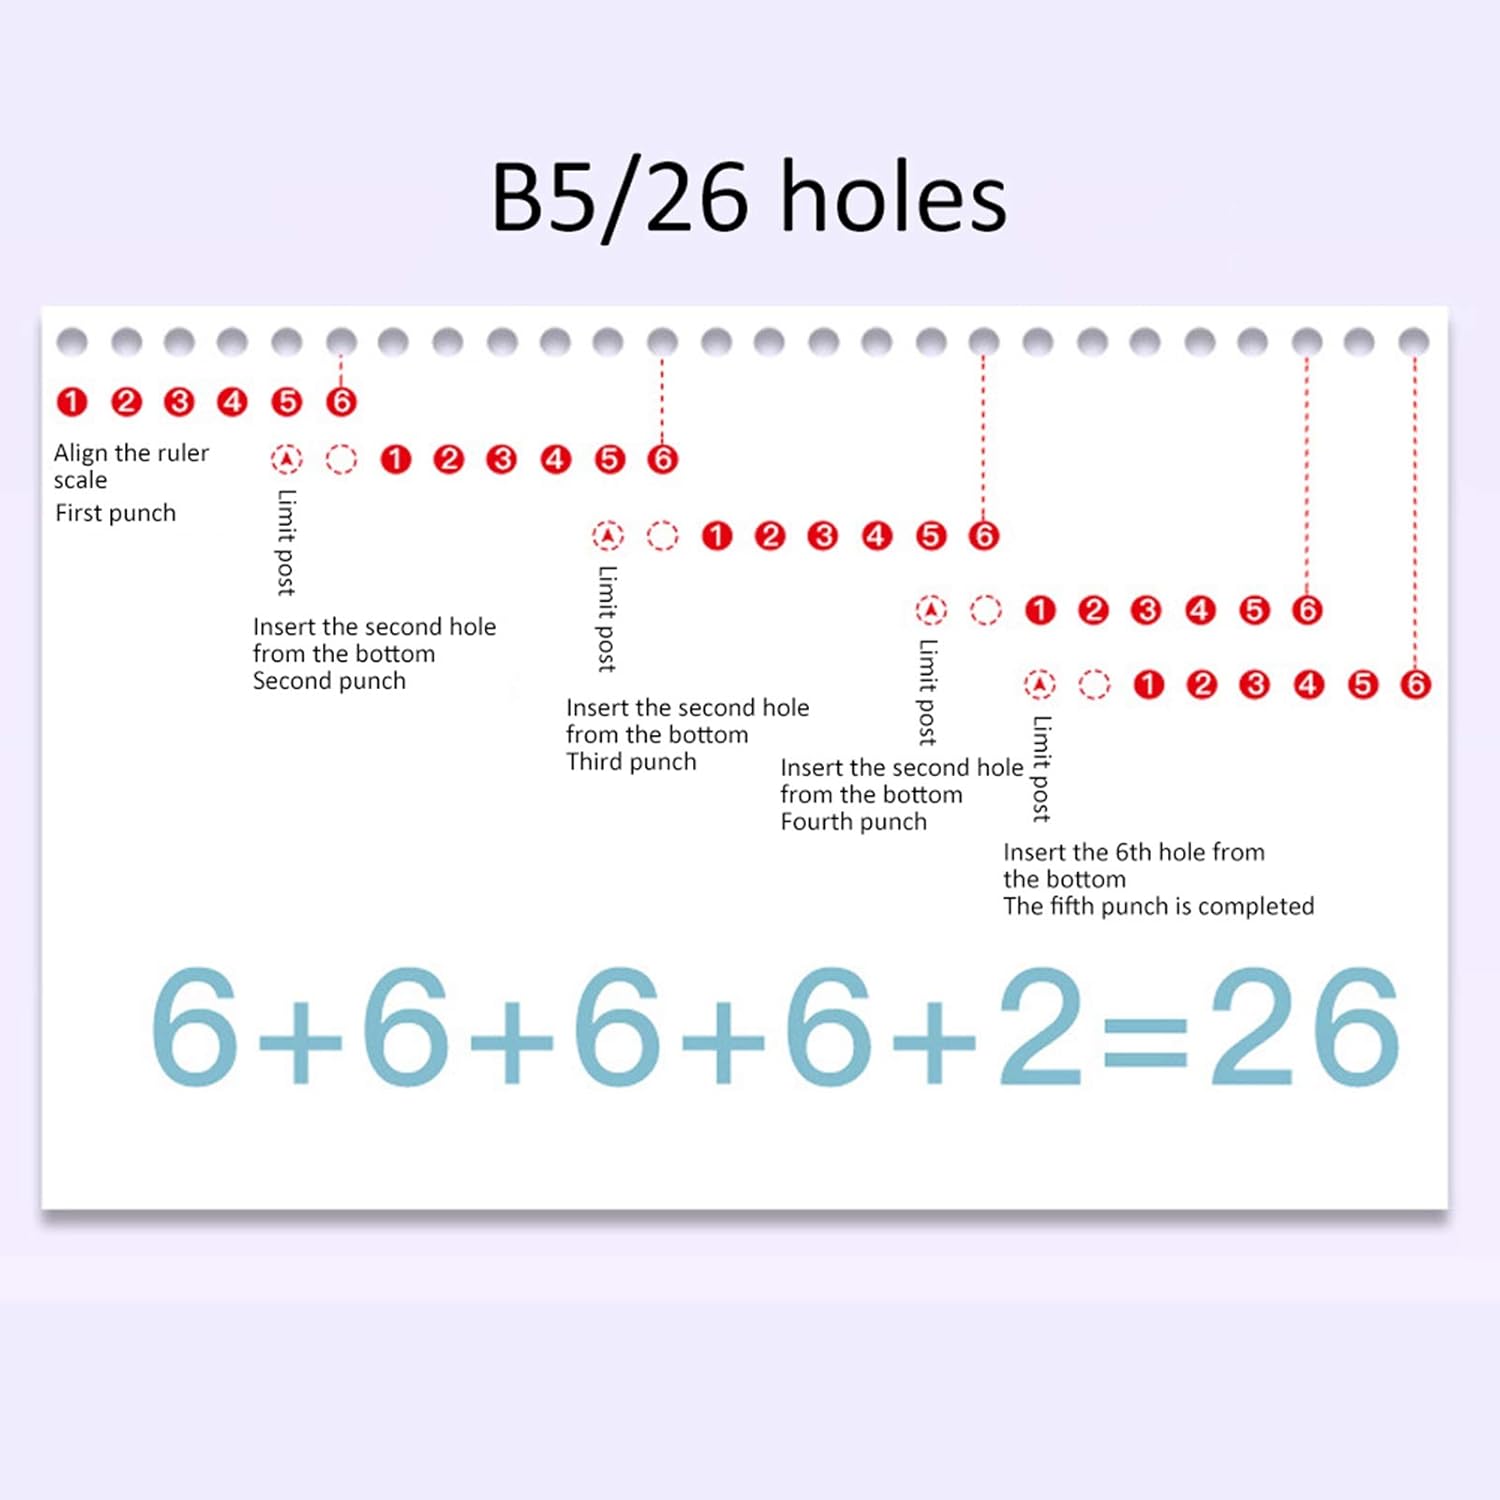
Figure 5: Step-by-step guide for punching 26 holes on B5 paper. Similar to A5, this diagram details the repositioning and punching sequence using the limit post to achieve 26 holes.
- Follow a similar repositioning method as for A5, using the limit post to ensure correct hole spacing and alignment for 26 holes. The diagram illustrates a sequence of 6+6+6+6+2 = 26 holes.
For A4 (30 holes), follow the same principle of repositioning the paper using the limit post to extend the punched area until 30 holes are achieved.
Maintenance
- Emptying the Scrap Box: Regularly check and empty the transparent scrap box located at the bottom of the puncher. This prevents accumulation of paper debris which can interfere with operation.
- Cleaning: Wipe the exterior of the puncher with a soft, dry cloth. Do not use abrasive cleaners or solvents.
- Storage: Store the puncher in a dry place, away from direct sunlight and extreme temperatures.
Troubleshooting
- Uneven Holes: Ensure the paper is properly aligned against the positioning columns and ruler before punching. Do not exceed the maximum sheet capacity.
- Difficulty Punching: Reduce the number of sheets being punched. Ensure the punch pins are clear of any debris.
- Paper Jams: If paper gets stuck, gently pull it out. Do not force the handle. Clear any jammed paper scraps from the punching area.
Specifications
| Model | 99h9 |
| Brand | GLOGLOW |
| Material | ABS, Iron |
| Color | Pink |
| Number of Punched Sheets | Up to 5 sheets (once) |
| Punching Aperture | Approx. 6mm / 0.2in |
| Feeding Depth | Approx. 7mm / 0.3in |
| Hole Distance | Approx. 9.5mm / 0.4in |
| Supported Paper Sizes | A4 (30 holes), B5 (26 holes), A5 (20 holes) |
| Item Weight | 180 Grams |

Figure 6: Dimensions of the GLOGLOW 99h9 Multi-Hole Paper Puncher. The image indicates approximate measurements of 6cm/2.4in height, 5.3cm/2.1in depth, and 7cm/2.8in width.
Warranty and Support
For warranty information or technical support, please refer to the product packaging or contact the manufacturer directly. Keep your purchase receipt for any warranty claims.