1. Introduction
This manual provides essential information for the safe assembly, operation, and maintenance of your SogesGame Height Adjustable Power Tower Dip Station. Please read this manual thoroughly before assembly and use to ensure proper function and safety. Retain this manual for future reference.

Figure 1: SogesGame Height Adjustable Power Tower Dip Station
2. Safety Information
- Always consult with a healthcare professional before starting any new exercise program.
- Ensure all bolts, nuts, and connections are securely tightened before each use. Regularly inspect the equipment for any signs of wear or damage.
- Do not exceed the maximum weight recommendation of 330 pounds (150 kg).
- Place the power tower on a flat, stable, and non-slip surface. Ensure adequate clear space around the equipment for safe movement.
- Keep children and pets away from the equipment during use.
- Use the equipment only for its intended purpose as described in this manual.
- If you experience pain, dizziness, or discomfort during exercise, stop immediately and consult a healthcare professional.
3. Package Contents
Verify that all components are present before beginning assembly. If any parts are missing or damaged, contact customer support.
- Main Frame Components (Uprights, Base Supports, Crossbars)
- Pull-up Bar
- Dip Handles / Armrests
- Backrest Pad (if applicable)
- Assembly Hardware (Bolts, Washers, Nuts)
- Assembly Tools (Wrenches, Allen Keys)
- User Manual
4. Assembly Instructions
Assembly typically requires two adults. Follow the included professional assembly instructions and use the provided tools for efficient and simple setup. Ensure all connections are secure for stability.
- Unpack Components: Carefully remove all parts from the packaging and lay them out on a clean, flat surface.
- Assemble Base: Attach the main base supports, ensuring the 'figure eight' anti-outside base is correctly oriented for maximum stability.
- Install Uprights: Securely fasten the vertical uprights to the assembled base using the provided hardware.
- Attach Dip Handles: Mount the dip handles/armrests to the uprights. These are designed for stability and comfort.
- Install Pull-up Bar: Secure the pull-up bar to the top of the uprights.
- Final Tightening: Once all components are loosely assembled, systematically tighten all bolts and nuts. Do not overtighten.
- Stability Check: Gently shake the assembled power tower to ensure it is stable and all parts are securely connected.

Figure 2: Detail of the stable base design
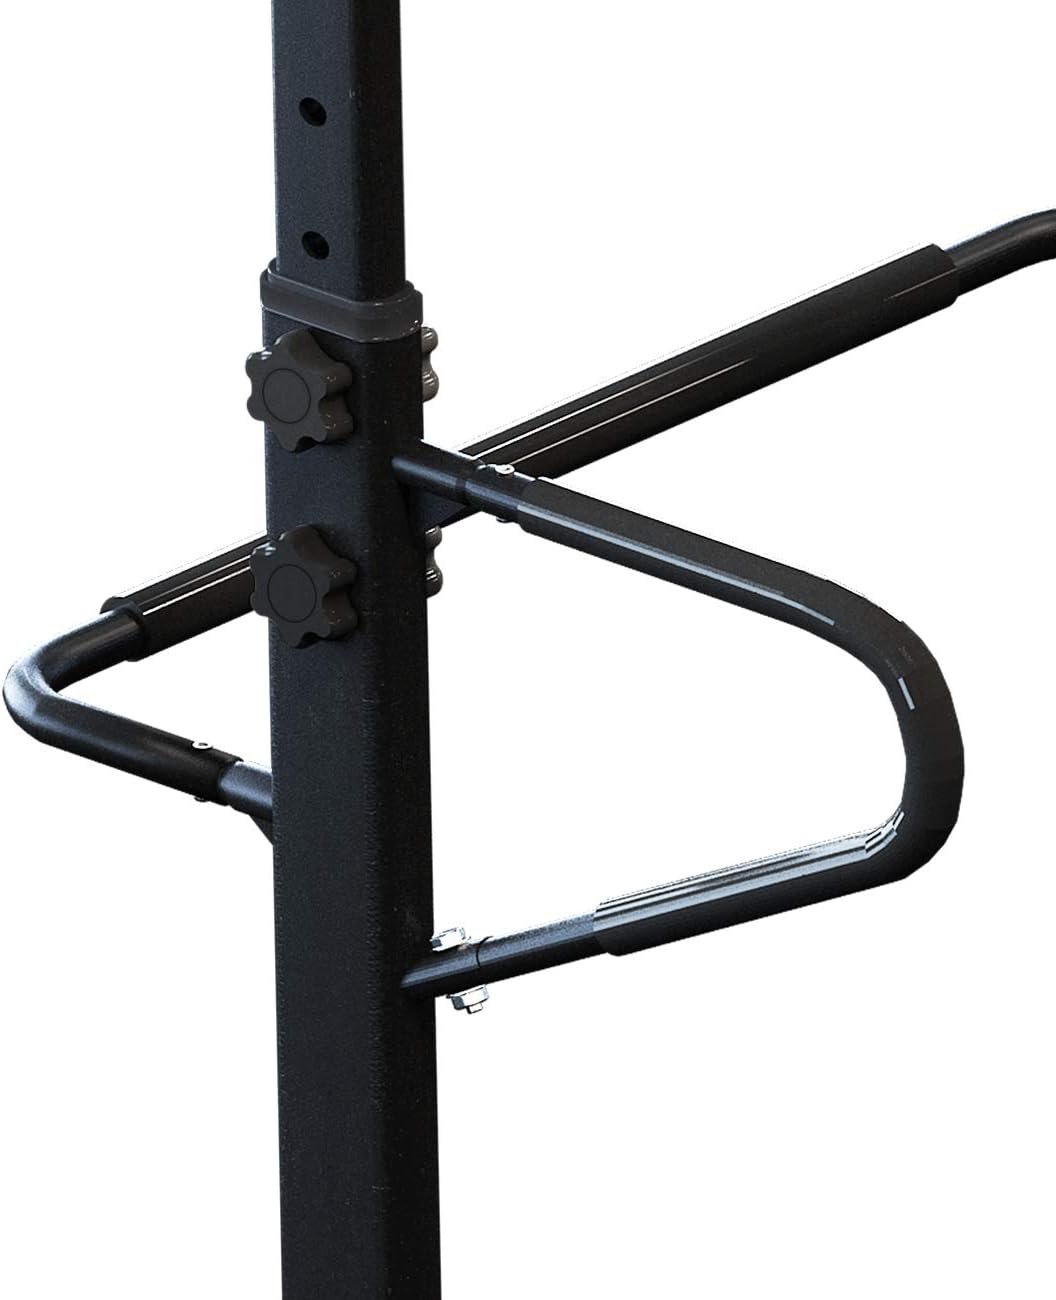
Figure 3: Adjustable dip handles with secure locking knobs
5. Operating Instructions
5.1 Height Adjustment
The SogesGame Power Tower features 6 adjustable height levels, ranging from 74.8 inches (190 cm) to 90.6 inches (230 cm). This allows for customization to suit various user heights and exercise requirements.
- Locate the adjustment knobs on the uprights.
- Unscrew and pull out the knobs to disengage the locking pins.
- Carefully slide the upper section of the tower to the desired height. Ensure both sides are adjusted equally.
- Reinsert the locking pins into the corresponding holes and securely tighten the knobs. Verify that the pins are fully engaged before use.

Figure 4: Height adjustment mechanism
5.2 Exercise Functions
The power tower supports a variety of bodyweight exercises targeting multiple muscle groups:
- Pull-ups: Engage back and arm muscles. Use the top bar for various grip positions.
- Chin-ups: Similar to pull-ups, with an underhand grip, focusing more on biceps.
- Dips: Utilize the dip handles to target chest, triceps, and shoulders.
- Push-ups: Can be performed on the floor or with elevated hands on the dip handles for varied intensity.
- Knee Raises / Leg Lifts: Use the dip station armrests to support your body while performing abdominal exercises.

Figure 5: Examples of exercises possible with the power tower
6. Maintenance
- Cleaning: Wipe down the equipment with a damp cloth after each use to remove sweat and dust. Avoid abrasive cleaners.
- Inspection: Periodically check all bolts, nuts, and connections for tightness. Tighten any loose fasteners.
- Wear and Tear: Inspect the frame, grips, and pads for any signs of cracks, tears, or excessive wear. Replace damaged parts immediately.
- Storage: Store the power tower in a dry, cool place away from direct sunlight and extreme temperatures.
7. Troubleshooting
- Equipment feels unstable:
- Ensure all assembly bolts are fully tightened.
- Verify the power tower is placed on a level surface.
- Check that the height adjustment pins are fully engaged and knobs are tightened.
- Difficulty adjusting height:
- Ensure adjustment knobs are fully unscrewed and pins are disengaged.
- Check for any obstructions in the adjustment holes.
8. Specifications
| Feature | Specification |
|---|---|
| Brand | SogesGame |
| Model Number | PSBB002-P |
| Material | Metal |
| Color | Black |
| Maximum Weight Recommendation | 330 Pounds (150 kg) |
| Adjustable Height Range | 74.8" to 90.6" (190 cm to 230 cm) |
| Item Package Dimensions (L x W x H) | 51.5 x 13.75 x 6 inches |
| Package Weight | 17.12 Kilograms |
| UPC | 883050942380 |
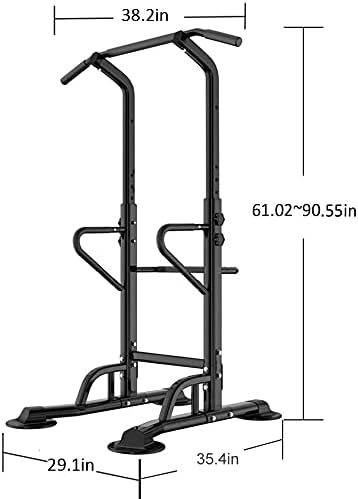
Figure 6: Product Dimensions
9. Warranty and Support
For warranty information or customer support, please refer to the product packaging or contact SogesGame directly through their official website or the retailer where the product was purchased. Keep your purchase receipt as proof of purchase.