Introduction
This manual provides detailed instructions for the installation, operation, and maintenance of your LATCH.IT RV Door Latch. Designed for enhanced security, this 100% metal lock offers a robust solution for your travel trailer or camper. Please read these instructions thoroughly before proceeding with installation or use to ensure proper function and safety.
Package Contents
Your LATCH.IT RV Door Latch kit includes the following components:
- 1x LATCH.IT RV Door Lock Assembly
- 4x Mechanical Keys (Keyed Alike)
- 1x Mounting Hardware Set (including 4x different length screws)
- 1x Owner's Manual / Installation Guide
- Gift-Ready Premium Packaging

Image: Contents of the LATCH.IT RV Door Lock package.
Video: An unboxing and demonstration of the LATCH.IT RV Door Lock, showcasing its components and initial functionality.
Compatibility & Fitment
The LATCH.IT RV Door Latch is designed to fit most RVs and travel trailers. It is crucial to verify your existing lock hole dimensions before installation to ensure proper fitment.
Required Lock Hole Dimensions:
- Height: 3.75 inches
- Width: 2.75 inches
- Thickness/Depth: 1.5 inches
Important: This lock will NOT fit Class A or Class C RVs. Please check your dimensions and latch style carefully before purchasing and installing.

Image: Visual guide for measuring your RV door's lock hole to ensure compatibility.
Setup & Installation
Installation of the LATCH.IT RV Door Latch is designed to be straightforward and typically takes around 10 minutes. A Phillips head screwdriver is generally the only tool required.
1. Removing Your Old Lock:
- Open your RV door.
- Locate and remove the screws securing the interior handle plate of your existing lock.
- Carefully pull the interior and exterior portions of the old lock assembly out of the door.
- Remove any remaining components, such as the strike plate on the door frame, if necessary.
2. Installing Your New LATCH.IT Lock:
- Ensure the pre-installed weather-resistant gasket is properly seated on the new LATCH.IT lock.
- Insert the exterior portion of the LATCH.IT lock into the prepared hole in your RV door.
- Align the interior handle plate with the exterior portion and secure it using the provided screws. Choose the appropriate screw length for your door's thickness.
- Verify that the orange tab on the interior handle operates the deadbolt smoothly.
- Verify that the handle operates the latch mechanism correctly.
- Install the new strike plate on the door frame, aligning it with the latch and deadbolt.
- Test the lock's functionality with the keys and interior mechanisms before closing the door completely.
Video: A step-by-step guide demonstrating the installation process of the LATCH.IT RV Door Lock.
Operating Instructions
The LATCH.IT RV Door Latch features both a main latch and a deadbolt for enhanced security.
1. Locking and Unlocking with Keys:
- Insert one of the provided mechanical keys into the upper keyhole to lock or unlock the main door handle.
- Insert the key into the lower keyhole to engage or disengage the deadbolt.
- Ensure both locks are engaged for maximum security when leaving your RV unattended.
2. Using the Interior Deadbolt:
- From the interior of your RV, locate the orange tab.
- Push the orange tab to the left to engage the deadbolt.
- Push the orange tab to the right to disengage the deadbolt.
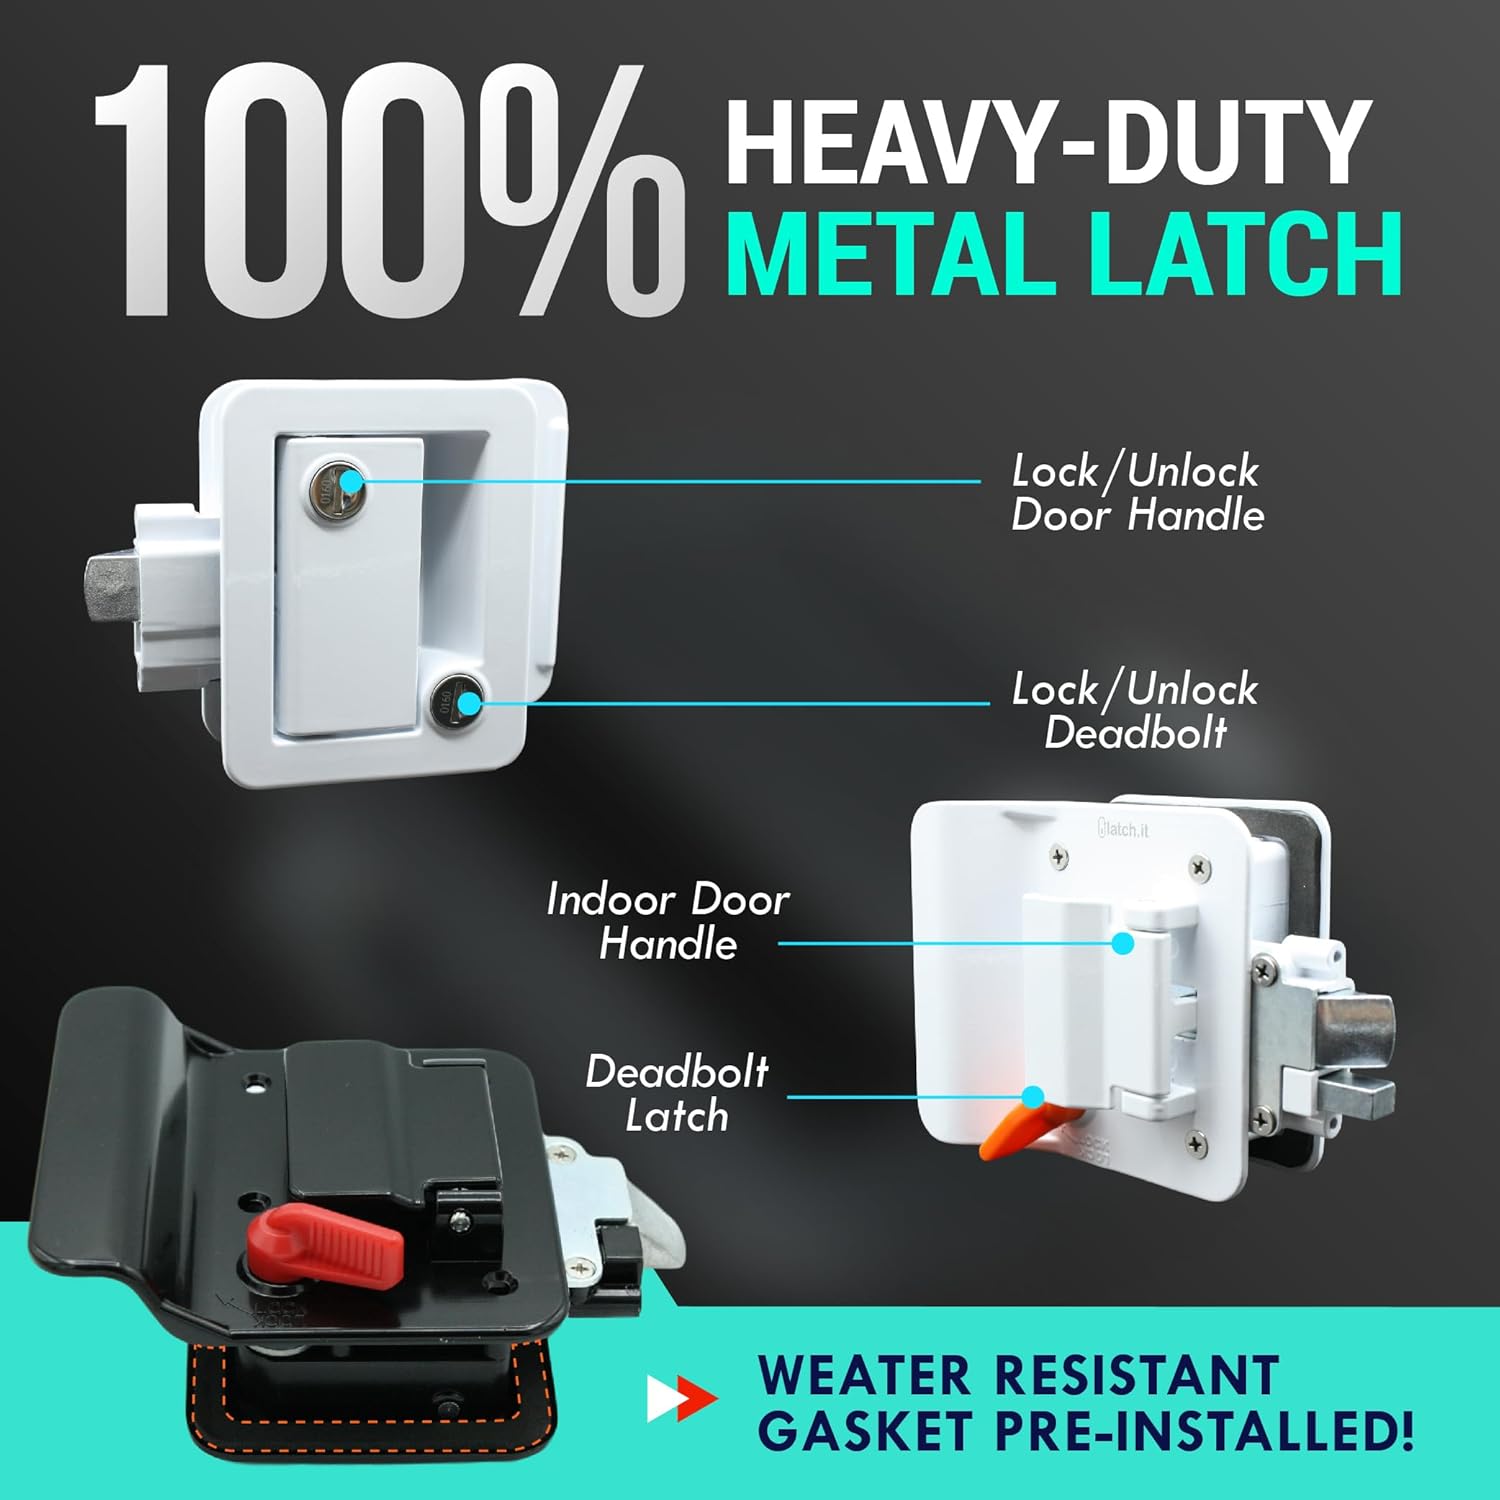
Image: Overview of the LATCH.IT RV Door Latch's locking mechanisms.
Maintenance
Regular maintenance ensures the longevity and smooth operation of your LATCH.IT RV Door Latch.
1. General Care:
- Keep the lock mechanism clean and free from dirt and debris.
- Periodically lubricate the moving parts of the latch and deadbolt with a silicone-based lubricant to ensure smooth operation.
- The lock features a smooth, rust-proof surface and water-resistant technology, but occasional cleaning with a mild soap and water solution is recommended.
2. Key Cylinder Replacement:
If you need to replace a key cylinder or re-key your lock to match other LATCH.IT locks, follow these steps:
- Insert the mechanical key into the cylinder you wish to remove and turn it to the unlocked position.
- Locate the small copper tab at the bottom of the cylinder within the handle assembly.
- Using a small flat-head screwdriver, gently push this tab inward while pulling the key and cylinder outwards.
- To install a new cylinder, insert the key into the new cylinder, align the tab with the slot, and push it firmly into place until it clicks.
- Test the new cylinder with the key to ensure it locks and unlocks correctly.
Video: Instructions on how to remove and replace the key lock cylinder on LATCH.IT RV Locks.
Troubleshooting
If you encounter any issues with your LATCH.IT RV Door Latch, consider the following:
- Difficulty Closing/Latching: Ensure the lock was installed correctly and is not misaligned. Improper installation can lead to the door not closing or latching properly. Re-check the alignment of the lock body and strike plate.
- Stiff Operation: Apply a silicone-based lubricant to the latch and deadbolt mechanisms. Ensure no debris is obstructing the moving parts.
- Key Not Turning: Check for any foreign objects in the keyhole. Ensure the key is fully inserted and is the correct key for the lock. If the cylinder is damaged, refer to the key cylinder replacement instructions.
Specifications
| Brand | LATCH.IT |
| Model Name | MCH-LK-01 |
| Lock Type | Key Lock |
| Material | 100% Metal |
| Color | White |
| Item Dimensions (L x W x H) | 7.7 x 5.6 x 6.2 inches |
| Item Weight | 5.13 pounds |
| Special Feature | USA Owned Family Business! |
| UPC | 852800008430 |
Warranty & Support
LATCH.IT stands behind the quality and performance of its products. This RV Door Latch comes with a Lifetime Warranty.
For any questions, concerns, or support needs, please refer to the contact information provided in your product packaging or visit the official LATCH.IT website.


