
YUHX C-25ft-11pcs Fittings+T Adapter
Refrigerator Water Line Kit Instruction Manual
Brand: YUHX
Model: C-25ft-11pcs Fittings+T Adapter
Introduction
This manual provides detailed instructions for the installation, operation, and maintenance of your YUHX Refrigerator Water Line Kit. This kit is designed to connect various water-using appliances such as refrigerators, ice makers, RO systems, water filters, and faucets to an existing water supply. Please read this manual thoroughly before beginning installation to ensure proper setup and safe operation.
Package Contents
Verify that all components listed below are included in your package:

Image: Overview of the YUHX Refrigerator Water Line Kit components, including tubing, fittings, and tools.
- Feed water adapter x 1
- 25 feet of 1/4" tubing x 1
- 1/4" inline shut-off valve x 1
- 1/4" tee fitting x 1
- 1/4" straight fitting x 1
- 1/4" OD tubing elbow x 2
- 1/4" adapter x 1
- Professional tube cutter x 1
- Teflon tape x 1
- 1/4” Compression fitting set (Compression Insert x 2, Compression Sleeve x 2, Brass Compression nut x 1)
Safety Information
- Always ensure the main water supply is turned off before beginning any installation or maintenance.
- Use appropriate tools and follow all local plumbing codes and regulations.
- Do not overtighten connections, as this can damage fittings and cause leaks.
- Thoroughly check all connections for leaks after installation and before restoring full water pressure.
- This product is designed for potable drinking water applications only.
Setup and Installation
This kit offers versatile connection options for various appliances. Follow the steps below for a successful installation.
Video: A detailed demonstration of the installation process for the 1/4" Water Line Kit, including cutting tubing and connecting fittings for refrigerators, ice makers, and RO systems.
Preparing the Tubing

Image: Close-up of the professional tube cutter in use, demonstrating how to achieve a clean, flat cut on the 1/4" tubing.
Use the provided professional tube cutter to cut the 1/4" OD tubing to the desired length. Ensure cuts are clean and flat to prevent leaks. Uneven cuts can compromise the seal and lead to leakage.
Quick Connect Fittings Installation

Image: Diagram illustrating the steps for inserting and releasing tubing from quick connect fittings.
- Insert Tubing: Firmly insert the tubing into the quick connector until it stops.
- Push Fully: Push the tubing straight in as far as possible, approximately 0.66 inches (17mm), to ensure a secure seal.
- To Release: To remove the tubing, push in the collet (the small ring around the tubing) and then pull the tubing out.
Compression Fitting Installation
For compression fittings, slide the compression nut, then the compression sleeve, and finally the compression insert onto the tubing. Tighten the compression nut onto the corresponding threaded connection. Use Teflon tape on threaded connections for a secure, leak-free seal.
Connecting to Water Supply (Feed Water Adapter)
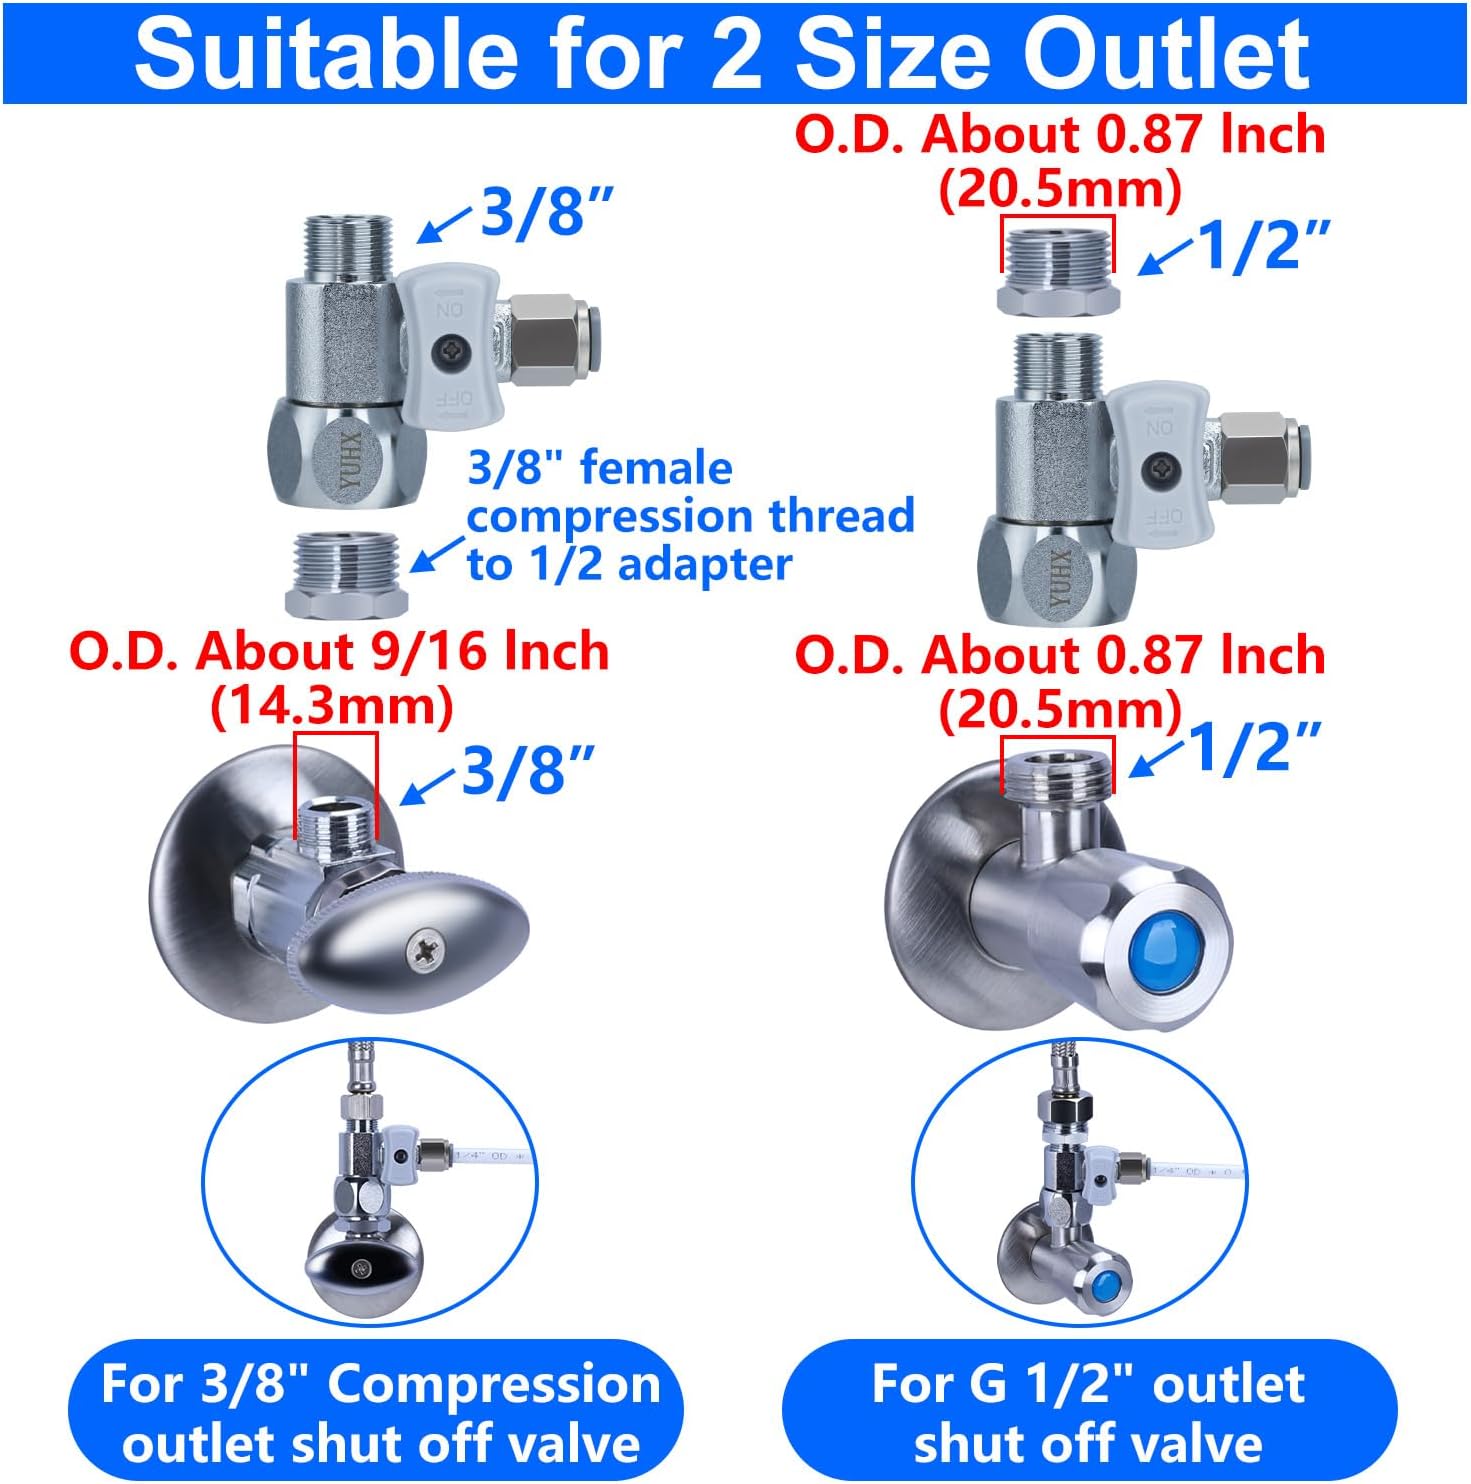
Image: Diagrams showing the feed water adapter connecting to 3/8" and 1/2" compression outlet shut-off valves.
The feed water adapter connects to your existing cold water supply line. It is compatible with most standard shut-off valves.
- Turn Off Water: Turn off the main water supply to your home.
- Disconnect Line: Disconnect the existing cold water line from the shut-off valve.
- Connect Adapter: Connect the feed water adapter to the shut-off valve. Apply Teflon tape to threaded connections for a secure seal.
- Reconnect Line: Reconnect the existing cold water line to the feed water adapter.
- Connect Tubing: Connect the 1/4" tubing from the kit to the quick connect port on the feed water adapter.
Connecting to Appliance (Refrigerator/Ice Maker/RO System)

Image: Diagrams showing typical installation configurations for a refrigerator/ice maker and a reverse osmosis/water filter system.
Route the 1/4" tubing from the feed water adapter to your appliance.
- For Refrigerators/Ice Makers: Connect the tubing to the water inlet on the back of your appliance using either the 1/4" adapter or the 1/4" compression fitting set, depending on your appliance's specific connection type.
- For RO/Water Filter Systems: Connect the tubing to the inlet of your RO or water filter system.
- Use the 1/4" inline shut-off valve to control water flow to the appliance, allowing for easy shut-off without affecting the main water supply.
- Utilize the 1/4" tee fitting and elbow fittings as needed for routing the tubing around corners or splitting the water line.
Operating Instructions
Once installation is complete and all connections are secure, follow these steps to operate your water line kit:
- Restore Water Supply: Slowly turn on the main water supply to your home.
- Check for Leaks: Carefully inspect all newly made connections for any signs of leaks. If a leak is detected, turn off the water supply immediately and re-secure the connection.
- Open Inline Valve: Open the 1/4" inline shut-off valve to allow water flow to your connected appliance.
- Flush System: Flush the system according to your appliance's or filter system's instructions to remove any trapped air or manufacturing residues.
Maintenance
This water line kit is designed for durability and requires minimal maintenance.
- Regular Inspection: Periodically inspect all tubing and connections for signs of wear, kinks, or leaks.
- Leak Response: If a leak is detected, turn off the water supply immediately and re-secure the connection or replace the affected component.
- Tubing Longevity: The tubing is made from durable food-grade materials and does not require regular replacement unless physically damaged or showing signs of degradation.
Troubleshooting
- No Water Flow:
- Ensure the main water supply is on and the inline shut-off valve is fully open. Check for severe kinks or blockages in the tubing.
- Leaks at Connections:
- Turn off water supply. Ensure tubing is fully inserted into quick connect fittings (0.66 inches/17mm). For compression fittings, ensure the nut is tightened sufficiently but not overtightened, and that Teflon tape was used. Check for damaged O-rings or cracked fittings.
- Slow Water Flow:
- Check for kinks or partial blockages in the tubing. Ensure all valves in the line are fully open. If connected to a filter system, check the filter's condition.
Specifications
| Feature | Detail |
|---|---|
| Brand | YUHX |
| Model | C-25ft-11pcs Fittings+T Adapter |
| Tubing Material | Food Grade Plastic |
| Fitting Material | Metal Copper Plastic |
| Tubing Length | 25 Feet |
| Tubing Outside Diameter | 0.25 Inches (1/4") |
| Compatibility | Most refrigerator brands (GE, LG, Whirlpool, Samsung, Frigidaire), RO systems, water filters, faucets. |
| Certifications | Tested to meet NSF/ANSI standards, BPA free |
| UPC | 782938779820 |
| Item Weight | 12.3 ounces |
Warranty and Support
For warranty information or technical support regarding your YUHX Refrigerator Water Line Kit, please refer to the product packaging or contact YUHX customer service directly through the retailer where the product was purchased. Keep your proof of purchase for any warranty claims.
Ask a question about this manual
Ask about setup, troubleshooting, compatibility, parts, safety, or missing instructions. Manuals+ will review the question and use this page’s manual context to help answer it.