1. Introduction
This manual provides essential information for the safe installation, operation, and maintenance of your VEVOR ST-60 6kW Steam Generator. Please read this manual thoroughly before installation and use, and retain it for future reference. Proper installation and adherence to these instructions are crucial for optimal performance and user safety.
2. Safety Instructions
WARNING: Failure to follow these safety instructions may result in electric shock, fire, serious injury, or death.
- Always ensure the steam generator is installed by a qualified electrician and plumber in accordance with all local and national codes.
- Do not operate the unit if it is damaged or malfunctioning.
- Ensure proper grounding to prevent electrical hazards.
- Keep children and pets away from the steam generator and steam outlet during operation.
- The steam nozzle becomes extremely hot during operation. DO NOT TOUCH the steam nozzle when using the unit.
- This unit is designed for steam generation for personal bathing/sauna purposes only. It is NOT TO BE USED FOR SPACE HEATING PURPOSES.
- The unit features overheat protection. If the water level is too low, the unit will automatically shut off to prevent dry burning.
- Regularly inspect all connections for leaks and ensure the manual drain is functioning correctly.
3. Product Overview and Components
The VEVOR ST-60 6kW Steam Generator is designed to provide a consistent and efficient steam supply for your sauna or steam shower. It features a durable stainless steel construction and a user-friendly digital controller.

Figure 3.1: VEVOR ST-60 6kW Steam Generator and its accessories, including the digital controller, cables, and steam outlet.
Key Components:
- Steam Generator Unit: The main housing containing the heating elements and water tank. Constructed from stainless steel for durability and corrosion resistance.
- Digital Display Controller: An external, waterproof control panel for setting temperature and time.
- Steam Nozzle: The outlet for steam into the sauna or shower area. Designed to prevent clogging.
- Manual Drain Valve: Allows for manual draining of the water tank for maintenance.
- Water Inlet: Connection point for the water supply.
- Electrical Connection Terminal: For power input.

Figure 3.2: Internal features of the steam generator, emphasizing quick heating, quiet operation, and overheat protection.

Figure 3.3: The waterproof digital display controller, detailing its dimensions (3.9" x 3.9" x 2" / 10 x 10 x 5 cm) and controls for temperature (35°C - 55°C) and time (1-60 minutes).

Figure 3.4: Details of the steam nozzle (1) and manual drain (2), highlighting safety features and certifications (ISO9001, CE).
4. Specifications
| Feature | Specification |
|---|---|
| Model | ST-60 |
| Power Output | 6 kW |
| Voltage | 220V - 240V |
| Frequency | 50 Hz / 60 Hz |
| Temperature Range | 35℃ - 55℃ (95°F - 131°F) |
| Time Setting Range | 1 - 60 minutes |
| Water Tank Capacity | 1.1 Gallon (4.3 Liters) |
| Material | 304 Stainless Steel |
| Certifications | ISO9001, CE |
| Product Dimensions (L x W x H) | 15.5" x 6" x 12.3" (39.5 x 15.3 x 31.3 cm) |
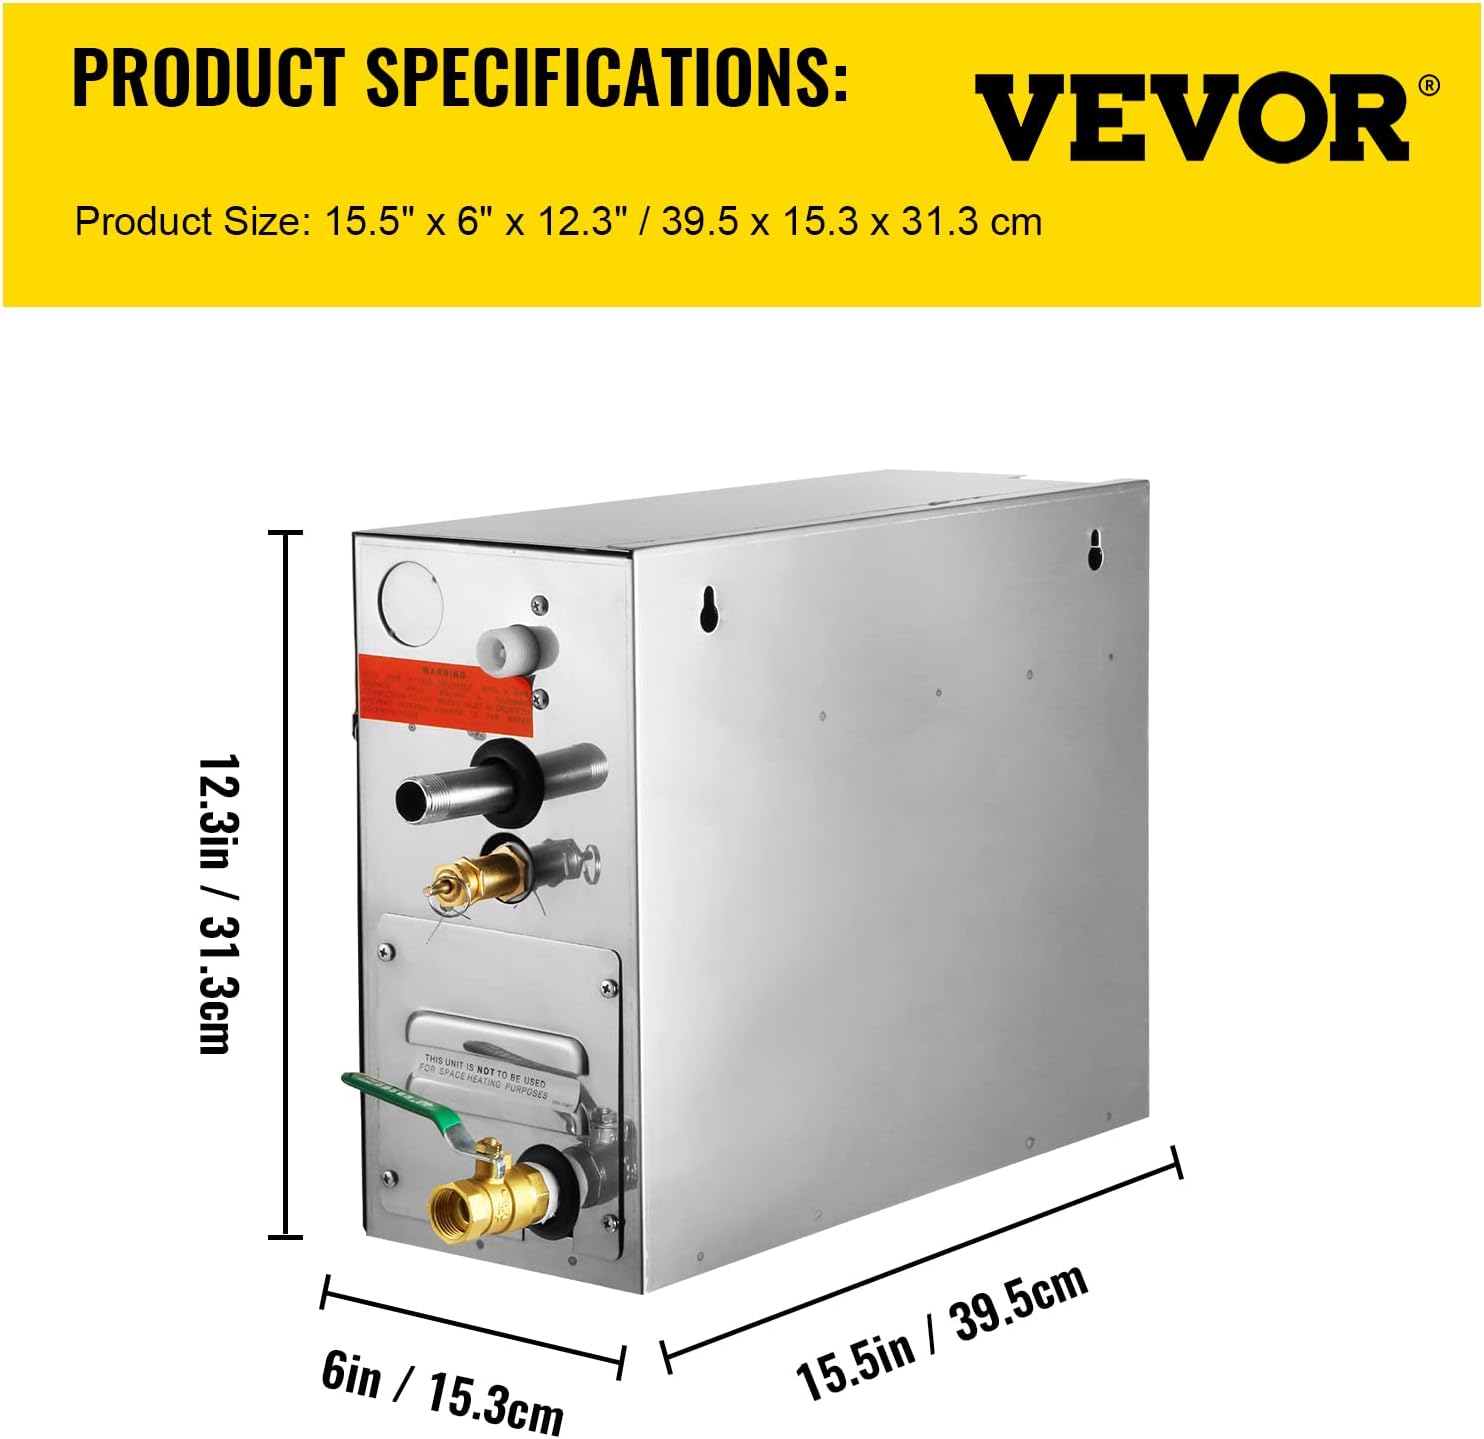
Figure 4.1: Detailed dimensions of the VEVOR ST-60 steam generator.
5. Installation
IMPORTANT: Installation must be performed by qualified personnel only. Ensure all power is disconnected before beginning installation.

Figure 5.1: The internal structure of the steam generator, illustrating the water tank and heating elements, designed to prevent dry burning.
- Mounting Location: The steam generator unit must be installed vertically with the arrows pointing upwards. Choose a dry, well-ventilated location that is easily accessible for maintenance but protected from direct water spray. Ensure sufficient clearance around the unit for air circulation and servicing.
- Water Supply Connection: Connect the water inlet to a cold water supply line. A shut-off valve should be installed on the supply line for easy maintenance. Ensure all plumbing connections are watertight.
- Steam Outlet Connection: Connect the steam nozzle to the steam line leading to your sauna or steam shower enclosure. Ensure the steam line is properly insulated and sloped to prevent condensation buildup.
- Drain Connection: Connect the manual drain valve to a suitable drainage system. This allows for easy draining of the water tank.
- Electrical Connection: Connect the steam generator to a dedicated electrical circuit with appropriate voltage (220V-240V) and amperage for a 6kW appliance. Ensure proper grounding. All wiring must comply with local electrical codes.
- Controller Installation: Install the waterproof digital controller in a convenient location inside or near the steam enclosure, ensuring it is easily accessible for the user. Connect the controller to the main unit using the provided cables.
6. Operation
Once the steam generator is properly installed and connected, follow these steps to operate it:
- Power On: Ensure the main power supply to the steam generator is switched on. The digital controller display should illuminate.
- Set Temperature: Use the 'SET TEMP' button and the up/down arrows on the digital controller to adjust your desired steam temperature. The temperature range is 35℃ to 55℃ (95°F to 131°F).
- Set Time: Use the time control buttons (usually up/down arrows) to set the desired operating duration. The time can typically be set from 1 to 60 minutes.
- Start Steam: Press the 'START/STOP' button to begin the steam generation process. The unit will start heating the water, and steam will begin to be produced shortly.
- Stop Steam: To stop the steam generation at any time, press the 'START/STOP' button again. The unit will cease operation.
- Enjoy: Allow the unit to reach the set temperature and enjoy your steam session.
7. Maintenance
Regular maintenance ensures the longevity and efficient operation of your VEVOR ST-60 Steam Generator.
- Draining the Water Tank: After each use, or periodically, open the manual drain valve to empty the water tank. This helps prevent mineral buildup and keeps the steam clean and healthy.
- Cleaning the Steam Nozzle: Inspect the steam nozzle regularly for any blockages. Clean as necessary to ensure unobstructed steam flow.
- Descaling: Depending on your water quality, mineral deposits may accumulate inside the tank. Consult a qualified technician for periodic descaling to maintain heating efficiency.
- External Cleaning: Clean the exterior of the unit and the digital controller with a soft, damp cloth. Do not use abrasive cleaners or solvents.
- Inspection: Periodically check all water and electrical connections for signs of wear, leaks, or damage. Address any issues promptly.
8. Troubleshooting
If you encounter issues with your VEVOR ST-60 Steam Generator, refer to the following common problems and solutions:
- No Power to Unit/Controller:
- Check the main power supply and circuit breaker.
- Ensure all electrical connections are secure.
- No Steam Production:
- Verify the water supply is connected and the inlet valve is open.
- Check if the water tank is filled. The unit has overheat protection against dry burning.
- Ensure the temperature and time settings are correctly configured on the controller.
- Inspect heating elements for damage (requires professional inspection).
- Insufficient Steam Output:
- Check for blockages in the steam nozzle or steam line.
- Ensure the room is adequately sealed to prevent steam escape.
- Consider descaling the unit if mineral buildup is suspected.
- Water Leaks:
- Inspect all plumbing connections for tightness.
- Check the manual drain valve is fully closed.
- Unit Shuts Off Unexpectedly:
- This could indicate the overheat protection has activated due to low water level. Check water supply.
- Ensure proper ventilation around the unit.
For issues not resolved by these steps, please contact VEVOR customer support or a qualified service technician.
9. Warranty and Support
For information regarding the product warranty, please refer to the warranty card included with your purchase or visit the official VEVOR website. For technical support, spare parts, or service inquiries, please contact VEVOR customer service through their official channels.