Snailfly Black Roof Rack Instruction Manual
Model: 2PCS | Brand: Snailfly
1. Introduction
This manual provides comprehensive instructions for the installation, operation, and maintenance of your Snailfly Black Roof Rack. Designed for durability and versatility, this roof rack allows for secure transportation of various cargo on your vehicle's hard top.
Compatibility: This roof rack is specifically designed for hard top models of the following vehicles:
- 2007-2018 Jeep Wrangler JK (2 & 4 Door)
- 2018-2025 Jeep Wrangler JL (2 & 4 Door)
- 2019-2025 Jeep Gladiator JT
Note: This product is NOT suitable for soft top vehicles.

This image illustrates the specific Jeep Wrangler JK, JL, and Gladiator JT hardtop models that are compatible with the Snailfly roof rack.
2. Safety Information
- Maximum Load Capacity: Do not exceed the maximum distributed load capacity of 220 lbs (100 kg). Overloading can lead to product failure, vehicle damage, or accidents.
- Weight Distribution: Always distribute cargo weight evenly across the cross bars. Uneven loading can affect vehicle stability and rack integrity.
- Secure Cargo: Ensure all cargo is securely fastened to the roof rack using appropriate tie-downs. Check tightness before and during travel.
- Regular Inspection: Periodically check all mounting hardware for tightness, especially after initial installation and before long trips.
- Vehicle Clearance: Be aware of the increased height of your vehicle with the roof rack and cargo, especially when entering garages, car washes, or low-clearance areas.
- Driving Habits: Adjust driving speed and habits when carrying cargo on the roof rack. High speeds, sudden braking, or sharp turns can affect stability.
3. Package Contents
Before beginning installation, please verify that all components listed below are present in your package:
- 2 x Black Powder-Coat Finish Cross Bars
- 4 x Clamps (Mounting Feet)
- Fitting Hardware (bolts, washers, Allen wrench, keys)
- Instruction Manual

The image displays the complete package contents: two black powder-coated cross bars, four clamps, all necessary fitting hardware, and the instruction manual. An installation video and 24-hour support are also indicated as available resources.
4. Setup and Installation
The Snailfly roof rack is designed for easy installation without the need for drilling or cutting. Follow these steps carefully:
- Prepare the Components: Unpack all components and identify the two cross bars, four clamps, and hardware.
- Attach Clamps to Cross Bars: Loosen the screws on the clamps to their maximum extent, but do not remove them completely. Slide the clamps onto the ends of each cross bar.
- Initial Placement on Vehicle: With assistance, carefully place the assembled cross bars onto the rain gutters of your vehicle's hard top. Ensure the bars are positioned correctly (front and rear).
- Adjust and Align: Adjust the position of the cross bars to your desired spacing. A common recommendation is to measure 7 inches from the front removable top for the front bar and 34.5 inches for the rear bar. Ensure the bars overhang evenly on both sides.
- Secure the Clamps: Once the desired position is achieved, remove the entire bar assembly from the roof. Now, tighten the screws on the clamps to firmly secure them to the cross bars. It is crucial to tighten the back screw so that the clamp will not slide.
- Final Installation: Re-place the tightened cross bar assemblies onto the rain gutters. Ensure they sit flush and are properly aligned.
- Tighten Mounting Bolts: Using the provided Allen wrench, securely tighten the mounting bolts that clamp the rack to the rain gutter. Do not overtighten, but ensure they are snug to prevent movement.
- Install End Caps: Carefully snap the plastic end covers onto the mounting feet. These covers can be removed for storage or further adjustments.
- Final Check: Gently shake the installed roof rack to confirm it is securely attached and does not wobble. Double-check all bolts for tightness.

A detailed view of how the roof rack clamps securely to the rain gutter of a vehicle's hard top, highlighting the mounting mechanism and adjustable features.

This image focuses on the aerodynamic profile of the cross bar end, indicating the front and rear sections. It also shows the integrated key lock mechanism for securing the mounting feet.
Installation Video Guide
This video provides a step-by-step visual guide for the installation of the Snailfly Roof Rack, demonstrating the process from unboxing to final securement on the vehicle's hard top.
5. Operating Instructions
Once installed, your Snailfly roof rack is ready to transport your gear. Adhere to the following guidelines for optimal performance and safety:
- Load Capacity: The maximum distributed load capacity for this roof rack is 220 lbs (100 kg). Always ensure the weight of your cargo, plus any accessories (e.g., cargo box, bike rack), does not exceed this limit.
- Cargo Types: The roof rack is compatible with a wide range of accessories and cargo, including cargo carriers, bike racks, kayak racks, roof boxes, and snowboards.
- Secure Attachment: Always use appropriate straps, nets, or other securing devices to firmly attach your cargo to the cross bars. Ensure there is no movement or shifting of cargo during transit.
- Aerodynamic Design: The cross bars feature a wind tunnel tested teardrop shape designed to minimize wind noise and improve aerodynamics.

The roof rack is shown demonstrating its versatility by carrying both a ski/snowboard carrier and a rooftop cargo box, illustrating its compatibility with various accessories for transporting gear.
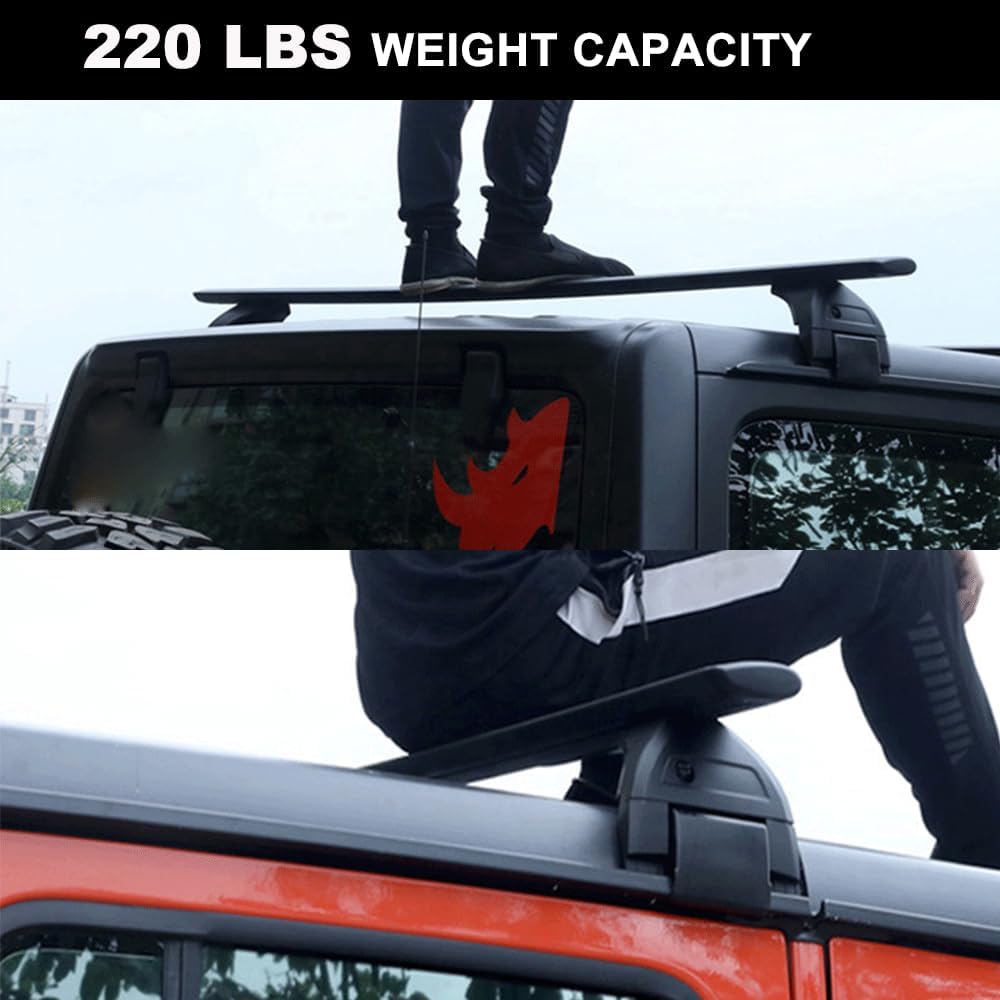
This image visually represents the robust 220 lbs weight capacity of the roof rack, showing a person standing on the cross bars to illustrate its strength and load-bearing capability.
6. Maintenance
To ensure the longevity and safe operation of your Snailfly roof rack, follow these maintenance recommendations:
- Regular Cleaning: Clean the cross bars and mounting feet regularly with mild soap and water to remove dirt, road grime, and salt. Avoid abrasive cleaners that could damage the black powder-coat finish.
- Check Fasteners: Periodically inspect all bolts, screws, and clamps for tightness. Vibrations during driving can cause fasteners to loosen over time. Re-tighten as necessary.
- Inspect Rubber Strips: Check the condition of the non-slip rubber strips on the cross bars. While designed to be durable, prolonged exposure to elements or heavy use may cause wear. If significant wear is observed, consider replacing them to maintain cargo grip.
- Corrosion Check: Although the rack features an anti-rust and anti-corrosion black powder-coated finish, inspect for any signs of rust or corrosion, especially in areas where the coating might have been scratched or chipped. Touch up with appropriate paint if needed.
- Seasonal Removal: If the roof rack is not needed for extended periods, consider removing it to reduce wear and tear, improve fuel efficiency, and prevent potential theft. Store components in a dry, safe place.
7. Troubleshooting
Here are solutions to common issues you might encounter:
- Rack Feels Loose After Installation: Ensure all mounting bolts and the back screws on the clamps are fully tightened. The back screw is critical for preventing the clamp from sliding. Re-check all fasteners after a short drive.
- Difficulty with Rubber Insert: The rubber top strip may be slightly long. Even the rubber on each end and use a flat blade screwdriver to tuck it into the ends while installing the end caps. This ensures a snug fit.
- Hardware Stripping: Avoid over-tightening bolts. Tighten until snug, then give a quarter turn. If hardware strips, contact customer support for replacement parts.
- Cargo Shifting/Scratches on Bars: Ensure cargo is properly secured. If the rubber inserts are worn or insufficient, consider adding additional padding or non-slip material between the cargo and the cross bars.
- Increased Wind Noise: While the design is aerodynamic, some wind noise is normal. Ensure the cross bars are installed correctly and all components are tight. Adjusting the position of the bars slightly may help.
8. Specifications
| Brand | Snailfly |
| Model | 2PCS |
| Color | Black |
| Load Capacity | 220 lbs (100 kg) |
| Mounting Type | Roof, Clamp Mount, Railing Mount, Crossbar Mount |
| Automotive Fit Type | Vehicle Specific Fit |
| Material | High-quality Aluminum Alloy |
| Item Weight | 17.96 pounds |
| Package Dimensions | 62 x 9 x 5 inches |
| Is Foldable | No |

This diagram illustrates the key dimensions of the roof rack cross bars, including overall length (63.2 inches), bar length (61 inches), bar height (1 inch), and bar width (3.14 inches), along with the height of the mounting feet (6.7 inches).
9. Warranty Information
Snailfly products are manufactured to high-quality standards. Specific warranty details may vary. Please refer to your purchase documentation or contact Snailfly customer support for information regarding warranty coverage and terms.
10. Support
If you have any questions, require assistance with installation, or need to report a missing/damaged part, please contact Snailfly customer support. Contact information can typically be found on the product packaging, the seller's page on the platform where you purchased the item, or the official Snailfly website.
When contacting support, please have your product model number (2PCS) and purchase details readily available.