1. Introduction
This manual provides detailed instructions for the installation, operation, and maintenance of your BANVIE 1 Way Car Security Alarm & Keyless Entry System Remote A. This system is designed to enhance vehicle security and convenience with features such as remote arming/disarming, central door locking automation, and anti-hijacking capabilities. Please read this manual thoroughly before installation and use to ensure proper function and safety.
2. Product Features
- Arm/Lock: Press the lock button once. The siren will chirp once, flash lights will gleam once, the central door locking system will lock automatically, and power windows will roll up within 30 seconds (if a window closer is installed). After 8 seconds, the LED indicator will gleam, signifying the system is armed and sensors (shock, microwave, side door, hood, ACC) are active.
- Central Door Locking System Automation: Close all doors before driving. Switch the key to the ACC/ON position, then press the footbrake after 5 seconds. Doors will lock automatically. When the key is removed before exiting the car, the doors will unlock automatically.
- Alarming Door/Hood/Engine Protection: In the armed state, if a car door or hood is forced open, or if the engine is started without authorization, the system will trigger an alarm. The siren will emit 6 loud tones, flash lights will gleam, and the car engine will be cut off. The alarm will sound for 60 seconds, then stop automatically and return to the armed state.
- Door Unclosed Reminding: Before driving, if any door is not properly closed and the key is switched to the ACC/ON position, the flash lights will gleam continuously until the door is closed. This warns other drivers and ensures safety.
- Anti-Hijacking: While the car is moving, press the silent button once (flash lights will gleam quickly), then press the lock button twice again to activate anti-hijacking mode. Flash lights will gleam urgently, the siren will chirp, and the engine will be cut off after 40 seconds. To exit anti-hijacking mode, the reset button must be pressed.
3. Technical Specifications
| Specification | Value |
|---|---|
| Working Voltage | 9-15V |
| Output Current (Central Door Lock) | 10A |
| Output Current (Siren) | 10A |
| Output Current (Turn Light) | 10A |
| Output Current (Trunk) | 10A |
| Output Current (Power Window) | -250mA |
| Working Frequency | 433.92MHz ±400KHz |
| Standby Current (Disarm Status) | ≤12mA |
| Standby Current (Arm Status) | ≤20mA |
| Remote Controlled Distance | ≥100m |
| Siren Volume | 110-125dB |
| Working Temperature | -40℃ - +85℃ |
4. Setup and Installation
The BANVIE 1 Way Car Security Alarm & Keyless Entry System includes all necessary components for installation. Due to the complexity of vehicle electrical systems, professional installation is highly recommended. If you have experience with car electronics, you may attempt self-installation by carefully following the provided wiring diagram.
4.1 Components Overview
The system typically includes:
- Main Control Unit
- Siren
- Remote Controls (2 units)
- Shock Sensor
- Microwave Sensor
- Wiring Harnesses and Connectors
- LED Indicator
- Trunk/Hood Switch
- Relay

Image 1: All components included in the BANVIE 1 Way Car Security Alarm and Keyless Entry System. This includes the main unit, siren, two remote controls, shock sensor, microwave sensor, and various wiring harnesses.

Image 2: The main control unit of the BANVIE car alarm system, showing its compact design and multiple connectors for various wiring harnesses.

Image 3: The siren component of the BANVIE car alarm system, designed to produce a loud audible alert when the alarm is triggered.

Image 4: The shock sensor (top) and microwave sensor (bottom) components. The shock sensor detects vibrations, while the microwave sensor detects intrusion into the vehicle's proximity.
4.2 Wiring Diagram
A detailed wiring diagram is crucial for correct installation. Ensure all connections are secure and insulated to prevent short circuits or malfunctions.

Image 5: Comprehensive wiring diagram illustrating all connections for the BANVIE 1 Way Car Security Alarm System, including connections for the main unit, sensors, siren, and vehicle electrical systems.
4.3 General Installation Steps (Consult Wiring Diagram for Details)
- Disconnect Battery: Always disconnect the vehicle's negative battery terminal before starting any electrical work.
- Mount Main Unit: Choose a secure, hidden location inside the vehicle, away from direct moisture and extreme temperatures.
- Install Siren: Mount the siren in the engine bay, facing downwards to prevent water accumulation, and away from heat sources.
- Connect Power and Ground: Connect the main unit's power wires to a constant 12V source and ground wire to a solid chassis ground point.
- Connect Door Lock Wires: Identify your vehicle's central locking system wires (positive, negative, or single-wire) and connect them according to the diagram.
- Connect Ignition/ACC Wires: Connect the ignition and ACC wires to the appropriate vehicle circuits.
- Install Sensors: Mount the shock sensor and microwave sensor in optimal locations for detection, adjusting sensitivity as needed.
- Install LED Indicator: Mount the LED indicator in a visible location on the dashboard to show the system's status.
- Connect Trunk/Hood Switch: Install the switch to detect opening of the trunk or hood.
- Test System: Reconnect the battery and test all functions of the alarm system using the remote controls.
5. Operating Instructions
Your BANVIE car alarm system is operated primarily via the remote controls. Familiarize yourself with the buttons and their functions.
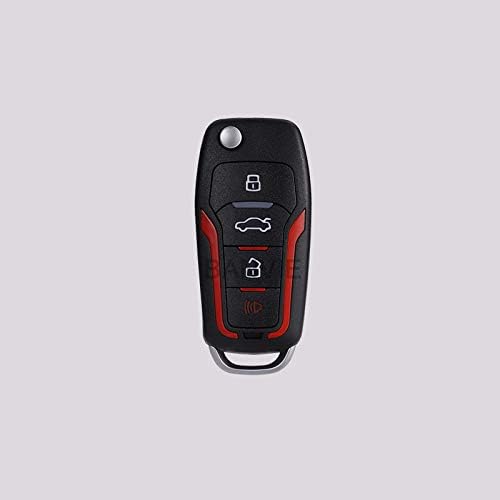
Image 6: One of the remote controls for the BANVIE car alarm system, featuring buttons for locking, unlocking, trunk release, and other functions.
5.1 Basic Functions
- Arming the System (Lock): Press the Lock button once. The vehicle lights will flash once, and the siren will chirp once, indicating the system is armed. Doors will lock.
- Disarming the System (Unlock): Press the Unlock button once. The vehicle lights will flash twice, and the siren will chirp twice, indicating the system is disarmed. Doors will unlock.
- Silent Arming: Press the Silent button (often marked with a bell or mute icon) once. The vehicle will arm silently without siren chirps.
- Trunk Release: Press and hold the Trunk Release button (often marked with a trunk icon) for a few seconds. The trunk will open if your vehicle supports remote trunk release.
- Car Locating/Panic: Press the Car Locating button (often marked with a speaker or car icon) to make the car lights flash and siren sound, helping you locate your vehicle or deter threats.
5.2 Advanced Functions
- Anti-Hijacking Activation: While driving, press the silent button once, then press the lock button twice. The system will enter anti-hijacking mode, flashing lights, sounding the siren, and eventually cutting off the engine.
- Anti-Hijacking Deactivation: Press the hidden reset button (location specified during installation) to exit anti-hijacking mode.
- Automatic Central Locking: As described in the features section, the doors will automatically lock when you start driving and unlock when the key is removed.
6. Maintenance
To ensure the longevity and optimal performance of your BANVIE car alarm system, follow these maintenance guidelines:
- Remote Control Batteries: Replace the CR2 batteries in your remote controls when the range decreases or the LED indicator on the remote dims. Refer to the remote control's casing for battery access.
- Sensor Cleaning: Periodically check and clean the shock and microwave sensors to ensure they are free from dirt, debris, or moisture that could affect their sensitivity.
- Wiring Inspection: Annually inspect all wiring connections for signs of wear, corrosion, or loose connections. Ensure all connections are properly insulated.
- Siren Check: Ensure the siren is free from obstructions and its mounting is secure.
- Avoid Water Exposure: While components are designed for automotive environments, avoid direct high-pressure water exposure to the main unit and sensors during car washes.
7. Troubleshooting
If you encounter issues with your BANVIE car alarm system, refer to the following common problems and solutions:
- System Not Responding to Remote:
- Check remote control battery.
- Ensure you are within the effective range (≥100m).
- Verify no strong electromagnetic interference is present.
- Re-pair the remote controls with the main unit (refer to installation guide for pairing procedure).
- False Alarms:
- Adjust the sensitivity of the shock sensor. Excessive sensitivity can lead to false alarms from minor impacts or loud noises.
- Check the microwave sensor for proper placement and sensitivity.
- Ensure all doors, hood, and trunk are securely closed.
- Inspect wiring for loose connections or shorts.
- Doors Not Locking/Unlocking:
- Check the central door lock wiring connections.
- Verify the vehicle's central locking system is functioning independently.
- Engine Immobilizer Not Working:
- Check the engine cut-off relay and its connections.
- Ensure the system is properly armed.
If these steps do not resolve the issue, it is recommended to consult a professional car alarm installer.
8. Warranty and Support
For warranty information and technical support, please refer to the documentation provided with your purchase or contact BANVIE customer service directly. Keep your proof of purchase for any warranty claims.