1. Introduction
Thank you for choosing the Beelink GK55 Mini PC. This compact and versatile computer is designed for various applications, including business, home entertainment, and specialized networking tasks. Equipped with an Intel Celeron J4125 processor, 8GB LPDDR4 RAM, and a 256GB SSD, it offers reliable performance in a small form factor. This manual provides essential information for setting up, operating, maintaining, and troubleshooting your device.
2. Product Overview
The Beelink GK55 Mini PC features a robust design with multiple connectivity options and efficient cooling. Its compact size allows for flexible placement, including VESA mounting behind a monitor.
2.1 Key Features
- Processor: Intel Celeron J4125 (up to 2.7GHz, 4C/4T)
- Operating System: Pre-installed Windows 11 Pro
- Memory: 8GB LPDDR4 RAM
- Storage: 256GB M.2 SATA SSD (expandable with 2.5-inch HDD)
- Graphics: Intel UHD Graphics 600, supporting 4K UHD resolution at 60FPS
- Connectivity: Dual Band 2.4G/5G WiFi, Bluetooth 4.0, Dual Gigabit Ethernet
- Video Output: Dual HDMI ports for simultaneous dual monitor display
- Special Functions: Auto Power On, Wake On LAN, PXE Boot, RTC Wake
- Cooling: All-copper heat sink with silent fan
2.2 Ports and Components
Familiarize yourself with the various ports and components of your Beelink GK55 Mini PC:

Figure 2.2.1: Front and side view of the Beelink GK55 Mini PC. This image shows the compact design and accessible front ports.

Figure 2.2.2: Rear view of the Beelink GK55 Mini PC. This image highlights the power input, HDMI ports, and Gigabit Ethernet ports.
- Front Panel: Power Button, 2x USB 3.0 ports, 1x Type-C port, Audio Jack
- Rear Panel: DC Power Input, 2x HDMI ports, 2x Gigabit Ethernet ports, 2x USB 2.0 ports

Figure 2.2.3: Summary of key features including processor, display support, cooling, storage, and display outputs.
3. Setup
Follow these steps to set up your Beelink GK55 Mini PC for the first time.
3.1 Package Contents
Before proceeding, ensure all items are present in the package:
- Beelink GK55 Mini PC
- Power Adapter
- 2x HDMI Cables
- VESA Mount with screws
- User Manual (this document)
3.2 Connecting Peripherals
- Connect Display: Use one of the provided HDMI cables to connect your monitor(s) to the HDMI port(s) on the rear of the Mini PC. The GK55 supports dual displays.
- Connect Keyboard and Mouse: Plug your USB keyboard and mouse into the available USB ports (USB 3.0 on the front, USB 2.0 on the rear).
- Connect Network (Optional): For a wired connection, connect an Ethernet cable from your router or modem to one of the Gigabit Ethernet ports on the rear. For wireless, refer to Section 4.2.
- Connect Power: Plug the power adapter into the DC Power Input port on the rear of the Mini PC, then plug the adapter into a power outlet.
3.3 VESA Mount Installation (Optional)
The included VESA mount allows you to attach the Mini PC to the back of a compatible monitor or to a wall, saving desk space.
- Attach the VESA bracket to the back of your monitor using the provided screws. Ensure the monitor has standard VESA mounting holes.
- Slide the Beelink GK55 Mini PC onto the mounted bracket until it clicks securely into place.

Figure 3.3.1: Beelink Mini PC set up on a desk, demonstrating its compact footprint.
4. Operating Instructions
4.1 Power On/Off
- Power On: Press the power button located on the front panel. The power indicator light will illuminate.
- Power Off: From Windows, click the Start button, then Power > Shut down. Alternatively, you can press and hold the power button for 5-7 seconds to force a shutdown (not recommended for regular use).
4.2 Network Connectivity
- Wired Connection: If an Ethernet cable is connected (as per Section 3.2), the system should automatically detect and connect to the network.
- Wireless Connection: In Windows, click the Wi-Fi icon in the taskbar, select your desired network, enter the password, and click Connect. The GK55 supports both 2.4GHz and 5GHz Wi-Fi bands.
4.3 Dual Display Setup
The Beelink GK55 supports connecting two monitors simultaneously via its dual HDMI ports, enhancing productivity.
- Connect both monitors to the HDMI ports on the Mini PC.
- Once Windows loads, right-click on the desktop and select "Display settings."
- Under "Multiple displays," you can choose to extend or duplicate your desktop across the two screens. Adjust resolution and orientation as needed.

Figure 4.3.1: The Beelink GK55 Mini PC configured for a dual monitor setup.

Figure 4.3.2: Visual representation of the dual screen display capability.
4.4 Advanced Features
- Soft Router Functionality: The dual Gigabit Ethernet interfaces allow the GK55 to be configured as a soft router. This requires specific software installation and network configuration, typically performed by advanced users.
- Auto Power On, Wake On LAN, PXE Boot, RTC Wake: These features can be enabled and configured within the BIOS settings. To access BIOS, press the DEL or F7 key repeatedly during startup.
5. Maintenance
Proper maintenance ensures the longevity and optimal performance of your Mini PC.
5.1 Cleaning
- Regularly wipe the exterior of the Mini PC with a soft, dry cloth.
- Ensure ventilation openings are free from dust and obstructions to maintain proper airflow. Do not use liquid cleaners directly on the device.
5.2 Storage Expansion
The Beelink GK55 supports storage expansion to meet your needs.
- M.2 SATA SSD: The device comes with an M.2 SATA 2280 SSD. This can be upgraded up to 1TB.
- 2.5-inch HDD/SSD: An additional 2.5-inch SATA HDD or SSD (up to 2TB) can be installed for expanded storage. Refer to the internal layout for the mounting bracket and SATA connector.

Figure 5.2.1: Internal view showing the M.2 SATA SSD slot and space for a 2.5-inch HDD.
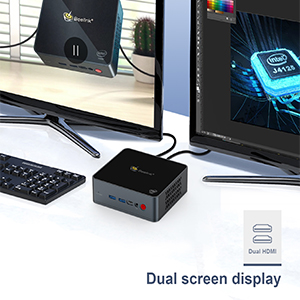
Figure 5.2.2: Diagram illustrating the M.2 SATA SSD and 2.5-inch HDD expansion capabilities.
5.3 Cooling System
The GK55 features an all-copper heat sink and a silent fan for efficient heat dissipation. Ensure the device is placed in a well-ventilated area to prevent overheating.

Figure 5.3.1: Internal view of the Beelink GK55 Mini PC's cooling system, featuring a copper heat sink and fan.
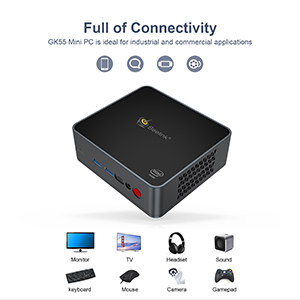
Figure 5.3.2: Diagram showing the heat dissipation path within the Mini PC.
6. Troubleshooting
This section addresses common issues you might encounter with your Beelink GK55 Mini PC.
6.1 No Power
- Ensure the power adapter is securely connected to both the Mini PC and a working power outlet.
- Verify the power outlet is functional by plugging in another device.
- Check if the power adapter's indicator light (if any) is on.
6.2 No Display
- Confirm that the HDMI cable(s) are securely connected to both the Mini PC and the monitor(s).
- Ensure your monitor is powered on and set to the correct input source (e.g., HDMI1, HDMI2).
- Try connecting to a different monitor or using a different HDMI cable to rule out faulty components.
6.3 Network Connectivity Issues
- Wired: Check the Ethernet cable connection. Ensure your router/modem is working correctly.
- Wireless: Verify that Wi-Fi is enabled in Windows settings. Ensure you are connecting to the correct network and entering the password accurately. Restart your router/modem if necessary.
6.4 System Instability or Crashing
- Ensure the Mini PC is placed in a well-ventilated area to prevent overheating. Avoid blocking the air vents.
- Close unnecessary applications to free up system resources.
- Ensure Windows and all drivers are up to date.
- If issues persist, consider performing a system restore or reinstalling Windows (back up your data first).
7. Specifications
Detailed technical specifications for the Beelink GK55 Mini PC.
| Feature | Specification |
|---|---|
| Brand | Beelink |
| Model Name | GK55 |
| Operating System | Windows 11 Pro |
| CPU Model | Intel Celeron J4125 |
| CPU Speed | 2.2 GHz (up to 2.7 GHz burst) |
| Processor Count | 4 |
| Graphics Coprocessor | Intel UHD Graphics 600 |
| RAM Memory Installed Size | 8 GB DDR4 |
| Memory Clock Speed | 2133 MHz |
| Memory Storage Capacity | 256 GB SSD (M.2 SATA 2280) |
| Hard Disk Description | SSD (expandable with 2.5-inch HDD/SSD) |
| Total USB Ports | 4 (2x USB 3.0, 2x USB 2.0) |
| Total Number of HDMI Ports | 2 |
| Other Ports | 1x Type-C, 2x Gigabit Ethernet, Audio Jack |
| Wireless Connectivity | 2.4G/5G WiFi, Bluetooth 4.0 |
| Display Resolution Maximum | 3840 x 2160 pixels (4K) |
| Power Consumption | 24 Watts |
| Item Dimensions | 4.88 x 4.45 x 1.61 inches |
| Cooling Method | Fan |
8. Warranty and Support
Beelink is committed to providing excellent customer service and support for your GK55 Mini PC.
8.1 Warranty Information
Your Beelink GK55 Mini PC comes with a 1-Year Free Warranty from the date of purchase. This warranty covers manufacturing defects and hardware malfunctions under normal use. Please retain your proof of purchase for warranty claims.
8.2 Technical Support
Beelink offers Lifetime Technical Support and 24/7 After-Sales Service. If you encounter any issues or have questions regarding your Mini PC, please do not hesitate to contact our support team. Contact information can typically be found on the official Beelink website or through your purchase platform.