KCO L1039-Black
KCO Lighting 6-Light Modern Globe Sputnik Chandelier
Model: L1039-Black | Brand: KCO
Introduction
Thank you for choosing the KCO Lighting 6-Light Modern Globe Sputnik Chandelier. This elegant fixture is designed to enhance the aesthetic of your living space, providing ample and stylish illumination. This manual provides essential information for the safe installation, operation, and maintenance of your new chandelier. Please read it thoroughly before beginning installation and retain it for future reference.
Safety Information
WARNING: Risk of electric shock. Disconnect power at the fuse box or circuit breaker before installation or servicing.
- All electrical connections must be in accordance with local codes, ordinances, or the National Electric Code (NEC).
- Consult a qualified electrician if you are unsure about the installation process.
- Wear safety glasses and gloves during installation.
- Ensure the mounting surface can support the weight of the fixture.
- Do not connect this fixture to an ungrounded electrical system.
- Do not exceed the maximum wattage specified for the bulbs.
Package Contents
Verify that all components are present and undamaged before beginning assembly. If any parts are missing or damaged, contact customer support.
- Chandelier Frame (Linear Bar)
- Amber Globe Glass Lampshades (6 pcs)
- Ceiling Plate/Canopy
- Adjustable Hanging Cords (2 pcs)
- Mounting Hardware (screws, wire nuts, mounting bracket)
- E26 Base Bulbs (6 pcs)
- Instruction Manual

Figure 1: Chandelier Components Overview
Product Dimensions
The KCO Lighting Chandelier features adjustable hanging cords to suit various ceiling heights and room configurations.
- Length: 47.2 inches (120 cm)
- Globe Diameter: 5.9 inches (15 cm)
- Ceiling Plate Diameter: 4.7 inches (12 cm)
- Adjustable Hanging Cord Length: Up to 47.2 inches (120 cm)
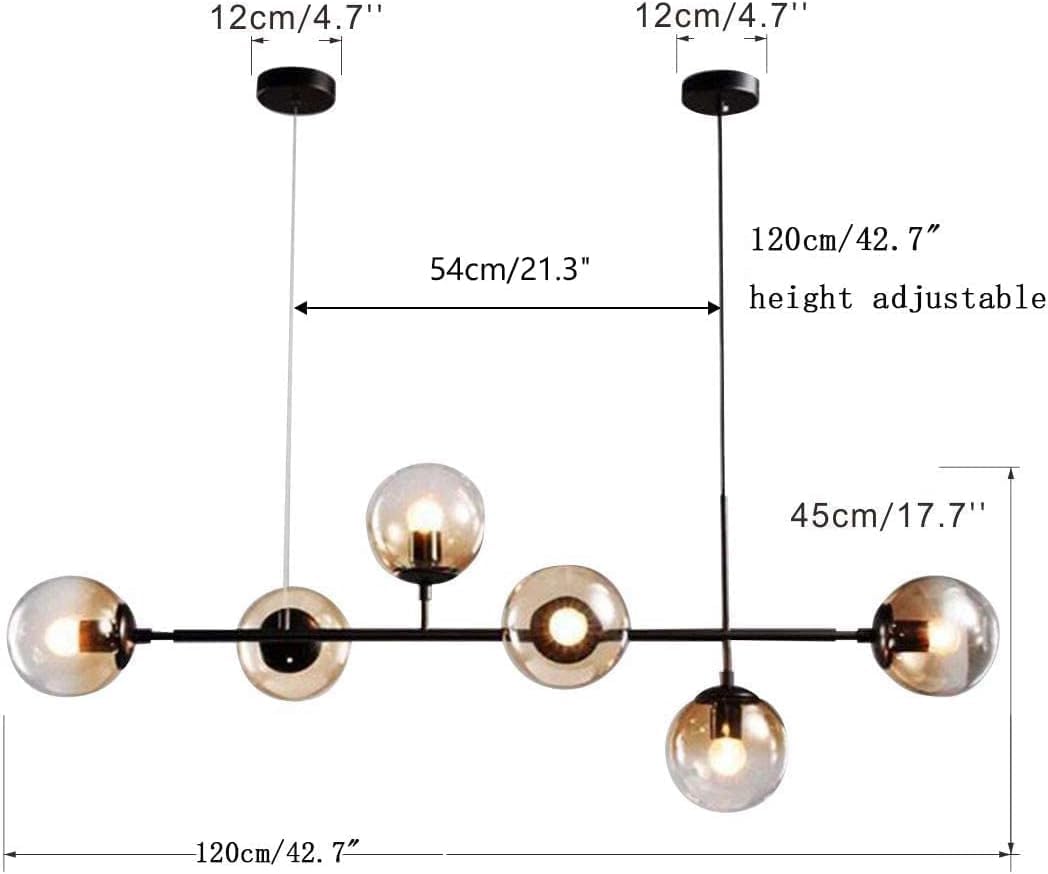
Figure 2: Chandelier Dimensions
Installation Guide
Follow these steps carefully to install your chandelier. Professional installation is recommended if you are not familiar with electrical wiring.
- Prepare for Installation:
- Turn off power at the main circuit breaker or fuse box.
- Ensure the mounting surface is clean, dry, and structurally sound.
- Unpack all components and lay them out on a clean, flat surface.
- Attach Mounting Bracket:
- Secure the mounting bracket to the junction box in the ceiling using the provided screws.
- Adjust Hanging Height:
- Determine the desired hanging height for your chandelier. The cords are adjustable up to 47.2 inches.
- Adjust the length of the hanging cords by pushing the cord into the canopy or pulling it out as needed. Ensure both cords are adjusted to the same length for level hanging.
- Make Electrical Connections:
- Connect the fixture's black wire to the house's black (hot) wire using a wire nut.
- Connect the fixture's white wire to the house's white (neutral) wire using a wire nut.
- Connect the fixture's ground wire to the house's ground wire (or ground screw on the mounting bracket) using a wire nut.
- Carefully tuck all wires into the junction box.
- Secure Fixture to Ceiling:
- Align the ceiling plate with the mounting bracket and secure it with the provided screws or nuts.
- Install Glass Globes and Bulbs:
- Carefully attach each amber globe glass lampshade to the fixture.
- Screw the E26 base bulbs into the sockets. Do not overtighten.
- Restore Power:
- Turn the power back on at the main circuit breaker or fuse box.
- Test the light fixture.
Operating Instructions
This chandelier operates like a standard light fixture.
- Turning On/Off: Use your wall switch to turn the chandelier on or off.
- Dimming Functionality: The fixture can be fully dimmable when used with dimmable E26 bulbs and a compatible dimmer switch (sold separately). Ensure your bulbs and switch are rated for dimming.
- Adjusting Height: The hanging height can be adjusted by manipulating the cords at the ceiling canopy. This adjustment should ideally be done before final electrical connections are secured, or with power off.
Maintenance
Regular maintenance will help preserve the appearance and functionality of your chandelier.
- Cleaning:
- Always turn off power to the fixture before cleaning.
- Wipe the metal parts with a soft, dry cloth.
- Clean the glass globes with a soft, damp cloth and a mild glass cleaner. Avoid abrasive cleaners that may scratch the finish.
- Ensure the fixture is completely dry before restoring power.
- Bulb Replacement:
- Turn off power to the fixture and allow bulbs to cool completely.
- Unscrew the old bulb and replace it with a new E26 base bulb, maximum 60 watts.
- Ensure the replacement bulb is compatible with any dimming system if applicable.
Troubleshooting
If you encounter issues with your chandelier, refer to the following common problems and solutions.
| Problem | Possible Cause | Solution |
|---|---|---|
| Light does not turn on. |
|
|
| Bulbs flicker or dim inconsistently. |
|
|
| Chandelier hangs unevenly. |
|
|
Specifications
| Feature | Detail |
|---|---|
| Brand | KCO |
| Model Name | L1039-Black |
| Color | Black+Amber |
| Material | Glass, Metal |
| Style | Mid-Century Modern |
| Light Fixture Form | Pendant |
| Product Dimensions | 12"L x 17.7"W x 47.2"H |
| Indoor/Outdoor Usage | Indoor |
| Power Source | AC |
| Light Source Type | LED (Bulbs Included) |
| Number of Light Sources | 6 |
| Voltage | 110 Volts |
| Wattage (Max per bulb) | 60 Watts |
| Bulb Base | E26 |
| Special Feature | Adjustable Cord |
| Assembly Required | Yes |
| Certification | UL Listed |
Warranty and Support
KCO Lighting provides high-quality after-sales service for your product.
- Warranty: We offer a 3-year warranty. Contact us for free replacement if you encounter any quality issues, such as cracked, broken, or damaged glass globes.
- Customer Service: If you have any problems or require assistance, please contact KCO Lighting customer support. We aim to reply within 24 hours and provide a solution.
- Customization Service: For specific needs like longer hanging wires, please contact us for consultation.
For further assistance, please visit the official KCO Lighting store or contact their customer support channels.
Related Documents - L1039-Black
 |
Chandelier Installation Guide Step-by-step instructions for installing a modern gold brass LED Sputnik chandelier with white acrylic lampshade. |
 |
Chiyoda 3318-M 1-Light Natural Black Cone Pendant Assembly Instructions and Guide Comprehensive assembly instructions and placement guide for the Chiyoda 3318-M 1-Light Natural Black Cone Pendant. Includes wire identification, step-by-step installation, and recommended lighting placement. |
 |
LNC L2EJYQI5159G9C Geometric Cage Chandelier Assembly and Installation Guide Detailed assembly and installation instructions for the LNC L2EJYQI5159G9C Geometric Cage Chandelier. Includes warnings, parts list, step-by-step guidance, and cleaning instructions. |
 |
George Oliver 29037-4-P Brass/Black Modern Chandelier Installation Manual Detailed assembly and installation instructions for the George Oliver 29037-4-P Brass/Black Modern Chandelier with Frosted Vase Glass Shade. Includes parts list, wiring diagram, and safety warnings. |
 |
Red Barrel Studio L38-6-BK Farmhouse Chandelier Installation Guide Detailed installation instructions and parts list for the Red Barrel Studio L38-6-BK Farmhouse Chandelier, designed for dining rooms. Includes safety warnings, assembly steps, and after-sales service information. |
 |
ARLGSIT L005030-D36-P36B Luxury Crystal LED Chandelier Installation Guide Detailed installation guide for the ARLGSIT L005030-D36-P36B Luxury Crystal LED Round Black Chandelier. Includes mounting instructions, wiring diagrams, component lists, and dimensions for safe and proper setup. |
Ask a question about this manual
Ask about setup, troubleshooting, compatibility, parts, safety, or missing instructions. Manuals+ will review the question and use this page’s manual context to help answer it.