1. Introduction
This manual provides essential information for the safe and efficient use, installation, and maintenance of your Candy PLE 64 X 4-burner built-in ceramic electric cooktop. Please read these instructions carefully before using the appliance and keep them for future reference.
2. Safety Information
Always adhere to the following safety precautions to prevent personal injury or damage to the appliance.
- Ensure the appliance is installed by a qualified technician in accordance with local regulations.
- Do not operate the cooktop if the ceramic surface is cracked or broken. Disconnect from power immediately.
- Keep children away from the appliance during operation and when it is cooling down. The surface remains hot after use.
- Do not use abrasive cleaning agents or sharp metal scrapers to clean the cooktop, as they can scratch the surface.
- Never leave cooking unattended, especially when using high heat settings.
- Ensure adequate ventilation in the kitchen during use.
- Do not store flammable materials near the cooktop.
- Disconnect the appliance from the power supply before any cleaning or maintenance.
3. Installation
The Candy PLE 64 X cooktop is designed for drop-in installation into a kitchen countertop. Professional installation is recommended.
3.1 Dimensions and Cut-out
Refer to the diagram below for precise dimensions and the required countertop cut-out measurements.
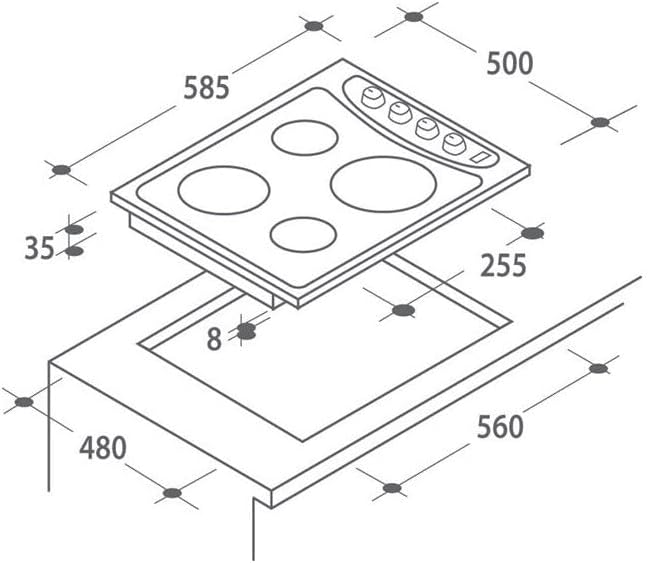
Figure 1: Installation diagram showing the cooktop dimensions (585x500mm) and the required countertop cut-out (560x480mm), with a depth of 35mm and a minimum clearance of 8mm below.
- Product Dimensions: 51 cm (Depth) x 9 cm (Height) x 61 cm (Width)
- Cut-out Dimensions: Approximately 56 cm (Width) x 48 cm (Depth)
- Ensure sufficient space for ventilation around the appliance.
3.2 Electrical Connection
The appliance requires a 220 Volt electrical supply. The electrical connection must be performed by a qualified electrician, ensuring compliance with all local electrical codes and regulations.
- Verify that the household electrical system can support the cooktop's power requirements.
- Install an accessible disconnect switch or circuit breaker near the appliance.
4. Operating Instructions
Your Candy PLE 64 X cooktop features four ceramic heating elements controlled by rotary knobs.
4.1 Control Panel Overview

Figure 2: Control panel featuring four rotary knobs for individual burner control.
Each knob corresponds to a specific heating zone. The symbols around the knobs indicate the power levels or functions.
4.2 Turning On and Adjusting Heat
- Place a suitable cooking pot or pan on the desired ceramic heating zone.
- Turn the corresponding rotary knob clockwise to the desired heat setting. The settings typically range from minimum (low heat) to maximum (high heat).
- The heating element will begin to heat up. An indicator light may illuminate to show that the zone is active.
4.3 Turning Off
To turn off a heating zone, rotate its knob counter-clockwise until it clicks into the 'off' position. The indicator light will extinguish.
4.4 Residual Heat Indicator
After turning off a heating zone, the ceramic surface will remain hot for some time. Many ceramic cooktops include a residual heat indicator (often an 'H' symbol) that stays lit until the surface temperature drops to a safe level. Exercise caution when cleaning or touching the cooktop after use.
5. Cleaning and Maintenance
Regular cleaning and maintenance will ensure the longevity and optimal performance of your cooktop.
- Daily Cleaning: After each use, once the cooktop has cooled down, wipe the ceramic surface with a damp cloth and a small amount of mild dish soap. Rinse thoroughly and dry with a clean cloth to prevent water spots.
- Stubborn Stains: For burnt-on food or stubborn stains, use a specialized ceramic hob cleaner and a non-abrasive scraper designed for ceramic surfaces. Follow the product instructions carefully.
- Avoid: Do not use abrasive sponges, scouring pads, harsh chemicals, or steam cleaners, as these can damage the ceramic surface.
- Control Knobs: The control knobs can be removed for cleaning. Wipe them with a damp cloth and dry thoroughly before reattaching.
- Inspection: Periodically inspect the cooktop for any signs of damage, especially to the ceramic surface or electrical connections. If damage is found, contact a qualified technician.
6. Troubleshooting
Before contacting customer service, review the following common issues and their potential solutions.
| Problem | Possible Cause | Solution |
|---|---|---|
| Cooktop does not turn on. | No power supply; circuit breaker tripped; appliance not properly connected. | Check the power supply and circuit breaker. Ensure the appliance is correctly plugged in or wired. |
| Heating element not heating. | Knob not set correctly; internal fault. | Ensure the knob is turned to a heat setting. If the issue persists, contact a qualified technician. |
| Cooktop surface is stained or discolored. | Burnt-on food; improper cleaning agents. | Clean with a specialized ceramic hob cleaner and a non-abrasive scraper after the surface has cooled. Avoid abrasive materials. |
| Unusual odors during first use. | Residues from manufacturing process. | This is normal for initial use. Ensure good ventilation. The odor will dissipate. |
7. Technical Specifications
| Feature | Specification |
|---|---|
| Brand | Candy |
| Model | PLE 64 X |
| Installation Type | Drop-in |
| Hob Type | Ceramic Electric |
| Number of Heating Elements | 4 |
| Control Type | Knob |
| Voltage | 220 Volt |
| Power Source | Electric |
| Product Dimensions (D x H x W) | 51 cm x 9 cm x 61 cm |
| Item Weight | 9 Kilograms |
| Included Components | None |
| Batteries Required | No |
8. Warranty and Support
For warranty information, please refer to the warranty card included with your product or contact your retailer. For technical support or service inquiries, please contact Candy customer service or an authorized service center.
Keep your purchase receipt as proof of purchase for warranty claims.


