1. Introduction
Thank you for choosing the Sinopé TH1310WF Smart Wi-Fi Thermostat. This device is designed to provide precise and efficient control over your in-floor heating system, enhancing comfort and energy savings. It integrates seamlessly with various smart home platforms, offering convenient control via mobile applications and voice commands.
This manual provides detailed instructions for the installation, operation, and maintenance of your TH1310WF thermostat. Please read it thoroughly before installation and keep it for future reference.

Figure 1: Sinopé TH1310WF Smart Wi-Fi Thermostat
The image displays the front of the Sinopé TH1310WF thermostat, a white rectangular device with a black digital display showing time, indoor temperature, and outdoor temperature. Below the screen, the Sinopé logo is visible, along with two circular buttons.
2. Safety Information
WARNING: Risk of electric shock. This product must be installed by a qualified electrician in accordance with local and national electrical codes. Disconnect power at the circuit breaker before installation or any maintenance.
- Ensure the power supply is OFF before handling any wiring.
- Do not install the thermostat with wet hands or while standing on wet surfaces.
- This thermostat is designed for indoor use only.
- Verify that the thermostat's voltage and wattage ratings match your heating system's requirements (240V, 3600W max).
3. Product Overview
3.1 Key Features
- No Hub Required: Connects directly to your Wi-Fi network.
- In-floor Heating Compatibility: Works with heating cables and heating cable mats. Includes a 15-foot floor sensor.
- Auxiliary Output: Features a second output for controlling an auxiliary heating system or connecting up to 10 expansion units (TR1310) for systems exceeding 15 A.
- Smart Home Integration: Compatible with Apple HomeKit, Amazon Alexa, Google Home, and Neviweb.
- Neviweb App: Offers advanced features such as automations, scenes, geofencing, and real-time energy reports.

Figure 2: Smart Home Platform Compatibility
This image shows the Sinopé TH1310WF thermostat alongside logos of compatible smart home platforms: Neviweb, SmartThings, Apple HomeKit, Amazon Alexa, and Google Home, highlighting its versatile integration capabilities.
3.2 Components
- TH1310WF Thermostat Unit
- 15-foot Floor Sensor
- Mounting Screws
4. Setup
4.1 Installation and Wiring
Installation of the TH1310WF thermostat involves electrical wiring and should only be performed by a qualified electrician. Ensure the power is disconnected at the main circuit breaker before beginning any wiring.
The thermostat is designed for a 240V AC power source and can handle up to 3600 watts. Connect the heating cables or mats to the LOAD terminals and the power supply to the LINE terminals. The included floor sensor should be installed within the heating mat area to accurately measure floor temperature.

Figure 3: Thermostat Wiring Terminals
This image shows the back of the Sinopé TH1310WF thermostat, highlighting the LOAD (120/240V, 15A max) and LINE (L1, L2(N)) wiring terminals. A strip gauge is also visible for proper wire preparation.

Figure 4: Thermostat Back Panel and Sensor Ports
The image displays the back panel of the Sinopé TH1310WF thermostat, showing regulatory information (FCC, IC, cETLus certification) and the auxiliary (Aux 1, Aux 2) and sensor (Sonde) connection ports.
4.2 Initial Configuration and Wi-Fi Connection
After physical installation, power on the thermostat. Follow the on-screen prompts to set the date, time, and initial operating mode. To enable smart features, connect the thermostat to your Wi-Fi network.
- Download the Neviweb app from your smartphone's app store (available for iOS and Android).
- Create a Neviweb account or log in if you already have one.
- Follow the in-app instructions to add your new TH1310WF thermostat to your account. This typically involves putting the thermostat into pairing mode and connecting it to your home Wi-Fi network.
5. Operation
5.1 Basic On-Device Control
The thermostat features a clear LCD display and two physical buttons for basic control. You can adjust the setpoint temperature, switch between operating modes (e.g., Manual, Program), and view current temperature readings directly on the device.
5.2 Neviweb App Control
The Neviweb app provides comprehensive control and advanced features for your thermostat:
- Remote Control: Adjust settings from anywhere.
- Scheduling: Create custom heating schedules for different times of the day and week.
- Automations: Set up triggers and actions based on schedules or other events.
- Scenes: Activate personalized ambiances with a single tap.
- Geofencing: Automatically adjust heating based on your proximity to home.
- Energy Reports: Monitor your energy consumption and savings in real-time.
- Multi-Location Management: Control thermostats in multiple properties from one account.

Figure 5: Neviweb App Device List
This image shows a smartphone screen displaying the Neviweb app interface, which lists various connected smart devices and their current status, allowing users to manage their smart home ecosystem.

Figure 6: Neviweb App Multi-Location Management
The image displays a smartphone screen with the Neviweb app open to the 'Locations' section, showing icons for 'Home', 'Cabin', and other properties, illustrating the ability to manage multiple locations from a single account.
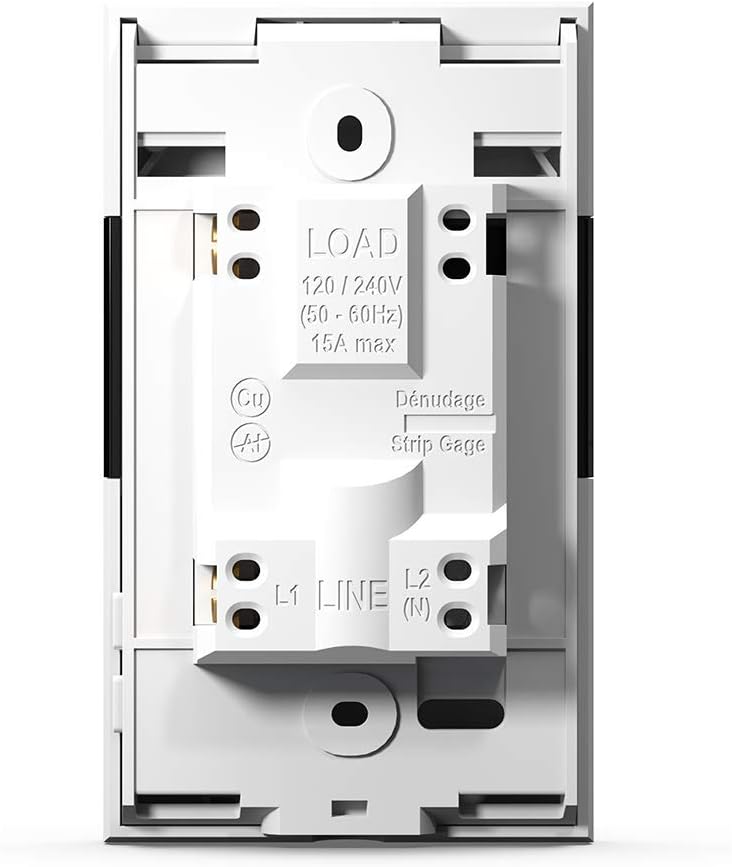
Figure 7: Neviweb App Energy Report
This image shows a smartphone displaying the Neviweb app's energy report feature, presenting a bar graph of energy consumption over time (24 hours, 30 days, 24 months) and estimated costs, allowing users to track their energy savings.
5.3 Voice Control
The TH1310WF thermostat can be controlled using voice commands through compatible smart assistants:
- Amazon Alexa: "Alexa, set the living room thermostat to 72 degrees."
- Google Home: "Hey Google, what's the temperature in the kitchen?"
- Apple HomeKit: Use Siri to control your thermostat once added to HomeKit.

Figure 8: Voice Assistant Integration
The image features an Amazon Echo Dot smart speaker on a kitchen shelf, illustrating how users can interact with their thermostat using voice commands through compatible voice assistants.
6. Maintenance
The Sinopé TH1310WF thermostat requires minimal maintenance. Keep the device clean by wiping it with a soft, dry cloth. Do not use abrasive cleaners or solvents. Ensure the vents are free from dust accumulation to maintain proper operation.
There are no user-serviceable parts inside the thermostat. Any repairs should be performed by qualified personnel.
7. Troubleshooting
| Problem | Possible Cause | Solution |
|---|---|---|
| Thermostat display is blank. | No power supply. | Check circuit breaker. Ensure proper wiring connections. |
| Cannot connect to Wi-Fi. | Incorrect Wi-Fi password; Thermostat too far from router; Router issues. | Verify Wi-Fi password. Move thermostat closer to router or use a Wi-Fi extender. Restart router. |
| Heating system not responding. | Thermostat in OFF mode; Wiring issue; Heating system malfunction. | Check thermostat mode. Verify wiring. Consult a qualified electrician or HVAC technician. |
| Inaccurate temperature reading. | Floor sensor not properly installed or damaged. | Ensure floor sensor is correctly placed within the heating mat. Inspect sensor for damage. |
8. Specifications
| Feature | Specification |
|---|---|
| Model Number | TH1310WF |
| Voltage | 240 Volts |
| Wattage | 3600 watts |
| Current | 15A max |
| Connectivity | Wi-Fi |
| Controller Type | Amazon Alexa, Apple HomeKit, Google Assistant, Neviweb |
| Temperature Range | 41 to 97 Degrees Fahrenheit |
| Included Components | Floor sensor - 15 ft |
| Dimensions | 4.8 x 2.83 x 1.02 inches |
| Item Weight | 13 ounces |
| Material | Plastic |
| Display Type | LCD |
| Mounting Type | Wall Mount |
9. Warranty and Support
9.1 Warranty Information
The Sinopé TH1310WF Smart Wi-Fi Thermostat is covered by a 3-year manufacturer's warranty from the date of purchase. This warranty covers defects in materials and workmanship under normal use. It does not cover damage resulting from improper installation, accident, misuse, abuse, or unauthorized modifications.
Please retain your proof of purchase for warranty claims.
9.2 Customer Support
For technical assistance, troubleshooting, or warranty inquiries, please contact Sinopé Technologies customer support:
- Website: www.sinopetech.com
- Email: support@sinopetech.com
- Phone: Refer to the contact section on the official Sinopé website for regional phone numbers.
When contacting support, please have your product model number (TH1310WF) and purchase date available.