1. Introduction
This manual provides detailed instructions for the assembly, care, and maintenance of your Mikro-mir AMP 72-010 Victory 357 Hawk 1/72 Scale Plastic Model Kit. Please read all instructions carefully before beginning assembly to ensure a successful and enjoyable building experience.
The Victory 357 Hawk is a prototype aircraft model, presented in 1/72 scale. This kit is designed for model enthusiasts and requires assembly, painting, and gluing (materials not included).

Image 1.1: Packaging for the Victory 357 Hawk model kit.
2. Product Overview
The Mikro-mir AMP 72-010 kit allows you to construct a detailed replica of the Victory 357 Hawk prototype aircraft. This kit includes various plastic parts molded on sprues, along with decals for markings. The finished model is intended for display.
2.1. Kit Contents
- Plastic parts molded on sprues (various components for fuselage, wings, engines, cockpit, etc.)
- Clear plastic parts (e.g., canopy)
- Decal sheet
- Instruction booklet
Note: Paint, glue, and modeling tools are not included and must be purchased separately.

Image 2.1: Overview of the plastic sprues and decal sheet included in the kit.

Image 2.2: A visual representation of the completed Victory 357 Hawk model.
3. Assembly Instructions
Follow these steps carefully for the assembly of your model. Refer to the included instruction booklet and diagrams for specific part numbers and placement.
3.1. Preparation
- Review Instructions: Carefully read through the entire instruction manual and familiarize yourself with all steps and diagrams before starting.
- Identify Parts: Locate all sprues and identify the parts according to the parts diagram.
- Gather Tools: Ensure you have all necessary modeling tools, including a hobby knife, plastic cement, tweezers, sanding sticks, and paints.
- Clean Parts: Wash plastic parts in mild soapy water to remove any mold release agents, then rinse and dry thoroughly.

Image 3.1: Diagram illustrating the various parts of the model and their initial assembly points.
3.2. Step-by-Step Assembly
- Cockpit Assembly: Assemble the cockpit interior components (seats, control panel, joysticks) as indicated in the diagrams. Paint these parts before gluing them into the fuselage halves.
- Fuselage Assembly: Join the fuselage halves, ensuring the cockpit assembly is correctly positioned inside. Use plastic cement sparingly and hold parts together until the glue sets.
- Engine Nacelles/Floats: Assemble the main engine nacelles or floats. These typically consist of multiple halves. Ensure proper alignment.
- Wing and Stabilizer Attachment: Attach the main wing sections and tail stabilizers to the fuselage. Pay close attention to the angle and alignment.
- Landing Gear/Display Stand: If applicable, assemble and attach the landing gear. Alternatively, prepare the model for a display stand.
- Detail Parts: Add smaller detail parts such as antennas, clear canopy, and other external features.
- Sanding and Filling: After major assembly, inspect for seams and gaps. Use putty and sand to achieve a smooth surface.
- Painting and Decals: Apply primer, then paint the model according to your desired scheme. Once paint is dry, apply decals using decal setting solutions for best results.
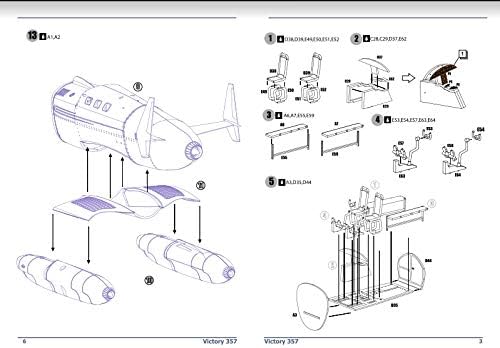
Image 3.2: Detailed assembly steps for internal components and fuselage sections.
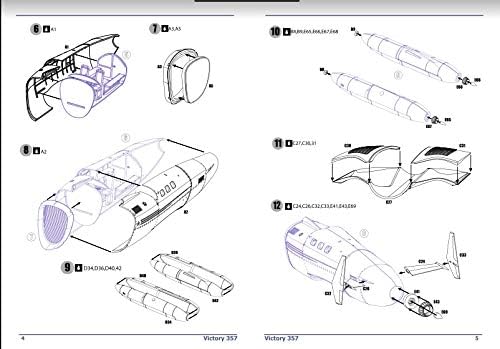
Image 3.3: Further assembly steps, including the attachment of external components and engine nacelles.
4. Display and Handling
Once your Victory 357 Hawk model is complete, it is ready for display. As a static model, it does not have operational functions.
- Display Location: Choose a stable, level surface away from direct sunlight, extreme temperatures, and high humidity to prevent damage or fading.
- Handling: Handle the model by its main body or sturdy sections. Avoid touching delicate parts like antennas or propellers to prevent breakage.
- Security: Consider using a display case to protect the model from dust and accidental damage.
5. Maintenance and Care
Proper care will preserve the appearance and integrity of your model for years.
- Dusting: Regularly dust the model using a soft, dry brush or a can of compressed air. Avoid abrasive cloths.
- Cleaning: For stubborn dirt, lightly dampen a soft cloth with water (and a tiny amount of mild soap if necessary), then gently wipe the surface. Avoid harsh chemicals or solvents, as these can damage paint and plastic.
- Repairs: If any parts become detached, reattach them using appropriate plastic cement.
6. Troubleshooting Common Assembly Issues
While building model kits, you may encounter some common challenges. Here are solutions to typical problems:
- Parts Not Fitting:
Solution: Carefully trim excess plastic (flash) from the edges of parts using a hobby knife. Lightly sand mating surfaces if necessary. Test fit parts before applying glue. - Gaps Between Parts:
Solution: Use plastic putty or filler to fill gaps. Once dry, sand smooth and prime before painting. For minor gaps, a small amount of extra plastic cement can sometimes melt and fill the gap. - Decals Not Adhering:
Solution: Ensure the surface is glossy and clean. Use decal setting solutions (e.g., Micro Sol, Micro Set) to help decals conform to irregular surfaces and adhere better. - Broken Small Parts:
Solution: Small parts can be delicate. If a part breaks, attempt to re-glue it using a small amount of plastic cement. For very fine parts, consider replacing them with stretched sprue or wire if repair is not feasible. - Paint Issues (e.g., 'Orange Peel' Texture, Runs):
Solution: Ensure paint is properly thinned and applied in thin coats. Allow each coat to dry thoroughly. For 'orange peel,' light sanding and re-application may be needed. For runs, allow to dry completely, then sand and repaint.
7. Specifications
| Feature | Detail |
|---|---|
| Brand | Mikro-mir |
| Model Name | Victory 357 Hawk |
| Item Model Number | AMP72010 |
| Scale | 1/72 |
| Material | Plastic |
| Color | Grey (unpainted) |
| Number of Pieces | 1 (refers to the kit, not individual parts) |
| Item Weight | 0.16 Kilograms (5.5 ounces) |
| Package Dimensions | 11.1 x 6.97 x 2.01 inches |
| Included Components | Various plastic parts for the aircraft model, not including paint and glue |
8. Warranty and Support
For any questions regarding missing parts, manufacturing defects, or assembly assistance, please contact the retailer or manufacturer directly. Keep your proof of purchase for any warranty claims.
As this is a model kit, specific operational warranties do not apply. However, the manufacturer typically addresses issues related to the quality or completeness of the kit components.