Makita Original Motor 629167-1
Product Instruction Manual
Brand: Makita | Model: store777
1. Introduction
This instruction manual provides essential information for the proper installation, operation, and maintenance of your new Makita Original Motor, part number 629167-1. This motor is a direct replacement for various Makita cordless drill/driver models, including DF331D, DF031D, HP331D, HP331DWE, HP331Z, and HP331DZ. Please read this manual thoroughly before attempting any installation or repair to ensure safe and effective use.
2. Safety Instructions
Always observe basic safety precautions when working with power tools and electrical components to reduce the risk of fire, electric shock, and personal injury.
- Disconnect Power: Always ensure the battery pack is removed from the tool before attempting any repair, maintenance, or installation of the motor.
- Use Proper Tools: Utilize appropriate tools for disassembly and reassembly to prevent damage to the tool or injury.
- Wear Personal Protective Equipment (PPE): Wear safety glasses and gloves when handling components.
- Professional Installation Recommended: If you are not confident in your ability to perform the replacement, seek assistance from a qualified service technician.
- Handle with Care: Motors contain delicate components. Avoid dropping or subjecting the motor to impact.
- Ventilation: Ensure adequate ventilation if using cleaning solvents during the repair process.
3. Product Overview
The Makita Original Motor 629167-1 is a genuine replacement part designed to restore the full functionality of your compatible Makita cordless drill/driver. It is engineered to meet Makita's quality and performance standards.
Compatibility: This motor is compatible with Makita models DF331D, DF031D, HP331D, HP331DWE, HP331Z, and HP331DZ.

Figure 3.1: The Makita Original Motor 629167-1, showing its serial number and compatibility label on the packaging.
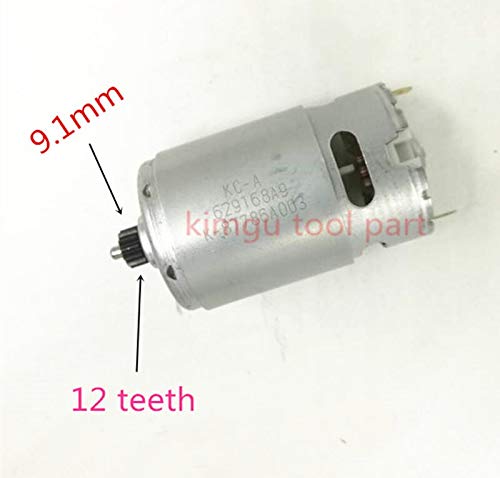
Figure 3.2: Close-up view of the motor shaft, indicating a 9.1mm shaft diameter and 12 teeth on the pinion gear. This detail is crucial for ensuring proper fitment.
4. Setup and Installation
Replacing the motor in a cordless drill/driver requires careful disassembly and reassembly. Follow these general steps. Specific disassembly instructions may vary slightly by tool model.
- Prepare the Workspace: Ensure a clean, well-lit, and organized workspace. Lay out a mat or cloth to prevent losing small parts.
- Remove Battery: Crucially, remove the battery pack from the drill/driver before beginning any work.
- Disassemble the Tool Casing: Locate and remove all screws holding the two halves of the drill/driver casing together. Carefully separate the casing halves. Note the position of all internal components.
- Disconnect Old Motor: Identify the old motor. Carefully disconnect the electrical wires leading to the motor. Note their polarity if applicable (though typically, DC motors can be wired either way for direction, but consistency is best).
- Remove Old Motor: The motor is usually seated within the gearbox assembly. Carefully detach it from the gearbox, noting how it engages with the gears.
- Install New Motor: Insert the new Makita 629167-1 motor into the gearbox assembly, ensuring the pinion gear properly meshes with the internal gears.
- Connect Wires: Reconnect the electrical wires to the new motor. Ensure secure connections.
- Reassemble Casing: Carefully place the internal components back into one half of the casing. Ensure all wires are tucked away and not pinched. Align the two casing halves and secure them with the screws removed earlier. Do not overtighten.
- Initial Test: Insert a charged battery pack. Briefly test the drill/driver's function (e.g., trigger response, forward/reverse, speed settings) before full use.
Note: Pay close attention to the orientation of components, especially springs and small plastic parts, during disassembly. Taking photos during the process can be helpful for reassembly.
5. Operating Instructions
Once the new motor is successfully installed, the operation of your Makita drill/driver remains unchanged. Refer to your original Makita drill/driver user manual for detailed operating instructions, including:
- Battery installation and charging.
- Trigger operation and variable speed control.
- Forward/reverse switch functionality.
- Torque settings and clutch operation (if applicable).
- Drilling and driving techniques.
Ensure the tool operates smoothly and without unusual noises or vibrations after motor replacement.
6. Maintenance
Proper maintenance extends the life of your power tool and its components, including the motor.
- Keep Clean: Regularly clean the exterior of your drill/driver to prevent dust and debris from entering the internal components. Use a soft, dry cloth.
- Ventilation Openings: Ensure the ventilation openings on the tool casing are clear of obstructions to allow for proper motor cooling.
- Avoid Overload: Do not continuously operate the tool under heavy load, as this can cause the motor to overheat and reduce its lifespan.
- Storage: Store the tool in a dry, clean environment away from extreme temperatures.
- Battery Care: Follow the battery manufacturer's instructions for charging and storage to ensure optimal performance and prevent strain on the motor.
7. Troubleshooting
If you encounter issues after replacing the motor, consider the following common problems and solutions:
| Problem | Possible Cause | Solution |
|---|---|---|
| Tool does not start after motor replacement. |
|
|
| Unusual noise or vibration during operation. |
|
|
| Reduced power or intermittent operation. |
|
|
If problems persist after attempting these solutions, it is recommended to consult a qualified service technician or contact Makita customer support.
8. Specifications
| Attribute | Value |
|---|---|
| Part Number | 629167-1 (equivalent to 629169-7) |
| Manufacturer | Makita |
| Compatible Voltage | 10.8 Volts |
| Model Number (Internal) | store777 |
| ASIN | B08HS2C3KQ |
| Shaft Diameter | 9.1 mm |
| Pinion Gear Teeth | 12 teeth |
9. Warranty and Support
Warranty coverage for replacement parts like the Makita Original Motor 629167-1 is typically provided by the manufacturer or the seller at the time of purchase. Please refer to the warranty information provided with your original purchase or contact the seller directly for details regarding specific warranty terms and conditions.
For this specific purchase, a 30-day return/replacement policy is offered by the seller, Shop Mancini. For any product support or inquiries, please contact the seller or Makita's official customer service channels.
Note: Information regarding spare parts availability for this specific component is not readily available.