
Tyler TTV705-14
Tyler TTV705-14 14-inch Portable LCD HD TV Instruction Manual
Model: TTV705-14 | Brand: Tyler
1. Introduction
This manual provides essential instructions for the safe and efficient operation of your Tyler TTV705-14 14-inch Portable LCD HD TV. Please read this manual thoroughly before using the device and retain it for future reference. This portable television is designed for versatile viewing, featuring multiple input options and a built-in battery for on-the-go entertainment.
2. Safety Information
Observe the following safety precautions to prevent damage to the device and ensure user safety:
- Do not expose the TV to rain or moisture to avoid fire or electric shock hazards.
- Do not block ventilation openings. Ensure adequate space around the TV for proper airflow.
- Use only the power adapter supplied with the unit. Using unauthorized adapters may cause damage.
- Protect the power cord from being walked on or pinched, particularly at plugs, convenience receptacles, and the point where they exit from the apparatus.
- Unplug the TV during lightning storms or when unused for long periods.
- Do not attempt to service this product yourself. Refer all servicing to qualified service personnel.
- Dispose of batteries responsibly. Do not expose batteries to excessive heat.
3. Package Contents
Verify that all items are present in the package:
- Tyler TTV705-14 Portable LCD HD TV
- Detachable Stand
- Remote Control
- AC Power Adapter
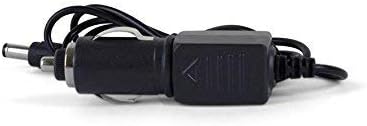
- Car Charger (DC 12V)
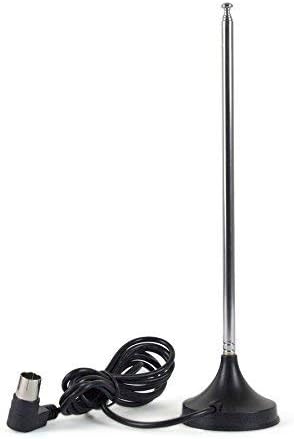
- External Antenna (Magnetic Base)
- External Antenna (Telescopic)
- User Manual (this document)
4. Product Overview
Familiarize yourself with the components and connections of your portable TV.
4.1 Front View

The front of the TV features the 14-inch LCD display, integrated stereo speakers, and basic control buttons (Power, Volume, Channel, Menu, Input) located below the screen. The included remote control provides full functionality.
4.2 Rear View and Stand


The rear panel includes ventilation openings and additional speaker grilles. The TV can be used with the included detachable desktop stand or an integrated kickstand for flexible placement.
4.3 Side Panel Connections

The side panel provides access to all connectivity options:
- ANT: F-type connector for connecting an external antenna for over-the-air digital TV reception.
- HD-IN: HDMI input for connecting high-definition devices such as Blu-ray players, game consoles, or streaming sticks.
- VGA: VGA input for connecting a computer.
- AV-IN/AV-OUT: 3.5mm jack for composite video and stereo audio input/output using an adapter cable (not always included).
- Headphone Jack: 3.5mm stereo output for private listening.
- USB: USB port for playing media files from a USB flash drive.
- CARD INPUT: SD/MMC card slot for playing media files from a memory card.
- DC-12V: Power input for the AC adapter or car charger.
- ON/OFF Switch: Main power switch for the unit.
5. Setup
5.1 Attaching the Stand
To attach the detachable desktop stand, align the stand's mounting plate with the corresponding slots on the back of the TV. Secure it firmly with the provided screws (if applicable) or by sliding it into place until it clicks. Alternatively, extend the integrated kickstand for quick tabletop placement.
5.2 Powering the TV
Your TV can be powered by the included AC adapter or the car charger.
- AC Power: Connect the AC power adapter to the DC-12V input on the TV and plug the other end into a standard wall outlet.
- Car Power: Connect the car charger to the DC-12V input on the TV and plug the other end into your vehicle's 12V accessory socket.
- Internal Battery: The TV features a built-in rechargeable battery. Ensure the battery is fully charged before portable use. The TV will charge when connected to AC or car power.
5.3 Connecting an Antenna
For over-the-air digital TV reception, connect one of the included antennas to the ANT port on the side of the TV.
- Magnetic Base Antenna: Position the magnetic base on a metallic surface for better reception, if available.
- Telescopic Antenna: Extend the telescopic rod fully for optimal signal reception.

5.4 Connecting External Devices
Connect external devices to the appropriate ports (HDMI, VGA, AV-IN) as needed.
6. Operating Instructions
6.1 Power On/Off
- Ensure the main ON/OFF switch on the side panel is in the "ON" position.
- Press the POWER button on the TV or remote control to turn the unit on or off.
6.2 Initial Setup and Channel Scan (for Antenna TV)
- After powering on for the first time, the TV may guide you through an initial setup wizard.
- Select your language and country/region.
- Navigate to the MENU, then select CHANNEL or SETUP.
- Choose AUTO SCAN or AUTO TUNE to search for available digital TV channels. This process may take several minutes.
- Once complete, you can use the CH+/- buttons on the TV or remote to change channels.
6.3 Selecting Input Source
To switch between different connected devices or the antenna TV:
- Press the INPUT or SOURCE button on the remote control or the TV.
- Use the arrow buttons to select the desired input (e.g., DTV, HDMI, VGA, AV, USB, SD).
- Press OK or ENTER to confirm your selection.
6.4 Media Playback (USB/SD Card)
To play media files from a USB drive or SD card:
- Insert your USB drive into the USB port or your SD card into the CARD INPUT slot.
- Select USB or SD as the input source.
- The TV's media browser will appear. Navigate through your files using the arrow buttons on the remote.
- Select the desired file (video, music, photo) and press OK to play.
6.5 Menu Navigation
Press the MENU button on the remote to access the TV's settings. Use the arrow buttons to navigate and OK to select. Common menu options include:
- Picture: Adjust brightness, contrast, color, aspect ratio.
- Sound: Adjust volume, bass, treble, balance, sound mode.
- Time: Set sleep timer, auto standby.
- Option: Language, OSD duration, factory reset.
- Channel: Auto scan, manual scan, channel list.
7. Maintenance
7.1 Cleaning
- Always unplug the TV before cleaning.
- Use a soft, dry cloth to wipe the screen and cabinet.
- For stubborn marks, lightly dampen the cloth with water or a mild, non-abrasive screen cleaner. Do not spray liquid directly onto the screen.
- Avoid using harsh chemicals or abrasive cleaning materials.
7.2 Battery Care
- To prolong battery life, avoid fully discharging the battery frequently.
- If storing the TV for an extended period, charge the battery to approximately 50% and store in a cool, dry place.
- Do not expose the battery to extreme temperatures.
8. Troubleshooting
If you encounter issues with your TV, refer to the following common problems and solutions:
| Problem | Possible Cause | Solution |
|---|---|---|
| No power | Power cord not connected; Main power switch off; Battery depleted. | Ensure power cord is securely connected. Check main ON/OFF switch. Charge the battery. |
| No picture/sound from antenna | Antenna not connected; No channels scanned; Weak signal. | Connect antenna securely. Perform an auto channel scan. Adjust antenna position or try a different antenna. |
| No picture/sound from external device (HDMI, AV) | Incorrect input source selected; Device not powered on; Cable faulty. | Select the correct input source. Ensure the external device is powered on. Check cable connections. |
| Remote control not working | Batteries depleted/incorrectly inserted; Obstruction between remote and TV. | Replace remote batteries. Ensure correct polarity. Remove any obstructions. Point remote directly at the TV's IR sensor. |
| Media files not playing from USB/SD | Unsupported file format; USB/SD card not properly inserted; Corrupted files. | Refer to the TV's specifications for supported file formats. Reinsert USB/SD card. Try different files or storage devices. |
9. Specifications
| Feature | Detail |
|---|---|
| Model Name | TTV705-14 |
| Brand | Tyler |
| Screen Size | 14.1 Inches (36 cm visible diagonal) |
| Display Technology | LCD |
| Resolution | 720p |
| Aspect Ratio | 16:9 |
| Connectivity Technology | HDMI, USB, RCA (via AV-IN/OUT), VGA, Antenna |
| Special Feature | Flat screen, Built-in rechargeable battery |
| Power Source | AC Adapter (12V DC), Car Charger (12V DC), Internal Lithium Ion Battery |
| Item Weight | Approximately 5.61 pounds |
| Package Dimensions | Approximately 15.24 x 12.4 x 6.85 inches |
| Included Components | TV, Detachable Stand, Remote Control, AC Power Adapter, Car Charger, External Antennas |
10. Warranty and Support
For warranty information and technical support, please refer to the documentation provided at the time of purchase or contact the retailer/manufacturer directly. As this product may be renewed, specific warranty terms may vary. Please consult your purchase documentation for details regarding your specific warranty coverage.
Ask a question about this manual
Ask about setup, troubleshooting, compatibility, parts, safety, or missing instructions. Manuals+ will review the question and use this page’s manual context to help answer it.