1. Introduction
The RME HDSPe AIO Pro is an advanced PCI Express audio interface designed for professional studio and broadcast environments. It offers a high channel count and a versatile array of analog and digital inputs and outputs, all of which can operate simultaneously. This manual provides essential information for the proper installation, configuration, and operation of your HDSPe AIO Pro card.
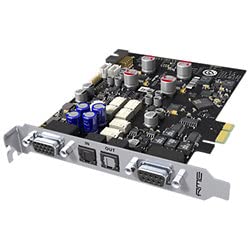
Figure 1: The RME HDSPe AIO Pro PCI Express Audio Interface card, showcasing its compact design and various connectors.
2. Setup and Installation
2.1 Hardware Installation
- Power Off: Ensure your computer is completely powered off and disconnected from the main power supply before opening the computer case.
- Open Case: Carefully open your computer's chassis to access the motherboard.
- Locate PCIe Slot: Identify an available PCI Express slot (x1 or larger) on your motherboard.
- Insert Card: Gently insert the HDSPe AIO Pro card into the chosen PCI Express slot, ensuring it is firmly seated. Secure the card with the retaining screw or clip provided by your computer case.
- Close Case: Close the computer case and reconnect the power supply.
2.2 Driver Installation
After hardware installation, the necessary drivers must be installed for the HDSPe AIO Pro to function correctly with your operating system. The card is compatible with Windows operating systems.
- Power On: Power on your computer. The operating system may detect new hardware.
- Download Drivers: Visit the official RME website (www.rme-audio.de/downloads.html) to download the latest drivers for the HDSPe AIO Pro.
- Install Drivers: Run the downloaded driver installer and follow the on-screen instructions. It is recommended to restart your computer after the installation is complete.
- Verify Installation: After restarting, check your computer's Device Manager to ensure the RME HDSPe AIO Pro is recognized and functioning without errors.
2.3 Connecting Audio Devices
The HDSPe AIO Pro supports various analog and digital connections. All inputs and outputs are simultaneously operational.
- Analog I/O: Connect your analog audio equipment (e.g., microphones, line-level devices, monitors) to the appropriate analog input and output jacks.
- Digital I/O (XLR): For AES/EBU connections, use XLR cables to connect to compatible digital audio devices.
- Digital I/O (Phono): For SPDIF connections, use phono (RCA) cables to connect to compatible digital audio devices.
3. Operating Instructions
3.1 Software Integration
The HDSPe AIO Pro is designed to work seamlessly with Windows-compatible audio software (DAWs, audio editors, etc.).
- Select Driver: In your audio software's preferences or settings, select the RME HDSPe AIO Pro as your primary audio device (e.g., ASIO driver for low latency).
- Configure I/O: Configure the input and output channels within your software to match your connected hardware.
3.2 Signal Management
The HDSPe AIO Pro features a dedicated attenuator in its output section. This attenuator helps to achieve an increased signal-to-noise ratio and a lower output impedance, particularly when operating at lower reference levels. Refer to the RME TotalMix FX software (installed with the drivers) for detailed control over routing, mixing, and monitoring of all inputs and outputs.
3.3 Sample Rate and Frequency Response
The interface supports a maximum sample rate of 192 KHz, providing high-resolution audio capture and playback. The frequency response is rated at 192000 Hz, ensuring accurate audio reproduction across the audible spectrum.
4. Maintenance
To ensure the longevity and optimal performance of your RME HDSPe AIO Pro, follow these maintenance guidelines:
- Keep Clean: Periodically clean the exterior of your computer and ensure proper airflow to prevent dust buildup on the card, which can lead to overheating.
- Secure Connections: Ensure all audio cables are securely connected to prevent signal loss or intermittent issues.
- Driver Updates: Regularly check the RME website for updated drivers and firmware to benefit from performance improvements and bug fixes.
- Environmental Conditions: Operate the card within recommended temperature and humidity ranges to avoid damage.
5. Troubleshooting
If you encounter issues with your HDSPe AIO Pro, consider the following troubleshooting steps:
- No Detection: If the card is not detected by your computer, ensure it is properly seated in the PCI Express slot and that the drivers are correctly installed. Try reinstalling the drivers.
- No Audio: Verify that the correct audio device is selected in your operating system's sound settings and within your audio software. Check all cable connections.
- Distorted Audio: Check sample rate and buffer size settings in your audio software. Ensure input levels are not clipping.
- Software Conflicts: If experiencing crashes or instability, ensure all other audio drivers are up-to-date or temporarily disable other audio devices.
- Consult RME Support: For persistent issues, refer to the RME support resources on their official website or contact their technical support team.
6. Specifications
| Feature | Detail |
|---|---|
| Brand | RME |
| Model Number | HDSPe AIO Pro |
| Compatible Devices | Personal Computer |
| Supported Software | Windows-compatible audio software |
| Connectivity Technology | XLR |
| Number of Channels | 760 (Total possible I/O streams, actual physical I/O varies) |
| Frequency Response | 192000 Hz |
| Operating System | Windows |
| Audio Input | XLR |
| Maximum Sample Rate | 192 KHz |
| Item Type Name | Audio Interface |
7. Warranty Information
The RME HDSPe AIO Pro comes with a 2-year manufacturer's warranty. This warranty covers defects in materials and workmanship under normal use. Please retain your proof of purchase for warranty claims. For detailed terms and conditions, refer to the official RME warranty policy available on their website.
8. Support
For technical assistance, driver downloads, firmware updates, and additional product information, please visit the official RME website:
You can also find FAQs and a user forum on the RME website for community support and common solutions.