1. Introduction
This manual provides comprehensive instructions for the installation, operation, and maintenance of your Bediffer Universal USB Car DVR. This high-performance dash camera is designed to enhance your driving safety and record your journeys in HD 1080P quality, integrating seamlessly with Android navigation systems. Please read this manual thoroughly before use to ensure proper functionality and longevity of your device.
2. Product Overview
2.1 Key Features
- High-Performance Recording: Supports large-screen display and full-screen touch for clear viewing and real-time playback. Features USB digital transmission and high resolution 1080P video capture.
- Battery-Free Design: Ensures enhanced safety by eliminating the risk of explosion associated with internal batteries.
- Automatic Save Function: Equipped with a built-in G-sensor that automatically locks and saves video footage during sudden impacts or collisions, providing crucial evidence.
- Strict Quality Control: Manufactured to high-quality international standards, ensuring reliable performance.
- Easy Installation: Designed for straightforward and quick installation, requiring no complicated tools. Professional installation is recommended for optimal setup.
2.2 What's in the Box
- 1 x Universal USB Car DVR Camera
- 1 x Data Cable (USB)
- 1 x User Manual (This document)
- 1 x Memory Card (TF Card, up to 32GB supported)
2.3 Product Visuals

This image displays the compact design of the dash camera, featuring its lens and the attached USB power/data cable. The camera unit has a black finish with red adhesive strips for mounting.

An angled perspective of the dash camera, illustrating its sleek profile and how the USB cable connects to the unit. The red adhesive pads are visible on the mounting bracket.
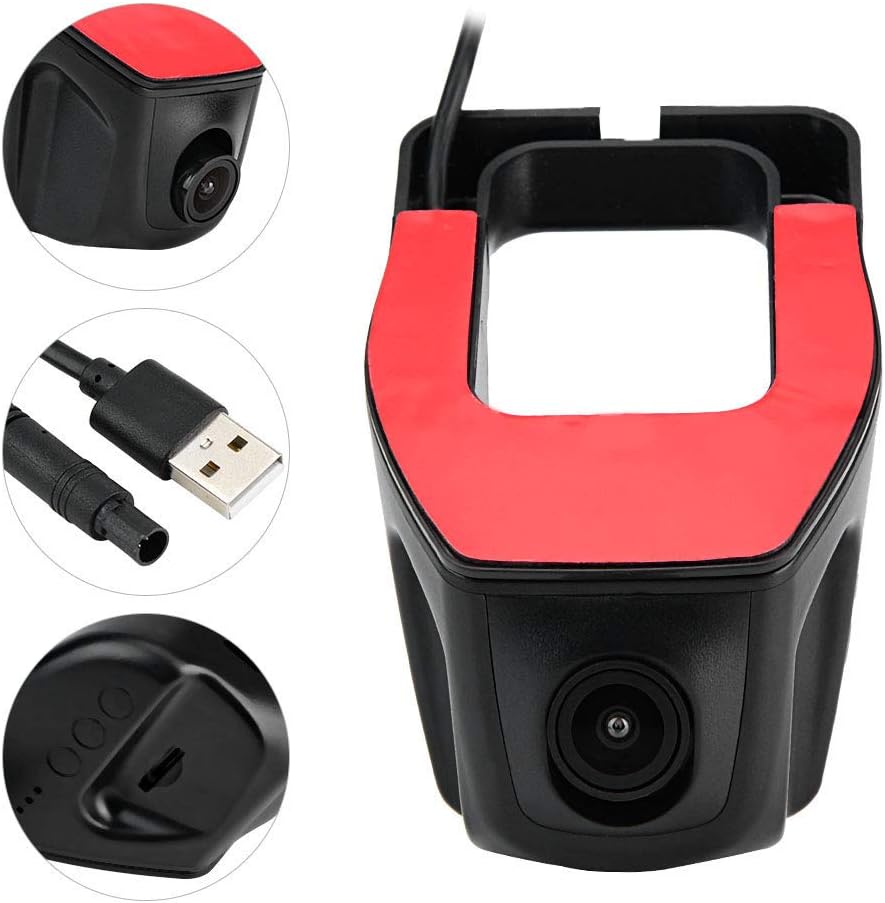
This composite image provides close-up views of the camera lens, the standard USB connector for power and data, and the small indicator lights on the side of the device.

The dash camera is shown alongside split-screen examples of video quality during daytime and nighttime driving conditions, demonstrating its recording capabilities in varied lighting.

This image illustrates various perspectives of the dash camera mounted on a car's front windshield, demonstrating its discreet placement behind the rearview mirror.

The dash camera is depicted with a graphical overlay suggesting advanced driving assistance system (ADAS) features, such as lane departure warnings and real-time speed display, as seen on a connected Android screen.

A clear view of the dash camera alongside its USB connector, emphasizing the simple plug-and-play connectivity for Android navigation systems.

This image visually confirms the dash camera's compatibility with large-screen displays and full-screen touch control, indicating ease of interaction with connected Android devices.
3. Specifications
| Attribute | Value |
|---|---|
| Product Dimensions | 3.94 x 3.94 x 3.94 inches |
| Item Weight | 7.7 ounces |
| Brand | Bediffer |
| Model Name | Bediffer (Universal USB Car DVR) |
| Screen | No screen (relies on Android navigation display) |
| Fitment | Special for Android navigation |
| APP Compatibility | USB 4th generation, APK, ADAS, cloud dog |
| Touch Screen Control | Support |
| Lens View Angle | 170° |
| Image Resolution | 1080P (1920 * 1080 20FPS) |
| Pixel | 12 million |
| Supported Languages | English, German, French, Spain, Italy, Portugal, Traditional Chinese, Simplified Chinese, Japanese, Russian |
| Memory Card | TF Card (MicroSD) |
| Storage Capacity | 32G (Maximum) |
| Transmission Interface | USB |
| Transmission Rate | 30M/S |
| Installation Position | Front Windshield |
| Connectivity Technology | USB |
| Video Capture Resolution | 1080p |
| Mounting Type | Windshield Mount |
| Field Of View | 170 Degrees |
| Control Method | Touch |
4. Setup and Installation
- Prepare the Mounting Surface: Clean the chosen area on your front windshield thoroughly to ensure strong adhesion. The recommended installation position is typically behind the rearview mirror to avoid obstructing your view.
- Attach the Camera: Remove the protective film from the red adhesive strips on the camera's mounting bracket. Firmly press the camera onto the cleaned windshield surface and hold for a few seconds to ensure secure attachment.
- Connect to Android Navigation System: Locate a compatible USB port on your Android navigation unit. Connect the provided USB data cable from the DVR camera to the USB port on your Android navigation system.
- Install the Application: The DVR requires a dedicated application to function with your Android navigation system. This application (e.g., USB 4th generation, APK, ADAS, cloud dog) is typically provided with the device or can be downloaded. Follow the on-screen prompts on your Android navigation system to install the necessary APP.
- Insert Memory Card: Ensure a TF (MicroSD) card (up to 32GB) is inserted into the designated slot on the DVR camera. This card will store your video recordings.
- Cable Management: Route the USB cable neatly along the edge of the windshield or dashboard to avoid interference with driving and maintain a tidy interior.
Note: While installation is designed to be easy, professional installation is recommended for optimal cable routing and system integration.
5. Operating Instructions
- Power On/Off: The DVR powers on automatically when your Android navigation system receives power (e.g., when the vehicle starts) and powers off when the navigation system shuts down.
- Accessing the DVR Application: Once connected and the APP is installed, open the DVR application on your Android navigation system's display.
- Live View: The application will typically display a real-time live view from the camera. You can interact with this view using the full-screen touch capabilities of your Android navigation system.
- Recording: The DVR is designed to automatically begin loop recording when powered on. Older files will be overwritten when the memory card is full, unless they are locked.
- G-Sensor (Emergency Recording): The built-in G-sensor detects sudden impacts or rapid deceleration/acceleration. When triggered, it automatically locks the current video segment, preventing it from being overwritten during loop recording. These locked files are saved in a separate folder.
- Playback: Within the DVR application, navigate to the playback section to review recorded videos. You can browse by date and time, and view both regular and locked emergency recordings.
- Settings: Access the settings menu within the DVR application to configure various parameters such as video resolution, loop recording duration, G-sensor sensitivity, and language settings.
- ADAS Features (if supported by APP): If your installed APP supports ADAS (Advanced Driving Assistance Systems), you may find features like Lane Departure Warning (LDW) or Forward Collision Warning (FCW). Refer to your APP's specific instructions for calibration and usage.
6. Maintenance
- Cleaning the Lens: Regularly clean the camera lens with a soft, lint-free cloth to ensure clear video quality. Avoid abrasive materials or harsh chemicals.
- Memory Card Management:
- Format the TF card periodically (e.g., once a month) through the DVR application settings to maintain optimal performance and prevent data corruption.
- Replace the memory card if you experience frequent recording errors or data loss, as memory cards have a limited lifespan, especially with continuous recording.
- Firmware Updates: Check for any available firmware updates for the DVR or the associated Android application. Updates can improve performance, add features, or fix bugs.
- Environmental Conditions: Avoid exposing the DVR to extreme temperatures or direct sunlight for prolonged periods when the vehicle is parked, as this can affect its lifespan.
7. Troubleshooting
| Problem | Possible Cause / Solution |
|---|---|
| DVR not powering on. |
|
| No video display on Android screen. |
|
| Recordings are not saving or are corrupted. |
|
| G-sensor is too sensitive or not sensitive enough. |
|
| Video quality is poor or blurry. |
|
8. Warranty and Support
Bediffer products are manufactured under strict quality control standards to ensure high performance and reliability. While specific warranty details are not provided in this manual, please retain your proof of purchase for any warranty claims.
For technical support, troubleshooting assistance beyond this manual, or warranty inquiries, please contact Bediffer customer service through the retailer where you purchased the product or visit the official Bediffer brand store online. Refer to the packaging or product listing for the most current contact information.
Online Resources:
- Bediffer Store on Amazon: Visit Store