
Introduction
This manual provides instructions for the installation, operation, and maintenance of your MATISMO AMT45R Radio Roller Shutter Motor. Please read this manual carefully before installation and use to ensure safe and efficient operation.
The MATISMO AMT45R is a powerful tubular motor designed for Ø60 mm roller shutter shafts, offering 20 Nm of torque and a traction force of up to 40 kg. It features mechanical limit switches for precise positioning and integrated radio control for convenient operation.
Safety Information
Important Safety Instructions:
- Installation and wiring must be performed by a qualified professional.
- Ensure the power supply is disconnected before any installation, maintenance, or repair work.
- Do not allow children to play with the motor or remote control.
- Keep the remote control away from children.
- Regularly inspect the roller shutter system for wear or damage.
- Do not operate the motor if any part of the system is damaged.
- Ensure the roller shutter is free from obstructions during operation.
Package Contents
Verify that all components are present before beginning installation:
- MATISMO AMT45R Tubular Motor
- Radio Remote Control
- Octagonal Adapters for Ø60 mm Shaft
- Mounting Bracket
- Adjustment Tool (for limit switches)
- Retaining Pin

Image: The MATISMO AMT45R tubular motor (blue) with its integrated head and a white radio remote control. The motor has a label showing "MATISMO AMT45R".

Image: Included accessories for the MATISMO AMT45R motor. This includes an orange adjustment tool, a metal mounting bracket, and a small retaining pin.
Specifications
| Feature | Specification |
|---|---|
| Model Number | AMT45R |
| Shaft Diameter Compatibility | Ø60 mm (Octagonal) |
| Torque | 20 Nm |
| Traction Force | Up to 40 kg |
| Control Method | Radio Remote Control |
| Limit Switch Type | Mechanical |
| Operating Mode | ON-OFF |
| Weight | 1.5 kg |
| Color | Blue |
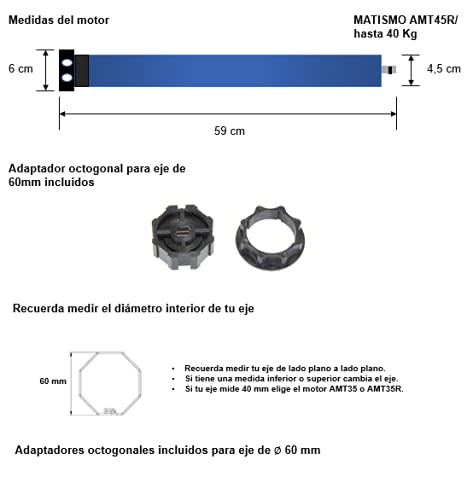
Image: Technical drawing showing the dimensions of the MATISMO AMT45R motor (length 59 cm, diameter 4.5 cm, head width 6 cm) and details for the Ø60 mm octagonal shaft adapter. It also advises to measure the internal diameter of the shaft and suggests AMT35 or AMT35R for 40mm shafts.
Installation and Setup
1. Prepare the Roller Shutter Shaft
- Ensure the roller shutter shaft is clean and free of debris.
- Measure the internal diameter of your shaft. This motor is designed for Ø60 mm octagonal shafts.
- Attach the provided octagonal adapters to the motor head and end.
2. Insert the Motor into the Shaft
- Carefully slide the motor with its adapters into the roller shutter shaft.
- Ensure the motor is securely seated within the shaft and the adapters engage correctly.
- Secure the motor in place using the retaining pin through the shaft and motor adapter, if applicable.
3. Mount the Motor Assembly
- Mount the motor assembly (shaft with motor) into the roller shutter box using the provided mounting bracket.
- Ensure the motor is level and securely fastened to prevent vibration and misalignment.
4. Electrical Connection
- WARNING: Disconnect power supply before wiring.
- Connect the motor's electrical wires to your power supply according to local electrical codes and the motor's wiring diagram (typically Live, Neutral, Earth).
- Ensure all connections are secure and insulated.
5. Setting Mechanical Limit Switches
The AMT45R motor uses mechanical limit switches to define the upper and lower stopping points of the roller shutter. These are adjusted using the orange adjustment tool.
- Restore power to the motor.
- Use the remote control to move the shutter to its desired upper limit.
- Insert the adjustment tool into the corresponding screw on the motor head (usually marked with an arrow pointing up or a '+' for increasing the travel). Turn the screw until the shutter stops at the desired upper position.
- Repeat the process for the lower limit, using the other adjustment screw (usually marked with an arrow pointing down or a '-' for decreasing the travel).
- Test the limits multiple times to ensure they are set correctly and the shutter stops precisely without overrunning.
Operating Instructions
Remote Control Functions

Image: A white radio remote control for the MATISMO motor. It features three buttons: an 'up' arrow, a 'stop' button (horizontal line), and a 'down' arrow.
- Up Arrow Button: Press to raise the roller shutter. Press again to stop.
- Down Arrow Button: Press to lower the roller shutter. Press again to stop.
- Stop Button (Horizontal Line): Press to immediately stop the roller shutter at its current position.
Pairing the Remote Control (if not pre-paired)
Refer to the specific instructions provided with your remote control for pairing procedures. Generally, this involves a short power cycle of the motor and pressing a button on the remote control within a specific timeframe.
Maintenance
The MATISMO AMT45R motor is designed for long-term, reliable operation with minimal maintenance.
- Regular Inspection: Periodically check the roller shutter system for any signs of wear, damage, or loose components. Pay attention to the shaft, mounting brackets, and the shutter slats themselves.
- Cleaning: Keep the motor area and remote control clean and free of dust. Do not use abrasive cleaners or solvents.
- Lubrication: The motor itself is maintenance-free and does not require lubrication. However, ensure that the roller shutter guides and moving parts are clean and operate smoothly.
- Battery Replacement: If the remote control's range decreases or it becomes unresponsive, replace its battery according to the remote control's specific instructions.
WARNING: Always disconnect power to the motor before performing any inspection or maintenance that requires direct access to the motor or wiring.
Troubleshooting
| Problem | Possible Cause | Solution |
|---|---|---|
| Motor does not respond to remote control. | No power to motor; Remote control battery low/dead; Remote control not paired; Obstruction. | Check power supply; Replace remote control battery; Re-pair remote control (refer to remote manual); Check for obstructions. |
| Shutter stops before reaching desired limit. | Limit switches incorrectly set; Obstruction. | Re-adjust mechanical limit switches; Check for obstructions in the shutter path. |
| Shutter overruns limit switches. | Limit switches incorrectly set; Faulty limit switch. | Re-adjust mechanical limit switches; If problem persists, contact support. |
| Motor makes unusual noise. | Obstruction; Worn components in shutter system; Motor fault. | Check for obstructions; Inspect shutter system for wear; Contact support if noise persists. |
Warranty Information
Specific warranty details for MATISMO products are typically provided at the point of purchase or on the manufacturer's official website. Please retain your proof of purchase for warranty claims.
The warranty generally covers manufacturing defects under normal use. It does not cover damage caused by improper installation, misuse, unauthorized modifications, or external factors.
Customer Support
For technical assistance, spare parts, or warranty inquiries, please contact MATISMO customer support through their official channels. You can often find contact information on the MATISMO brand store on Amazon or their dedicated website.
When contacting support, please have your product model number (AMT45R) and proof of purchase readily available.
Link to MATISMO store: MATISMO Amazon Store